This series of Access Points offers a wide range of features for a mid-range price. One of the outstanding features in its price class is the ability to use ARP sniffing to determine a client's IP address even if it changes during a user session. Activating this feature fulfils the requirement for MAC to IP correlation from the confederation policy and obsoletes logging of DHCP leases.
The following steps are needed to set up eduroam on a Lancom L-54 or L-300 series access point. It describes the setup via the web interface and is current as of LCOS Version 8.0. The starting point of this tutorial is a factory-reset device, i.e. it is not configured at all and set up to its defaults.
...
Initial provisioning
After connecting the device to mains power, it will boot with the Power LED on the front becoming steadily green. The LEDs on top flash green-yellow-blank to indicate that the device is unconfigured.
...
If you changed the IP address of the Access Point with the wizard, re-connect to the Access Point on its new address after finishing the wizard.
...
Timezone setup
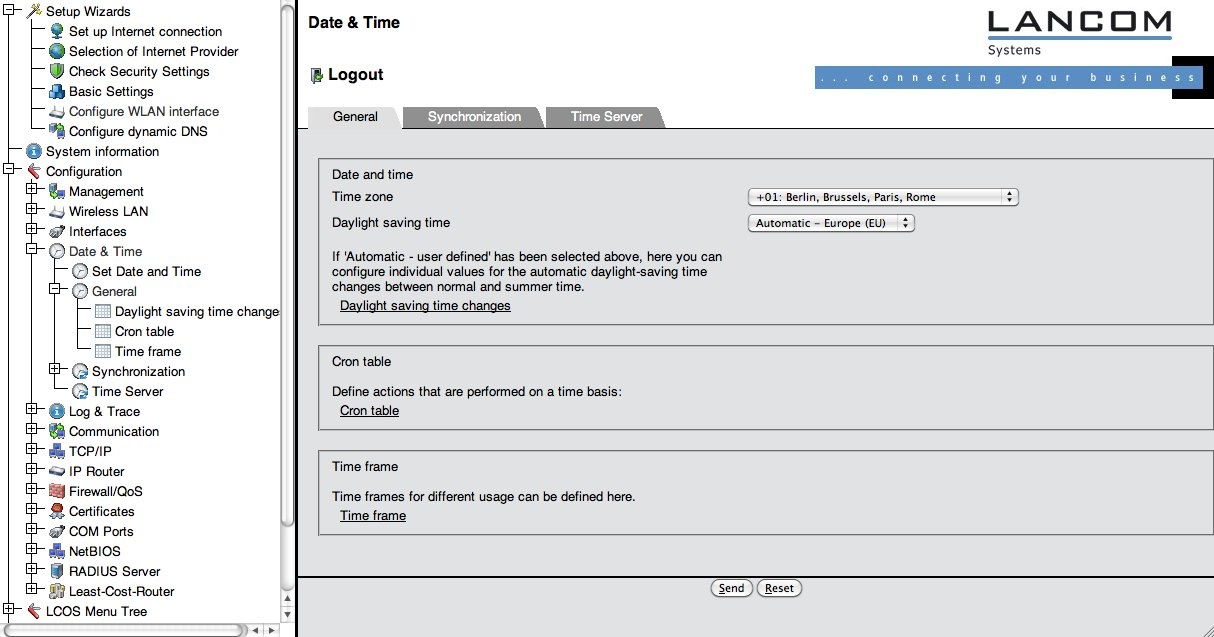
The Access point needs to be synchronised with a NTP or SNTP time server (which was set up using the wizard), which requires correct timezone settings. Click on "Configuration" -> "Date & Time" -> "General". and verify that the correct time zone and dayight saving time settings are set (see screenshot).
...
Logging
Another requirement in the eduroam policy is that the eduroam SP is required to maintain logs of the authentication and of MAC-address to IP address bindings. LANCOM devices can satisfy both by logging events via syslog. By default, the device keeps short-term logs by logging to "127.0.0.1". The logs can be viewed by navigating to the menu ""LCOS Menu Tree" > "Status" > "TCP-IP" > "syslog" > "Last Messages" and look like the following (prefixed with the exact timestamp, left out for readability reasons):
...
:
...
AUTH | Notice | [WLAN-1] Associated WLAN station 64:b9:e8:a0:2e:a4 [] ] ]></ac:plain-text-body></ac:structured-macro> | <ac:structured-macro ac:name="unmigrated-wiki-markup" ac:schema-version="1" ac:macro-id="6cc61895-ea6b-4a35-9a53-37095ddf2db2"><ac:plain-text-body><![CDATA[ | ||
AUTH | Notice | [WLAN-1] WLAN station 64:b9:e8:a0:2e:a4 [] authenticated via 802.1x [user name is certuser-2010-001@restena.lu] | ]]></ac:plain-text-body></ac:structured-macro> | ||
<ac:structured-macro ac:name="unmigrated-wiki-markup" ac:schema-version="1" ac:macro-id="ca9a6738-011f-4210-b5b3-792ae1f78d81"><ac:plain-text-body><![CDATA[ | AUTH | Notice | [WLAN-1] Key handshake with peer 64:b9:e8:a0:2e:a4 successfully completed | ]]></ac:plain-text-body></ac:structured-macro> | <ac:structured-macro ac:name="unmigrated-wiki-markup" ac:schema-version="1" ac:macro-id="93f3cc4a-348a-49d9-bec6-c3e648c4b67c"><ac:plain-text-body><![CDATA[ |
AUTH | Notice | [WLAN-1] Connected WLAN station 64:b9:e8:a0:2e:a4 [] ] ]></ac:plain-text-body></ac:structured-macro> | <ac:structured-macro ac:name="unmigrated-wiki-markup" ac:schema-version="1" ac:macro-id="d1a8585e-53c5-4440-adba-763139d57894"><ac:plain-text-body><![CDATA[ | ||
AUTH | Notice | [WLAN-1] Determined IPv4 address for station 64:b9:e8:a0:2e:a4 []: 158.64.3.24 | ]]></ac:plain-text-body></ac:structured-macro> | <ac:structured-macro ac:name="unmigrated-wiki-markup" ac:schema-version="1" ac:macro-id="15c89dd9-5721-486a-9d63-3d79f8417b83"><ac:plain-text-body><![CDATA[ | |
AUTH | Notice | [WLAN-1] Determined IPv6 address for station 64:b9:e8:a0:2e:a4 []: 2001:0a18:0000:0403:66b9:e8ff:fea0:2ea4 ]]></ac:plain-text-body></ac:structured-macro> | <ac:structured-macro ac:name="unmigrated-wiki-markup" ac:schema-version="1" ac:macro-id="2e39d1aa-bbdf-48a0-918c-a44209a0ab3d"><ac:plain-text-body><![CDATA[ | ||
AUTH | Notice | [WLAN-1] Determined IPv6 address for station 64:b9:e8:a0:2e:a4 []: fe80:0000:0000:0000:66b9:e8ff:fea0:2ea4 | ]]></ac:plain-text-body></ac:structured-macro> | ||
<ac:structured-macro ac:name="unmigrated-wiki-markup" ac:schema-version="1" ac:macro-id="c171e89e-f35f-46c5-ab84-b028595cbecc"><ac:plain-text-body><![CDATA[ | AUTH | Notice | [WLAN-1] Disassociated WLAN station 64:b9:e8:a0:2e:a4 [] due to station request (Disassociated because sending station is leaving BSS | ]]></ac:plain-text-body></ac:structured-macro> |
As you can see, the authentication itself and all MAC -> IP binding actions are logged, both for IPv4 and IPv6.
It is required to log these notices to an external syslog server, since the syslog buffer in the device fills quickly and the information would be lost otherwise. Add your syslog server by selecting the menu item "Configuration" > "Log &Trace" > "Syslog" and make sure the box "Send information..." is checked (it is by default) (see screenshot).
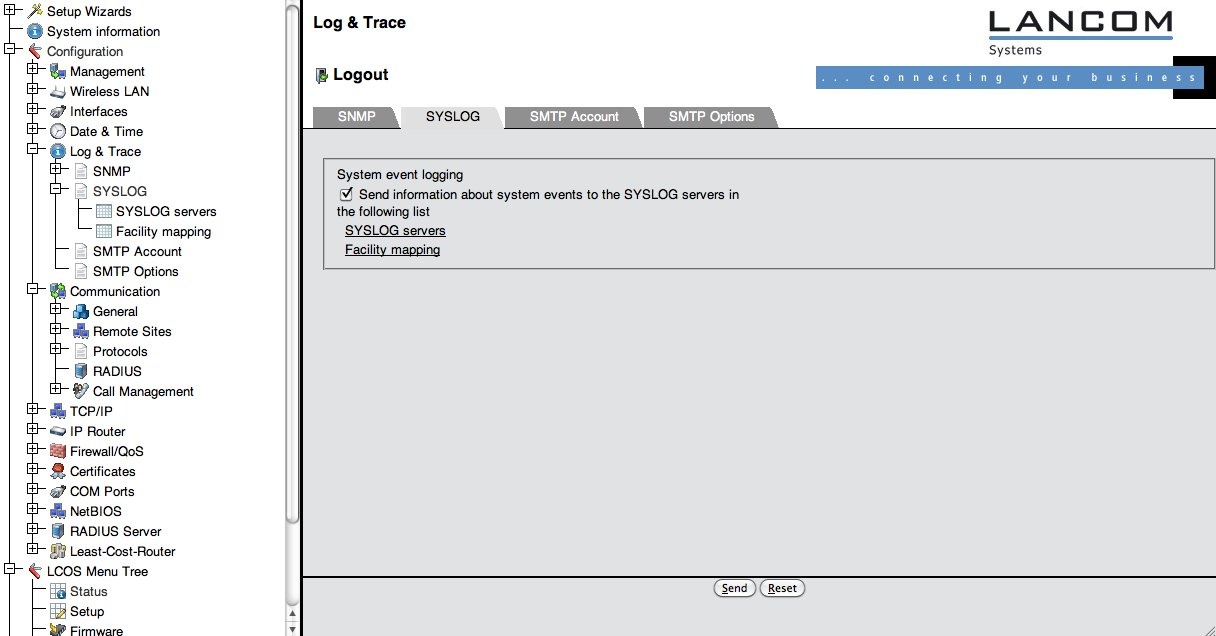
Then click on "Syslog servers" and on the following page "Add".
...
for a comprehensive overview of events on the device.
...
Configuring the wireless LAN
The network name (SSID) for an eduroam SP is usually "eduroam", and the SSID needs to be broadcasted. Unfortunately, the network cannot be set up via the corresponding wizard, since the wizard only allows to configure WPA-Personal authentication, not eduroam's WPA-Enterprise. So, the necessary settings can only be found under "Configuration" > "Wireless LAN" > "General". (see screenshot)
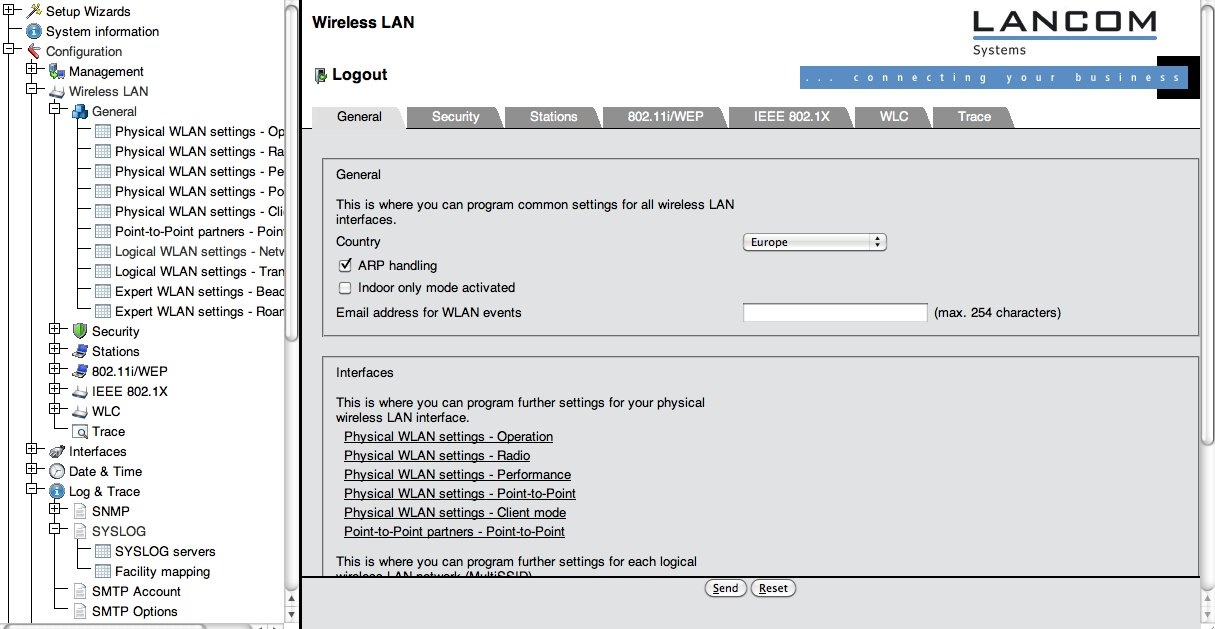
First, we need to enable the MAC to IP address logging. This is done by checking the box "ARP handling". You should also make sure that you enter the correct country on this page, since the country setting makes your device conformant to national regulations for radio usage.
...
After these settings, go to the sub-menu "Logical WLAN setting – Network", see screenshot below.
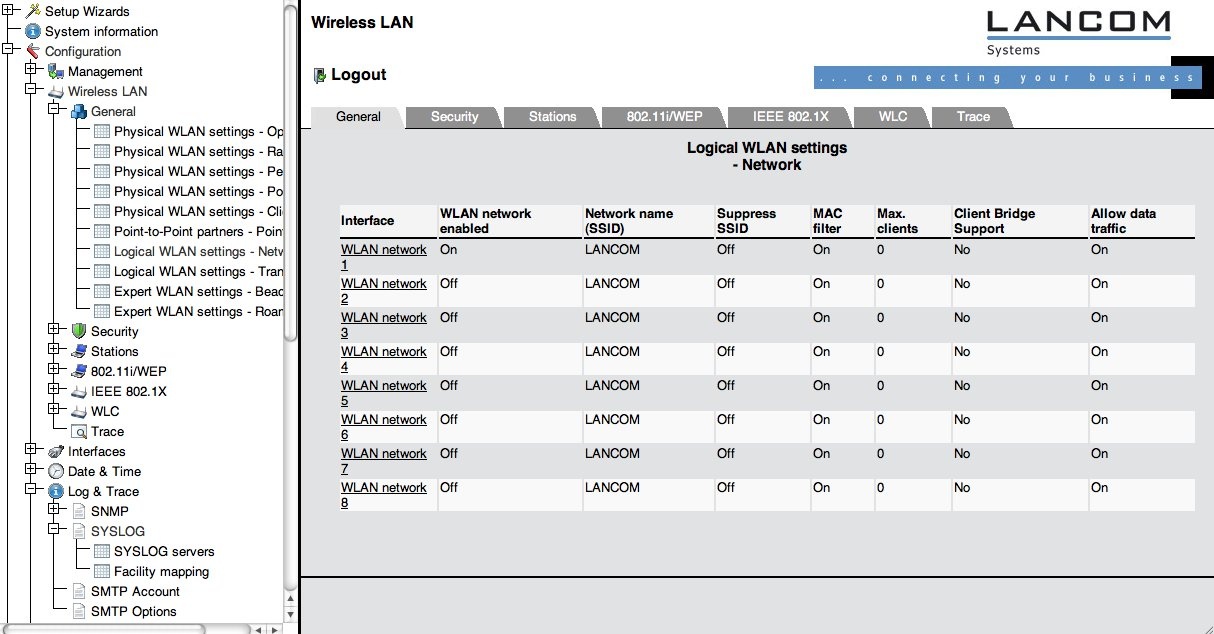
The device offers eight independent networks. Choose one you want to use for eduroam (for example: WLAN-1) and click on its entry. Now set the properties of this network as follows:
...
When deploying your hotspot, you should also consider some non eduroam-specific guidelines for WLAN deployment. An incomplete list of things to consider is collected in chapter FOO.
...
Security settings
You need to make two security-relevant settings: configure the RADIUS server to use for authenticating users and configure the eduroam Wireless LAN to use RADIUS at all.
...
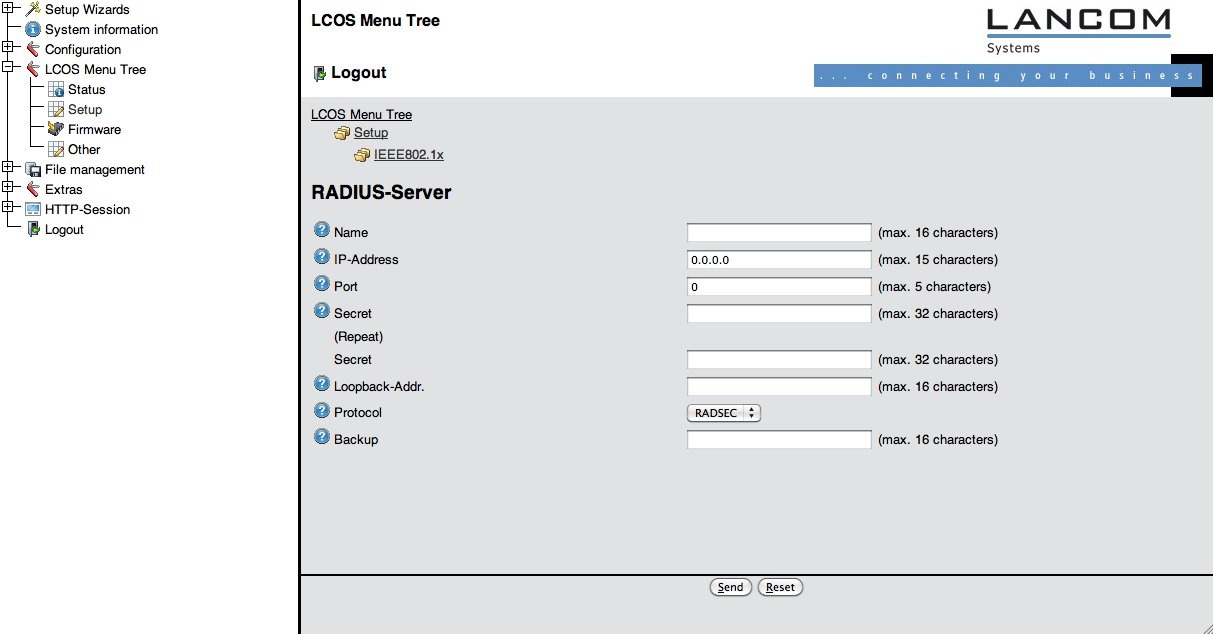
Select "Configuration" > "Wireless LAN" > "IEEE 802.1X" > "RADIUS server" and click on "Add". (see screenshot below).
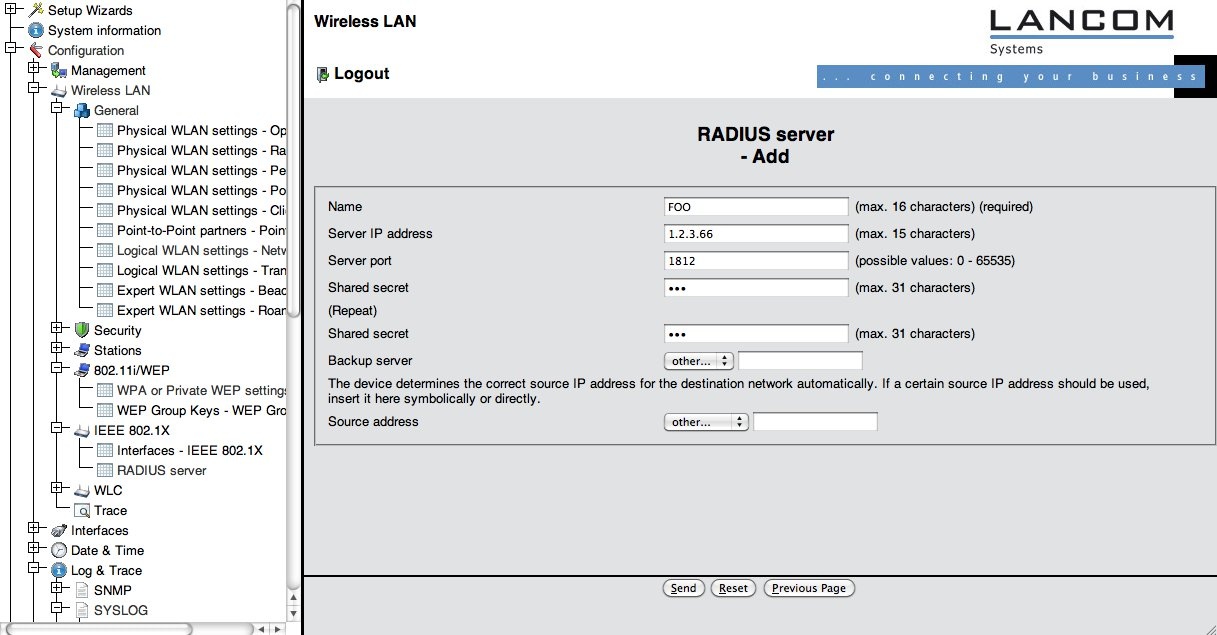
Then, fill in your RADIUS server details as negotiated with your eduroam IdP or federation operator.
In the second step, we'll apply the RADIUS server and encryption scheme to the SSID eduroam. To do that, go to the menu "Configuration" > "Wireless LAN" > "802.11i/WEP" > "WPA or Private WEP settings". Then, click on the WLAN network which you chose for the "eduroam" SSID before (see screenshot).

Set the following entries:
...
A recurring question is "Why is Client EAP method irrelevant?" The answer is: this setting refers to which authentication method the access point should use when it is in Client mode (i.e. it acts as a supplicant to connect to another access point). When in Access Point mode, its role is by design limited to transparently pass all authentication methods to a RADIUS server.
...
Using RADIUS/TLS instead of RADIUS (optional)
LANCOM devices have a RADIUS/TLS client built-in. It can be used instead of standard RADIUS for the uplink to an IdP. Please note that most of the value of RADIUS/TLS plays out in long-haul connections, like from an eduroam IdP server to his federation. If your Access Point is located closely to your RADIUS server, using RADIUS is sufficient and you need not follow the steps below.
...
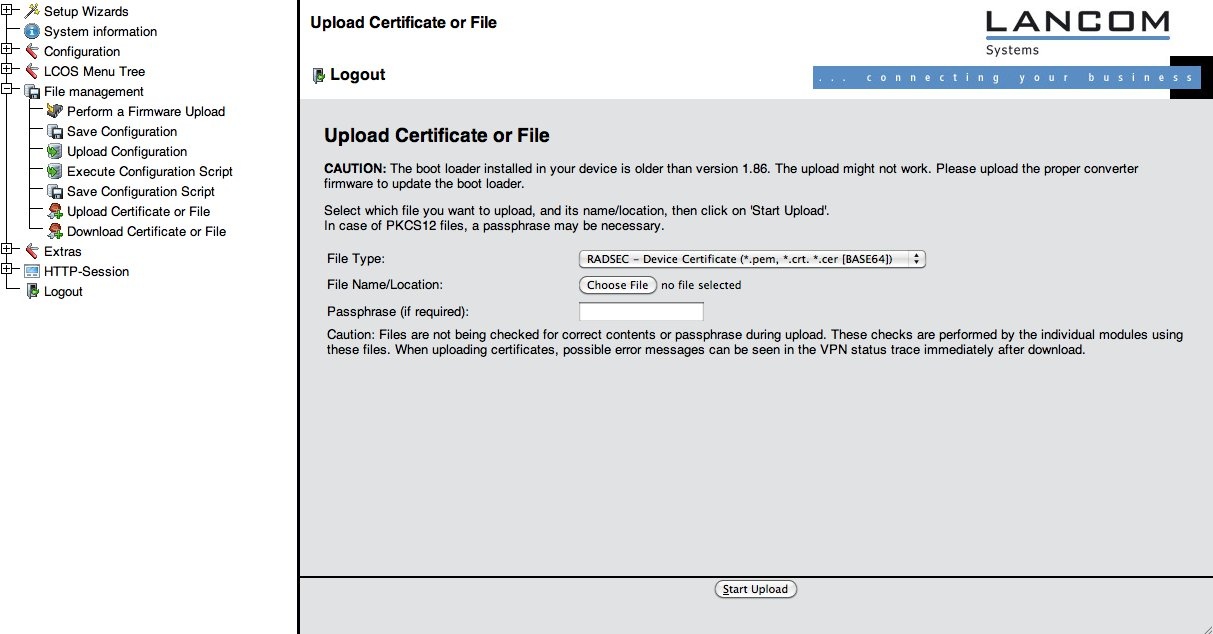
Upload them using the File Type "RADSEC ..." as in the screenshot below.
Then, go to "LCOS Menu Tree" > "Setup" > "IEEE802.1X" > "RADIUS Server" and set the Protocol option to "RADSEC", as in the screenshot below. The shared secret is not security-relevant when using RADIUS/TLS, but it must be set nevertheless. eduroam uses the fixed string "radsec" for all RADIUS/TLS shared secrets.