...
- Log in using the button in hte the top right hand corner - this will take you to the eduGAIN 'where are you from' page. Select your home institute or appropriate Social Media (e.g. G+)
- Your login profile is accessible via the button in the top right hand corner - you can edit at any time
- Choose your category (e.g Network, EndHost, Performance and Measurement Tools, General Knowledge, and Case Studies) on the "Welcome Page" or look for a specific topic or page using the "search field".
...
Adding a New Page
- The page tree on hte the left hand side shows the topic hierarchy. Navigate or search to find the right parent topic (page), and select that page.
...
- Enter the title of your new page (in the example - eduPERT final Home).
- Edit your new page - all available features ot hepl to help with this are on the tool bar at the top of the page.
- At any point you can "Preview" your page using the button in the bottom right hand corner.
- When the page is complete (or you want to take a break from editing), select "Update" inthe in the bottom right hand corner.
- Note, although the page The page status (next to the page title) will change from 'Published' (with a little green circle) to 'Editing' (with a yellow circle)- the page will be visible to you, it will not be publicy vissible publicly visible or accessible until it has been approved by a moderator - see xxx below.
- When the page is ready to be published
- Click on the 'Editing' link (next to the yellow circle) - this will open a pop up box
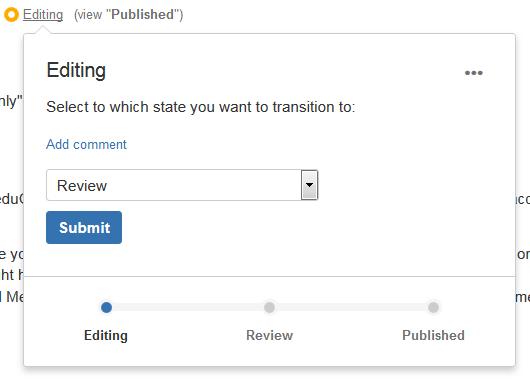
- Select 'Review', and Submit
The page will then go through a moderation/review process (see 'Workflow' below), at the end of which it will be 'Published' and visible to all
Revise or Update existing Content
- Either browse (using page tree on left hadn hand side) or search (using search box at top of page) to find the page you wish to edit.
- Click the "Edit" button (located towards the on top of your right hand side) and make appropriate changes.
- At any point you can preview your changes using the "Preview" button (buttom button right hand side).
- When you have finished your changes
- Add a brief comment as to what you have done in the text box at the bottom of the page (with prompt text 'What did you change?')
- Select or de-select the 'Notify Watchers' check box. For example, if the changes are of a minor cosmetic nature (typo fixing) it is approriate appropriate to de-select the option.
- Click the "Update" button (bottom right hand corner)Note, although your changes will be immediately
- The page status (next to the page title) will change from 'Published' (with a little green circle) to 'Editing' (with a yellow circle)- the page will be visible to you,
- it will not be publicly visible
- or accessible until it has been approved by a moderator
- .
- When the page is ready to be published
- Click on the 'Editing' link (next to the yellow circle) - this will open a pop up box
- (Optional but desirable) Click 'Add comment' link and add a brief description of the change.
- Select 'Review', and Submit
The page will then go through a moderation/review process (see 'Workflow' below), at the end of which it will be 'Published' and visible to all
Adding a Comment
As well as editing pages, it is possible to add comments, either to a whole page, or to specific text within an page (an "in-line comment"). You need to log in to add a comment, but unlike page editing there is no approval process - comments are immediately visible to everyone.
...
- Select (using mouse/cursor) the text you wish to comment on.
- A speech-bubble icon will appear at the top of the selected text - click on that and add your comment
Workflow: Page Status - From Contributions
...
to Published Documents:
Contribution (page addition and editing) is only possible after logging in using eduGAIN, which itself requires valid federated account (note, some social media accounts are eduGAIN compliant, includig including Google G+)
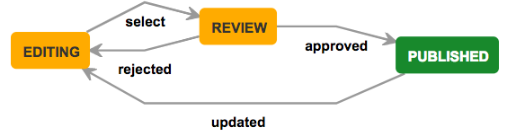
Page States
- Newly created page has status DRAFT.
- Page Status Editing: Create (single “empty” page) a new page under chosen parent topic.
- Page Status Editing: Contribution activated (Update). This contribution is not visible publicly. (This is also the status of an existing page which somene someone starts editing)
- Page Status Change - from Editing to Review: Contributor changes the status “Editing” to “Review” with Comment (Check status with “View Workflow” or show “Activity Report”):
- Page Status Review: A mail is sent to the SMEs, to the eduPERT asking for Reviewing. One SME from the eduPERT team will Review the contribution
- Page Status Published: Contribution approved, the contribution is now visible for the whole world:
- A mail is sent to the contributor, noted with the approve.
- Page Status Editing (after Review): Contribution rejected:
- A mail is sent to the contributor, noted with rejecting the contribution with Page Status “Editing".
- Contributor can revise/report contribution and ask again for Review => Change page status to Review.
- One SME will Review again the contribution – will approve or reject the contribution with comments.
...