UPDATE ......From Tuesday 8 April 2025 we have changed the way that Single Sign-on works on this wiki. Please see here for more information:
Update
The example configuration shown in this chapter was obtained from a Cisco 4400 Series Wireless LAN Controller.
Initial settings and defining the IP address
In the first phase the controller must be accessed through the Command Line Interface (CLI). When an IP address has been assigned to the controller, further configuration can be done using the web interface, but the CLI can be continued to be used.
Establish access to the controller by using a serial console and configure the initial settings for example as follows.
| Code Block |
|---|
Welcome to the Cisco Wizard Configuration Tool
Use the '-' character to backup
System Name [Cisco_b2:e2:83]: <your_system_name>
Enter Administrative User Name (24 characters max): <your_username>
Enter Administrative Password (24 characters max): <your_password>
Re-enter Administrative Password                 : <your_password>

Service Interface IP Address Configuration [none][DHCP]: DHCP

Enable Link Aggregation (LAG) [yes][NO]: NO

Management Interface IP Address: esim. xxx.yyy.zzz.1
Management Interface Netmask: <your_network_mask>
Management Interface Default Router: <your_router's_IP_address>
Management Interface VLAN Identifier (0 = untagged): <0 or 1>
Management Interface Port Num [1 to 2]: 1
Management Interface DHCP Server IP Address: esim. xxx.yyy.zzz.2

AP Transport Mode [layer2][LAYER3]: <layer2 if controller and access points are on same subnet; layer3 if routing in between>
AP Manager Interface IP Address: esim. xxx.yyy.zzz.3

AP-Manager is on Management subnet, using same values
AP Manager Interface DHCP Server (xxx.yyy.zzz.2):

Virtual Gateway IP Address: xxx.yyy.zzz.www

Mobility/RF Group Name: <choose a suitable name if you have more than one controller. Otherwise, don't care>

Enable Symmetric Mobility Tunneling [yes][NO]: NO

Network Name (SSID): <Define a test SSID at first>
Allow Static IP Addresses [YES][no]: no

Configure a RADIUS Server now? [YES][no]: no #Will be done later
Warning! The default WLAN security policy requires a RADIUS server.
Please see documentation for more details.

Enter Country Code list (enter 'help' for a list of countries) [US]: <your country abbreviation>

Enable 802.11b Network [YES][no]: no
Enable 802.11a Network [YES][no]: YES
Enable Auto-RF [YES][no]: YES

Configure a NTP server now? [YES][no]: no #Will be done later
Configure the system time now? [YES][no]: no #Will be done later

Warning! No AP will come up unless the time is set.
Please see documentation for more details.

Configuration correct? If yes, system will save it and reset. [yes][NO]: yes

#When the system has rebooted, familiarize yourself with the CLI by defining
(Cisco Controller) >config time ntp server 1 xyz.zyx.zzy.wyz
(Cisco Controller) >config time ntp server 2 xyz.zzz.zzy.wyz
|
Access Control Lists
After the initial setup, the access control (ACL) list needs to be configured, in order to prohibit unauthorized access to the controller. Choose SECURITY and then Access Control Lists | Access Control Lists and create an ACL by pressing New... The ACL shoud include at least
...
The next step is to define the wireless network, which has to be done separately for 2,4 GHz and 5 GHz. First, choose WIRELESS and then 802.11b/g/n | Network. Enabling the 802.11b-standard will result in less available capacity on your network and therefore it is recommended to enable only the standards 802.11g and 802.11n. Enable 802.11g according to the figure shown below. If you want to support also the 802.11-b standard, set _Mandatory_ for 1 Mbps and the lowest 802.11b-rate that you want to support (1 Mbps, 2 Mbps, 5.5 Mbps or 11 Mbps), set _Supported_ for all other data ratesdata rates higher than this rate and _Disabled_ for all rates lower than this rate. If 802.11b needs to be supported, it may pay off to disable the lowest rates, in order to avoid clients being attach to an AP far away, unwilling to roam.
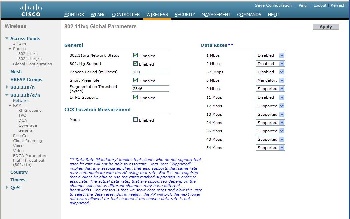
Next, switch to enable the standard 802.11a for 5 GHz by selecting 802.11a/n | Network. Configure the settings according to the figure below.
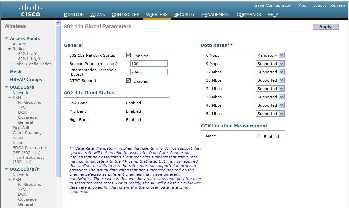
The only standard left to enable is the standard 802.11n. You can choose to enable it for either 2,4 GHz or 5 GHz. It has been suggested that 802.11n is enabled only on the 5 GHz band, in order to utilise the radio resources effectively, see the Campus Best Practice document on "WLAN network planning and setup" Chapter 6.3. http://www.terena.org/activities/campus-bp/pdf/gn3-na3-t4-wlan-network-planning.pdf. That document, along with a wealth of other WLAN resource planning advice, can be found at GEANT Campus Best Practices - Wireless. To enable 802.11n in the network select 802.11a/n | High throughput (802.11n) and/or 802.11b/g/n | High throughput (802.11n) and configure the settings according to the figure below.
...
These are the basic settings for the Cisco controller. More advanced settings can be found from the upcoming Campus Best Practice document on "WLAN infrastructure", to be published in the first half of 2011.<to be continued>