...
When you re-visit the "Edit IdP" page later from the Institution Overview page, the explanatory texts are condensed in order not to overload the user interface. You'll certainly find your way around without the wizard texts.
Profiles
Profiles are the specific EAP configurations for your user group(s), and installers are always generated for specific profiles. If you only have one user group, the distinction between institution-wide and profile-wide settings does not make a difference. However, many IdPs have different user groups which share some properties, but not all. One example is where on the one hand students have username/password accounts, authenticating with PEAP and generic helpdesk contact points, and on the other hand permanent staff have TLS Client certificates with EAP-TLS and access to a better second-level helpdesk just for them.
eduroam CAT makes it easy to manage multiple user group profiles for one institution. Shared properties for e.g. server certificates and helpdesk contacts can be defined institution-wide (which makes them immediately available in all profiles) or per-profile (the property then is only defined for this specific profile). You can also define institution-wide settings and override them in specific profiles.
In the first-time wizard, the CAT automatically takes you to the profile creation page as soon as the institution-wide settings are submitted.
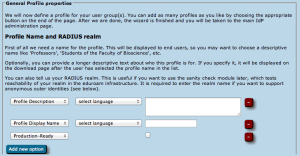
For a profile, you first have to set its name and description, which as usually can be done in many languages. There is also one important option: "Production-Ready". We will not publish your generated installers on the end-user download page unless you set this option and check the box. This is to prevent that people accidently download installers with incomplete information while you are still working on the final setup.
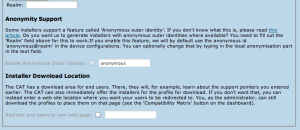
The CAT also asks for the RADIUS realm belonging to this profile; submitting the realm name is optional, but highly recommended because it enables us to do very thorough sanity checks on your RADIUS installation later. Please see the section "Verifying my RADIUS setup" for more details. You can also decide whether you want the generated installers to be configured with an anonymous outer identity, and what that identity should be. If you want users of that profile NOT to be given an installer, you can also specify that we should send your users to your own support page instead. A typical use case for that is if you, the admin, want to generate installers but only download them yourself and present them on your own eduroam support page.
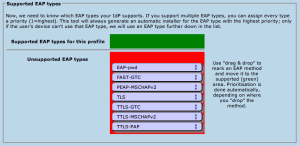
The third part of profile generation is about the EAP types which you've configured in your RADIUS server for this user group. By simple drag&drop, please drag all the EAP types you support into the upper green area. The list is ordered by preference, so drag the EAP types into your preferred order. The CAT will always compare the EAP types you've configured here with the capabilities of the various devices which are to be configured. If the device supports your most preferred EAP type, installers will always be generated for that EAP type. If your preferred EAP type does not work on a given device, the preference list is worked through until a match occurs, and then installers for that device will use that not-so-preferred EAP type (which is better than not supporting eduroam configuration at all). Finally, if there is a complete mismatch between the EAP types you support and the EAP types on a device, then we can't generate installers for that device. You might be luckier if you can change your RADIUS setup to support more EAP types then.
After these steps, you can enter helpdesk and certificate details if you haven't done so on the institution-wide settings already. If you have entered one specific option institution-wide already, and you enter something else here, then the settings on profile level supersede the institution-level ones.

That's all - the CAT then proceeds to a sanity check of the things you have configured and will tell you about any things which need fixing, it any. You are then transported to the Institution dashboard - from where you can continue to download your installers, change institution or profile details, perform sanity checks and more.
Generating installers for my users
...