Requirement
|
|

Overview
In [Modular design #001] article we described RARE/freeRtr main components:
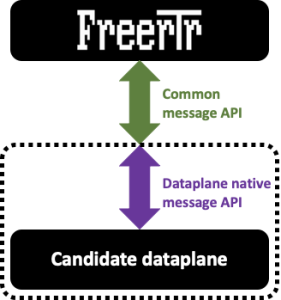
- a control plane
- a data plane which can have different "flavor"
- and a message API interface that is tying the 2 components above
Article objective
In most of our past articles, all the components listed above were running on the same host as it is mostly the case on traditional monolithic hardware. In this article we demonstrate that RARE/freeRtr inherently exposes a totally disaggregated model. Practically, what does this means ? We will show in subsequent section that each of the components above can run on different hosts.
Note
While the control plane and the message API interface can be run from any host such as bare metal server, VM or even container, the dataplane of your choice will have to run on specific platform. For example, if you plan to implement a core backbone MPLS router able to switch 6.4 Tbps of packet throughput, the dataplane must be a specific hardware. (e.g. powered by INTEL TOFINO switch ASIC)
Diagram
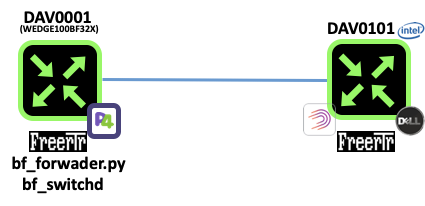
In this example we will consider 2 routers named DAV0001 and DAV0101 respectively. Both if these routers are establishing an OSPF adjacency between them.
- DAV0001 is a P4 switch powered INTEL TOFINO ASIC
- DAV0101 is a SOHO RARE/freeRtr DELL VEP1445
Let's assume the logical figure below:
[ #002 ] - Modular design
In reality, we will run DAV0001 components in a different host respectively. We assume of course that there is connectivity between each of them.

Verification
Discussion
Conclusion
In this 2nd article you:
- had a showcase on how to implement a fully disaggregated RARE/freeRtr
- even if the control plane and the interface can be run almost anywhere, the dataplane still needs to be specific and adapted to the use case you planned to deploy
- pcapInt tool is a nitty gritty tool used to bind existing ports to a UDP socket tunnel.
Requirement
|
|
|


Overview
Wireguard gained a lot popularity and attention when it went into Linux kernel in March 2020. And pure coincidence or not, 1 month later, Wireguard made its way through ubuntu 20.04 LTS. Csaba MATE, freeRtr maintainer took "the Taurus by his horns" (sorry for the pure French translation of the proverb ![]() ) and in turn, he added Wireguard support into freeRtr few months later ...
) and in turn, he added Wireguard support into freeRtr few months later ...
In the current pandemic context, Wireguard is highly used to establish software VPN connectivity toward office resources. In my context, among other usages, I'm using it in order to reach DN42, an overlay network very good for learning protocol like BGP and explore routing technology.
Article objective
There are plenty of web resources debating Wireguard based VPN topics. The purpose of this article will simply put the focus on how to configure a Wireguard tunnel between:
- ubuntu 20.04 host
- RARE/freeRtr
Diagrams
In this example, I'll use my home router as Wireguard tunnel end point and a ubuntu 20.04 server in my home LAN.
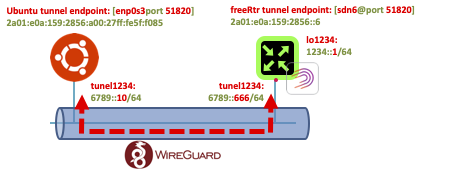
The steps at RARE/freeRtr level are:
- configure vrf v1234.
- configure loopback1234 with IPv6 network 1234::666/64 at freeRtr level and bind it to vrf v1234
- configure Wireguard crypto stanza
- configure tunnel1234
- with Wireguard crypto stanza defined above,
- configure tunnel source, destination underlay in vrf inet
- finally configure tunnel interface in vrf v1234
- As RARE/freeRtr is oriented toward the future we will just forget about legacy IPv4, therefore the underlay tunnel will be established with IPv6 only. (←Joke
 )
)
Tip
As we are running RARE/freeRtr with DPDK dataplane do not forget to update server p4lang p4 stanza:
- add vrf v1234
- add tunnel1234
[ SOHO #009 ] - "Network 1234::/64 ? Please follow tunnel1234 Wireguard tunnel !"
Verification
Conclusion
In this article we learned how to configure a Wireguard tunnel between ubuntu 20.04 and RARE/freeRouter. Configuring Wireguard is a simple 2 steps operation:
- Configure Wireguard crypto stanza
- and bind it to a Wireguard tunnel
RARE validated design: [ SOHO #009 ] - key take-away
In this example the key take-away are:
- Wireguard configuration is simple
- We used ubuntu 20.04 but of course you can enabled Wireguard with any host supporting Wireguard protocol
- IPv6 is used here. But of course IPv4 is also available

- Last but not least do not forget to export VRF and Wireguard tunnel interface in "server p4lang p4" should you run RARE/freeRtr with a dedicated dataplane (p4emu, dpdk)
This is a pretty unique freeRouter feature ! Are you aware of any other router able to set up a Wireguard VPN ?
Requirement
|
|

Overview

This comes alongside "Winter" as a famous TV show would say. ![]() . Mion is an interesting Operating System meant to run on network appliance. It is built on top of Yocto project and inherently share its root with Linux Open Embedded system. In order to learn more about the Operating system I invite you to read Mion project page.
. Mion is an interesting Operating System meant to run on network appliance. It is built on top of Yocto project and inherently share its root with Linux Open Embedded system. In order to learn more about the Operating system I invite you to read Mion project page.
Why consider such an OS you would say ? It actually boils down to:
- having a minimalistic Operating system with the smallest software footprint.
- predictable Operating System with the minimum software requirement
- A supported Operating System powered by a regular release cycle
Note
While trying to reach a minimalistic image in order to run the RARE software, for now we only managed to have a 5Gb image (with INTEL SDE installed). We are confident that we can still slimmed down the image but times is running against us. ![]() The very initial Mion image has a size of 45Mbytes !
The very initial Mion image has a size of 45Mbytes !
Tip
Mion will support multiple network equipments ranging from APS bf2556x-1t, bf6064x, Edgecore wedge100bf32x and wedge100bf65x and many more (Delta, asgvolt64 etc.)
Article objective
In this article, we will present :
- how to build Mion from scratch
- how to install it on our favorites P4 switches (bf2556x-1t and wedge-100bf-32x)
[ #001 ] - Cookbook
Mion docs has an excellent getting started page. In this section we will emphasize how easy it is to build Mion. First, make sure you have a machine compliant to the "Build host" requirements. Install a pristine Debian 10 and you should be go to go ...
sudo apt-get install gawk wget git-core diffstat unzip texinfo gcc-multilib \
     build-essential chrpath socat cpio python3 python3-pip python3-pexpect \
     xz-utils debianutils iputils-ping python3-git python3-jinja2 libegl1-mesa \
     libsdl1.2-dev pylint3 xterm
git clone --recursive git@github.com:NetworkGradeLinux/mion.git
cd mion
# To obtain related mion layers:
git clone git@github.com:NetworkGradeLinux/meta-mion.git
# Obtain the mion hardware layer
git clone git@github.com:NetworkGradeLinux/meta-mion-bsp.git
Note
The above steps require you have a GitHub account and uploaded public key to your account. You'll also have to activate ssh-agent as the build script will fetch software from Git using SSH transport.
source openembedded-core/oe-init-build-env
time ../mc_build.sh -m stordis-bf2556x-1t -h host-onie:mion-onie-image-onlpv1
Sstate summary: Wanted 1251 Found 0 Missed 1251 Current 0 (0% match, 0% complete)
NOTE: Executing Tasks
WARNING: mc:host-onie:expat-native-2.2.9-r0 do_fetch: Failed to fetch URL https://downloads.sourceforge.net/expat/expat-2.2.9.tar.bz2, attempting MIRRORS if available
NOTE: Tasks Summary: Attempted 3161 tasks of which 1 didn't need to be rerun and all succeeded.

Summary: There was 1 WARNING message shown.

real    150m43.758s
user    0m16.407s
sys     0m3.836s
Tip
Even if the build process can be long depending on your build host, build duration can reach 30 minutes with a 32 cores machines. Subsequent builds will take significantly less time as a cache mechanism will avoid to to redo the whole build process.
Believe me, you are done !
Just wait the end of the build process and grab the freshly baked image.
Sstate summary: Wanted 0 Found 0 Missed 0 Current 1251 (0% match, 100% complete)
NOTE: Executing Tasks
NOTE: Tasks Summary: Attempted 3161 tasks of which 3161 didn't need to be rerun and all succeeded.

real    0m27.430s
user    0m1.939s
sys     0m0.585s
p4@mion-build-host:~/mion/build$ cd tmp-glibc/deploy/images/stordis-bf2556x-1t/
p4@mion-build-host:~/mion/build/tmp-glibc/deploy/images/stordis-bf2556x-1t$ ls
bzImage
bzImage--5.4.49+git0+d626f9108d_ec485bd4af-r0-stordis-bf2556x-1t-20201216195930.bin
bzImage-stordis-bf2556x-1t.bin
grub-efi-bootx64.efi
mion-onie-image-onlpv1-stordis-bf2556x-1t-20201216195930.rootfs.ext4
mion-onie-image-onlpv1-stordis-bf2556x-1t-20201216195930.rootfs.manifest
mion-onie-image-onlpv1-stordis-bf2556x-1t-20201216195930.rootfs.tar.bz2
mion-onie-image-onlpv1-stordis-bf2556x-1t-20201216195930.rootfs.tar.xz
mion-onie-image-onlpv1-stordis-bf2556x-1t-20201216195930.rootfs.tar.xz.bmap
mion-onie-image-onlpv1-stordis-bf2556x-1t-20201216195930.testdata.json
mion-onie-image-onlpv1-stordis-bf2556x-1t.ext4
mion-onie-image-onlpv1-stordis-bf2556x-1t.manifest
mion-onie-image-onlpv1-stordis-bf2556x-1t.tar.bz2
mion-onie-image-onlpv1-stordis-bf2556x-1t.tar.xz
mion-onie-image-onlpv1-stordis-bf2556x-1t.tar.xz.bmap
mion-onie-image-onlpv1-stordis-bf2556x-1t.testdata.json
modules--5.4.49+git0+d626f9108d_ec485bd4af-r0-stordis-bf2556x-1t-20201216195930.tgz
modules-stordis-bf2556x-1t.tgz
onie-installer.bin
onie-installer-x86_64-stordis_bf2556x_1t.bin
Of course get onie-installer-x86_64-stordis_bf2556x_1t.bin image and you are good to go for next section ![]()
- Boot bf2556x-1t via ONIE rescue session
- put you Mion image at the root of a web server
onie-nos-install http://<your_web_server>/onie-installer-x86_64-stordis_bf2556x_1t.bin
Once the installation has finished, your system reboot and you'll be rewarded by Mion Grub welcome page:

Tip
And in just 1 minute ![]() you have installed a minimalistic OS on your bf2556x-1t. In this post we will stop here. However, in order to finalise the installation you'll to install INTEL P4 Software Development Environment as of course you'll want to run your P4 program on the bf2556x-1t. We will cover this subsequent installation in a subsequent post.
you have installed a minimalistic OS on your bf2556x-1t. In this post we will stop here. However, in order to finalise the installation you'll to install INTEL P4 Software Development Environment as of course you'll want to run your P4 program on the bf2556x-1t. We will cover this subsequent installation in a subsequent post.
Conclusion
In this short article we saw:
- how to build Mion
- how to install Mion (process is the same on every ONIE based system: we tested bf2556x-1t, bf6064x wedge100bf-32x, wedge100bf-64x)
Please let us know if you want us to test your P4 platform with the RARE P4 software. We will then add it to the RARE Hardware Compatibility List (RARE HCL) !
(In that case you might have to arrange access to your P4 equipment or better ... Send us a sample ! ![]() )
)
Final words
Mion build is quite straightforward. As it share its root from Yocto, adding specificities related to your project is easy. Most probably a Bitbake recipe already exist and you'll just have to add a reference to the layer of your interest in Bitbake config file. First time build can be long and tedious if you have a small build host machine but subsequent build will be faster thanks to the sstate cache mechanism.
Last but not least, we covered only the base OS installation, now that you have a minimal OS required to manage your machine, you need to add specific drivers and software needed to run P4 programs on APS or WEDGE platform.
Requirement
|
|

Overview
I'm very fond listening music at home and started my personal music collection. I was aware of this practice, and since then started 24/96 flac collection. As mechanical hard drives became more and more affordable, storage was not an issue for the NAS I deployed. I purchased then a refurbished but still decent DLNA network player (DMP) that would be able to stream music sources from DLNA server(DMS). All of this is orchestrated though my mobile phone acting as DLNA media controller (DMC). So far so good, but DLNA alliance expects that all DLNA protagonists are in the same and unique broadcast domain.
You might have guess already, but I'm not a huge FAN of having a single layer 2 domain at home and throw everything inside the same subnetwork. Granted the fact that not all home network are running OSPF/ ISIS MPLS or Segment Routing, everything is so simple and more predictable to manage at layer 3 whether you use IPv4 or IPv6.
Long story short, I can't listen music by structuring my home network using layer 3 as it is now ... ![]()
Article objective
In this article we will pursue the SOHO network appliance installation and enable THE UNIQUE freeRouter feature that you won't find in any router in the world: UPNP forwarder server.
Diagrams
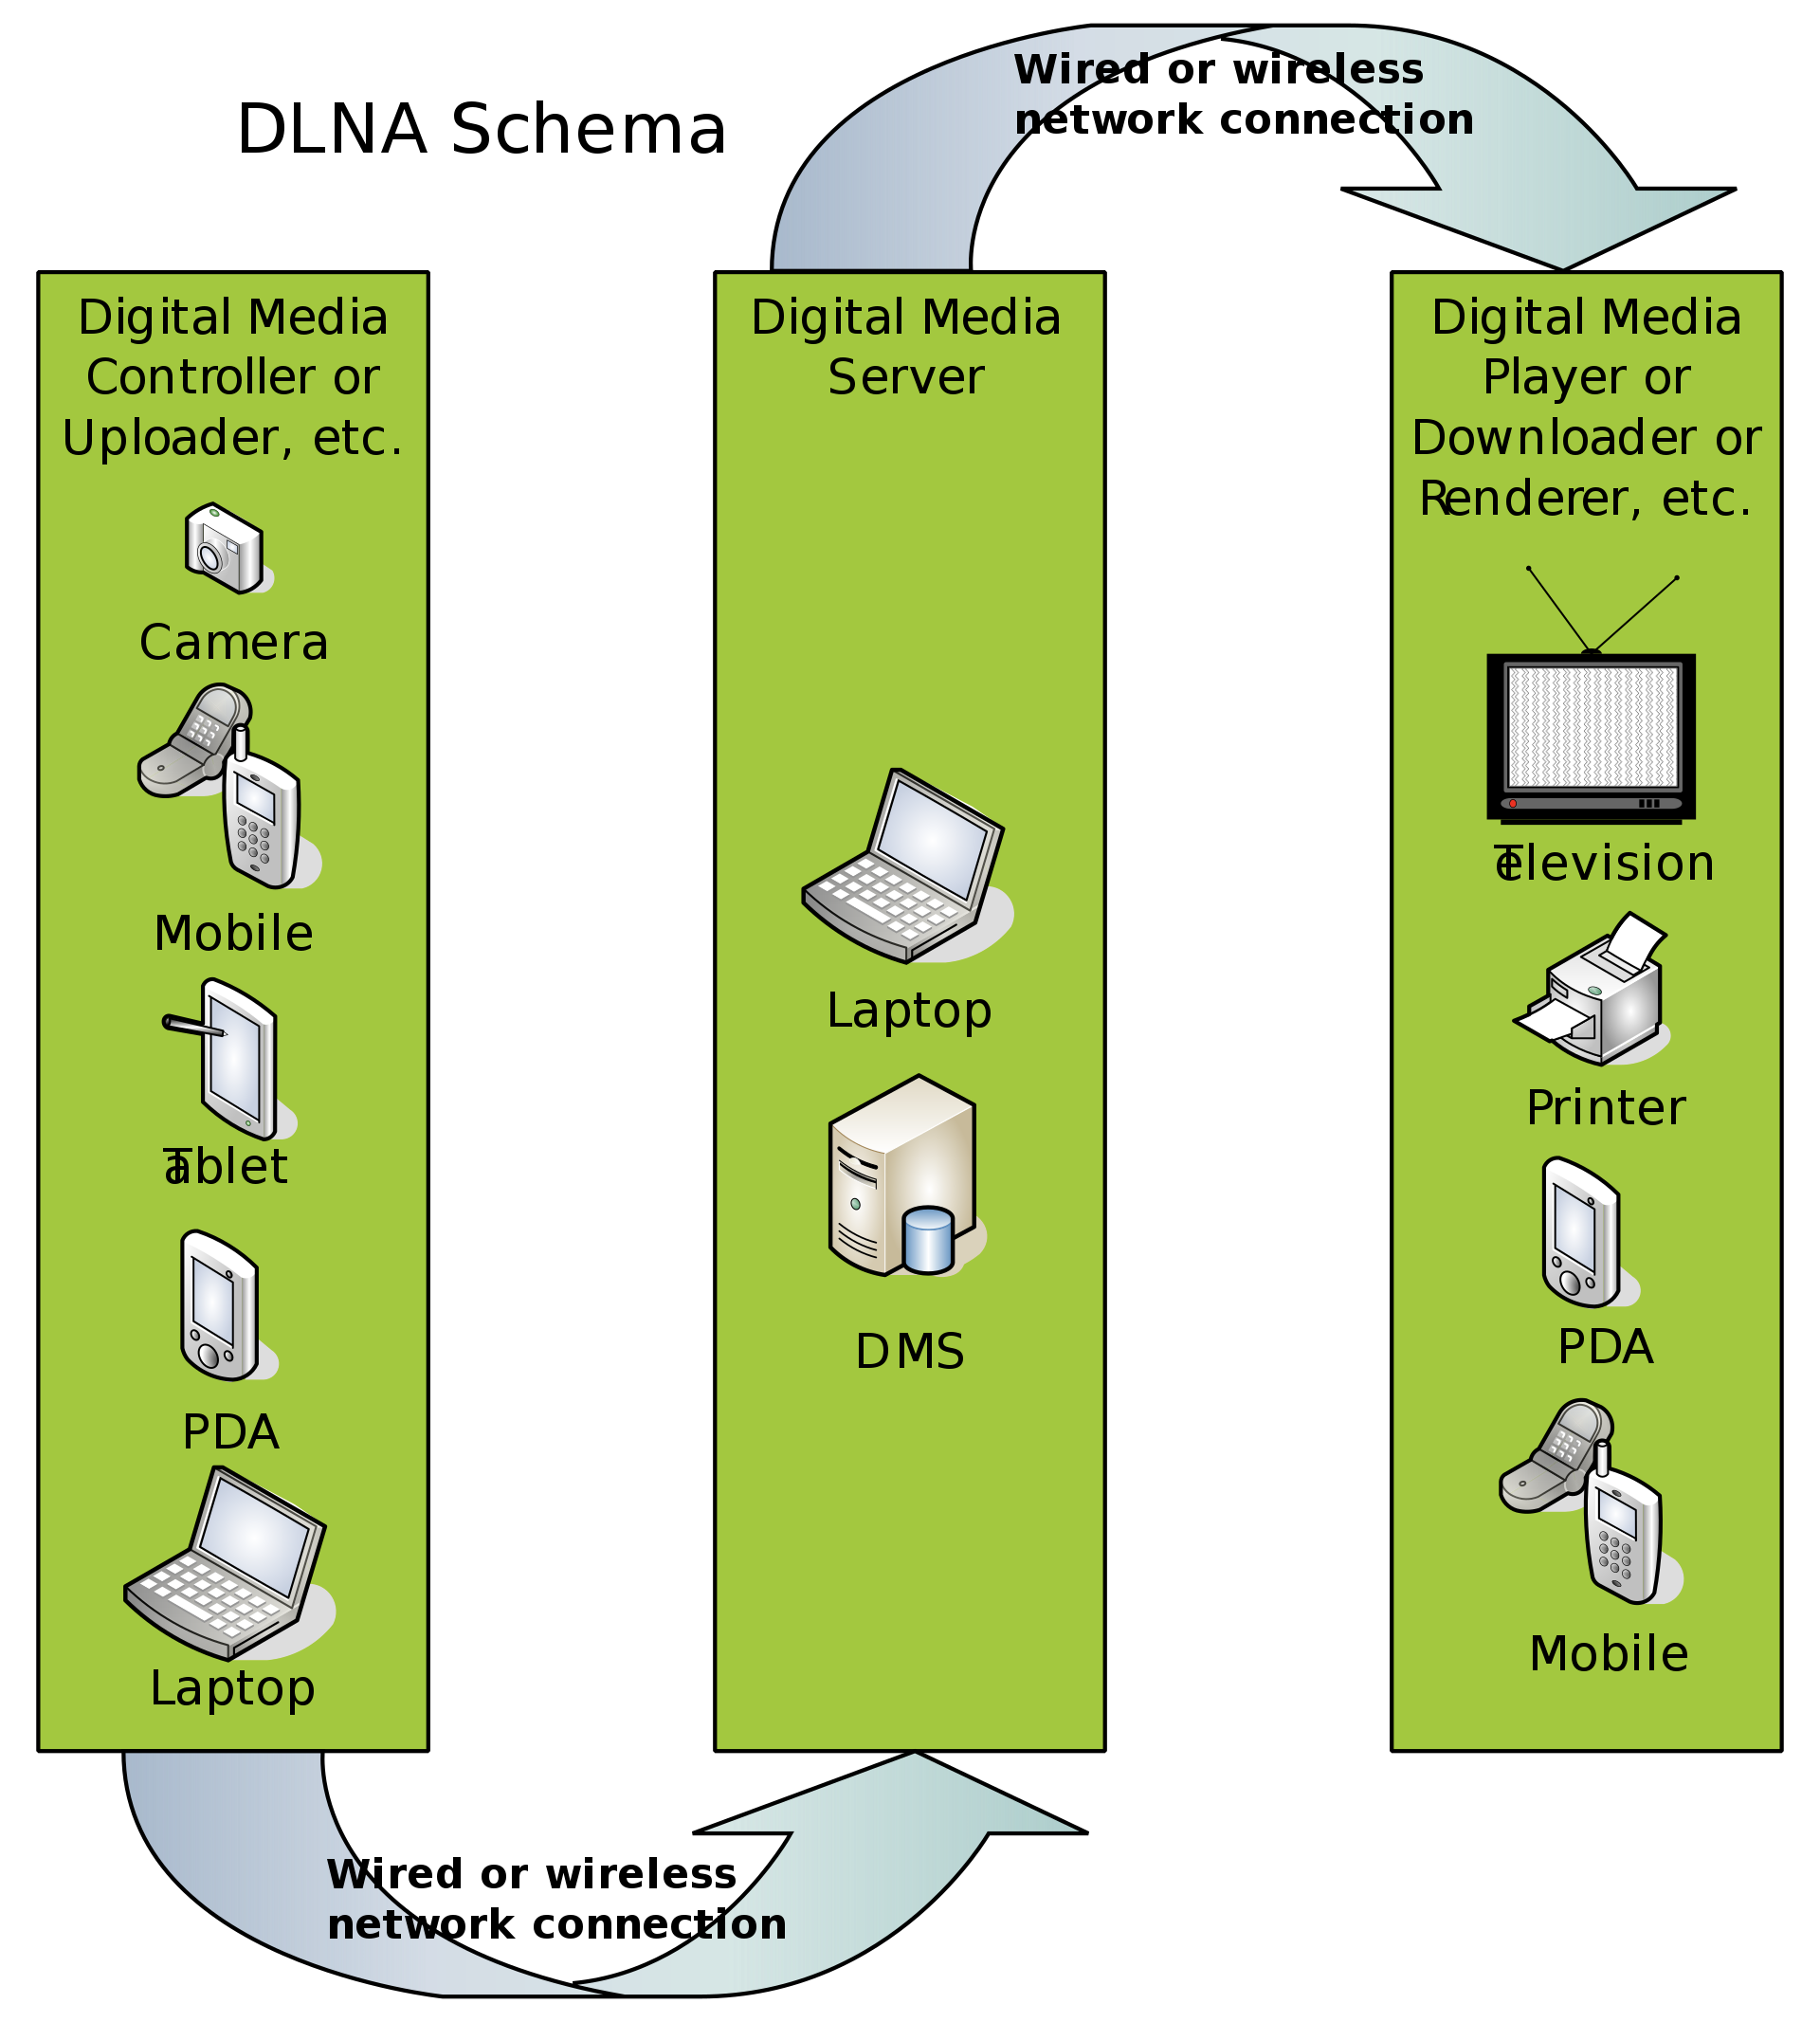
source: DLNA German wikipedia
[ SOHO #008 ] - "It's the end of L2 at my home... At last !"
Verification
In the screenshot below, the DLNA player is shutdown

Check that the App is able to discover the DLNA server DMS in other L3 subnet


Conclusion
In this article we enabled RARE/freeRouter DLNA/UPNP server/client:
- You have now the possibility to position any DLNA devices on any L3 subnet of your home network
- Bye bye flat single VLAN design
- Not having a flat VLAN is desirable when you have lots of IPv4/IPv6 devices of different nature. You would want domotic/IoT devices not in the same subnet as your wifi client and have a separate subnet for you NAS or wired services
RARE validated design: [ SOHO #006 ] - key take-away
In this example the key take-away are:
- Configure an UPNP hub
- Configure UPNP forwarder on very interface you expect DLNA/UPNP communication
- Of course this is IPv4/IPv6 compliant
This is a pretty unique freeRouter feature !
Requirement
|
|

Overview
In the previous articles we describe the hardware in SOHO #001 and initial staging steps in SOHO #002.
Note
You technically juts have to cut'n paste the config if you get the same hardware and operating system.
But if you pay attention, we did not cover one particular aspect of the hardware: integrated WIFI
Article objective
In this article we will pursue the SOHO network appliance installation and enable the integrated module so that all mobile host @ home can benefit from connectivity offered by SOHO router. In this basic example I'll show you basic WIFI implementation
- WIFI is b/g/n module (therefore no 5Ghz wifi)
- WIFI won't be directly under RARE/freeRouter control
Diagrams

[ SOHO #007 ] - "I'm not wired ... I need connectivity too !"
Verification
Conclusion
In this article we enabled the appliance WIFI integrated hardware:
- We ensured that wifi hardware was detected by Linux kernel
- We also ensured that Linux loaded the right wifi driver kernel module
- hostapd would control wireless interface
- we create a veth pair (veth2a Linux side - veth2b / DPDK side)
- wlan0 traffic is bound to veth2a using pcap2pcap utility (in freeRouter binaries bundle)
- veth2b is bound to sdn998 (and declalred in p4lang server)
- we create a hairpin 1 (hairpin11 , hairpin12) interface
- bridge 1 has also been created
- sdn998 and hairpin11 have been added to the bridge
- hairpin12 is a routed interface declared in VRF inet and has an IP 192.168.129.1 inside wireless subnet 192.168.129.0/24
RARE validated design: [ SOHO #006 ] - key take-away
In this example the key take-away are:
- The above action lead to bridge wireless traffic and pour it into VRF inet
- From that point all defined previously will apply (NAT, DHCP) but now with wireless subnetwork
This example cover the case of a basic bridge in which we included a basic interface sdn998 and a hairpin interfaces pouring traffic from/to VRF inet. freeRouter is acting as a wireless controller local to the integrated WIFI. We will see in further article another typical WIFI implementation more flexible. Pleas note that we could have directly applied routing at sdn998 (so without the use of the bridge and hairpin). The usage of bridge and hairpin setup will be described in a next article describing alternate wifi implementation. In short we will add an OpenWRT Access point behind sdn6 and SOHO router will act as WIFI controller for both the integrated WIFI hotspot and the newly added OpenWRT.
Requirement
|
|

Overview
In the previous article during the verification we assume to have one host connected to a subnetwork cascaded behind SOHO router@sdn6. However, we did not described how the host could get connectivity.
Article objective
In this article we will pursue the SOHO network appliance installation and enable DHCP for IPv4 server. SOHO router can then answer to DHCPv4 request ingressing sdn6 interface.
- Let's assume we have a switch connected to SOHO router@sdn6 for the future
- sdn6 has ipv4 interface 192.168.136.1 manually configured
- switch has IPv4 192.168.136.2
- subnetwork behind sdn6 is 192.168.136.0/24
- DHCPv4 will serve 192.168.136.3 → 192.168.136.254
Diagrams
[ SOHO #006 ] - "Do you need an IP ?"
Verification
Conclusion
In this article DHCP service has been enabled at:
- SOHO router level
- All host getting an IPv4 via DHCP will get a DNS server set to SOHO@loopback0 (192.168.254.1)
RARE validated design: [ SOHO #005 ] - key take-away
In this example the key take-away are:
- DHCP is available for IPv4 and IPv6
- DHCP here is bound to an interface so rogue DHCP request coming from any router interface other than the speficied interface won't be honoured
- Feel free to explore all DHCP options propose by RARE/freeRouter
DHCP for IPv6 is also available if you want to strictly reproduce IPv4 allocation scheme. In our case we will use IPv6 SLAC.
Requirement
|
|

Overview
In the previous article we enabled and checked IPv4 connectivity between all potential host within 192.168.128.0/17 and the outside Networks beyond ISP box. But, this is pretty useless as I can't imagine my kids typing IPv6 address (2001:8b0:0:30::666:102) in the browser in order to play a FUN puzzle. (Though for now we are suppose to have only IPv4 ![]() ) So we definitely need to provide name service resolution at the SOHO router itself.
) So we definitely need to provide name service resolution at the SOHO router itself.
Article objective
In this article we will pursue the SOHO network appliance installation and enable name service to all host @ home.
Diagrams

[ SOHO #005 ] - "Got your Id number, but ... What's your name ?"
Verification
Conclusion
In this article DNS service has been enabled at:
- SOHO router level
- All host getting an IPv4 via DHCP will get a DNS server set to SOHO@loopback0 (192.168.254.1)
RARE validated design: [ SOHO #005 ] - key take-away
In this example the key take-away are:
- proxy-profile usage in order to proxy DNS query into VRF inet
- proxy-profile can be used to proxy other types of traffic
- data/routed traffic is not affected by proxy-profile
Requirement
|
|

Overview
In the previous article we enabled and checked IPv4 connectivity between RARE/freeRouter and ISP box using sdn1 interface within 192.168.0.0/24 network. But as stated in the previous post, I'd like:
- all people connected within 192.168.128.0/17
- to access the external world
Article objective
In this article we will pursue the SOHO network appliance installation and enable IPv4 connectivity for all host connected within your internal network to the external world.
Diagrams

[ #004 ] - Do you need translation ?
Let's configure IPv4 Network Address Translation specifically for Loopback0
!
conf t
access-list ACL-NAT4
 sequence 10 deny all 192.168.128.0 255.255.128.0 all 192.168.128.0 255.255.128.0 all
 sequence 20 deny all any all 224.0.0.0 240.0.0.0 all
 permit all 192.168.254.1 255.255.255.255 all any all
exit
!
ipv4 nat inet sequence 10 srclist ACL-NAT4 interface sdn1
!
In the config stanza above we configure an access-list called ACL-NAT4 in VRF inet that would translate all incoming packet matching 192.168.254.1 going to anywhere to interface sdn1 IPv4. But we also don't NAT for inter-vlan traffic within 192.168.128.0/17 and also does not touch multicast traffic.
ping 8.8.8.8 /vrf inet /interface sdn1
pinging 8.8.8.8, src=192.168.0.90, vrf=inet, cnt=5, len=64, tim=1000, ttl=255, tos=0, sweep=false
!!!!!
result=100%, recv/sent/lost=5/5/0, rtt min/avg/max/total=3/3/4/16
Yahhoooo ! It works ... Our guess was good after all... ![]()
IPv6 does need NAT in my specific case as my ISP has allocated me public IPv6 prefixes. We will see IPv6 configuration in the next articles.
Verification
Conclusion
In this article
- We finally have a router that enables connectivity for all hosts inside the home network to the outside world
- due to the ISP specific setup, our router had to translate inner home IP subnets to subnet that can be in turn NAT'ed by the ISP box.
- We have a consistent IPv4 addressing plan
- We now can add very exciting feature from now on. (In next articles !)
RARE validated design: [ SOHO #004 ] - key take-away
In this example we are proposing a basic connectivity scenario. However, keep in mind that depending on your location the configuration might be drastically different. But do not fear ! RARE/freeRouter has all the features need to enable connectivity !
- NAT64 is available. So in case you want to run a pure IPv6 network, freeRouter can NAT64 traffic for you.
- NAT46 is also available. In case you are desperate and don't want to implement a pure IPv6 home network and have an ISP running only IPv6, freeRouter can NAT46 your traffic for you !
- In the example described, we are lucky to have IPv6 public global IPv6 address. We will see IPv6 configuration in subsequent articles.
Requirement
|
|

Overview
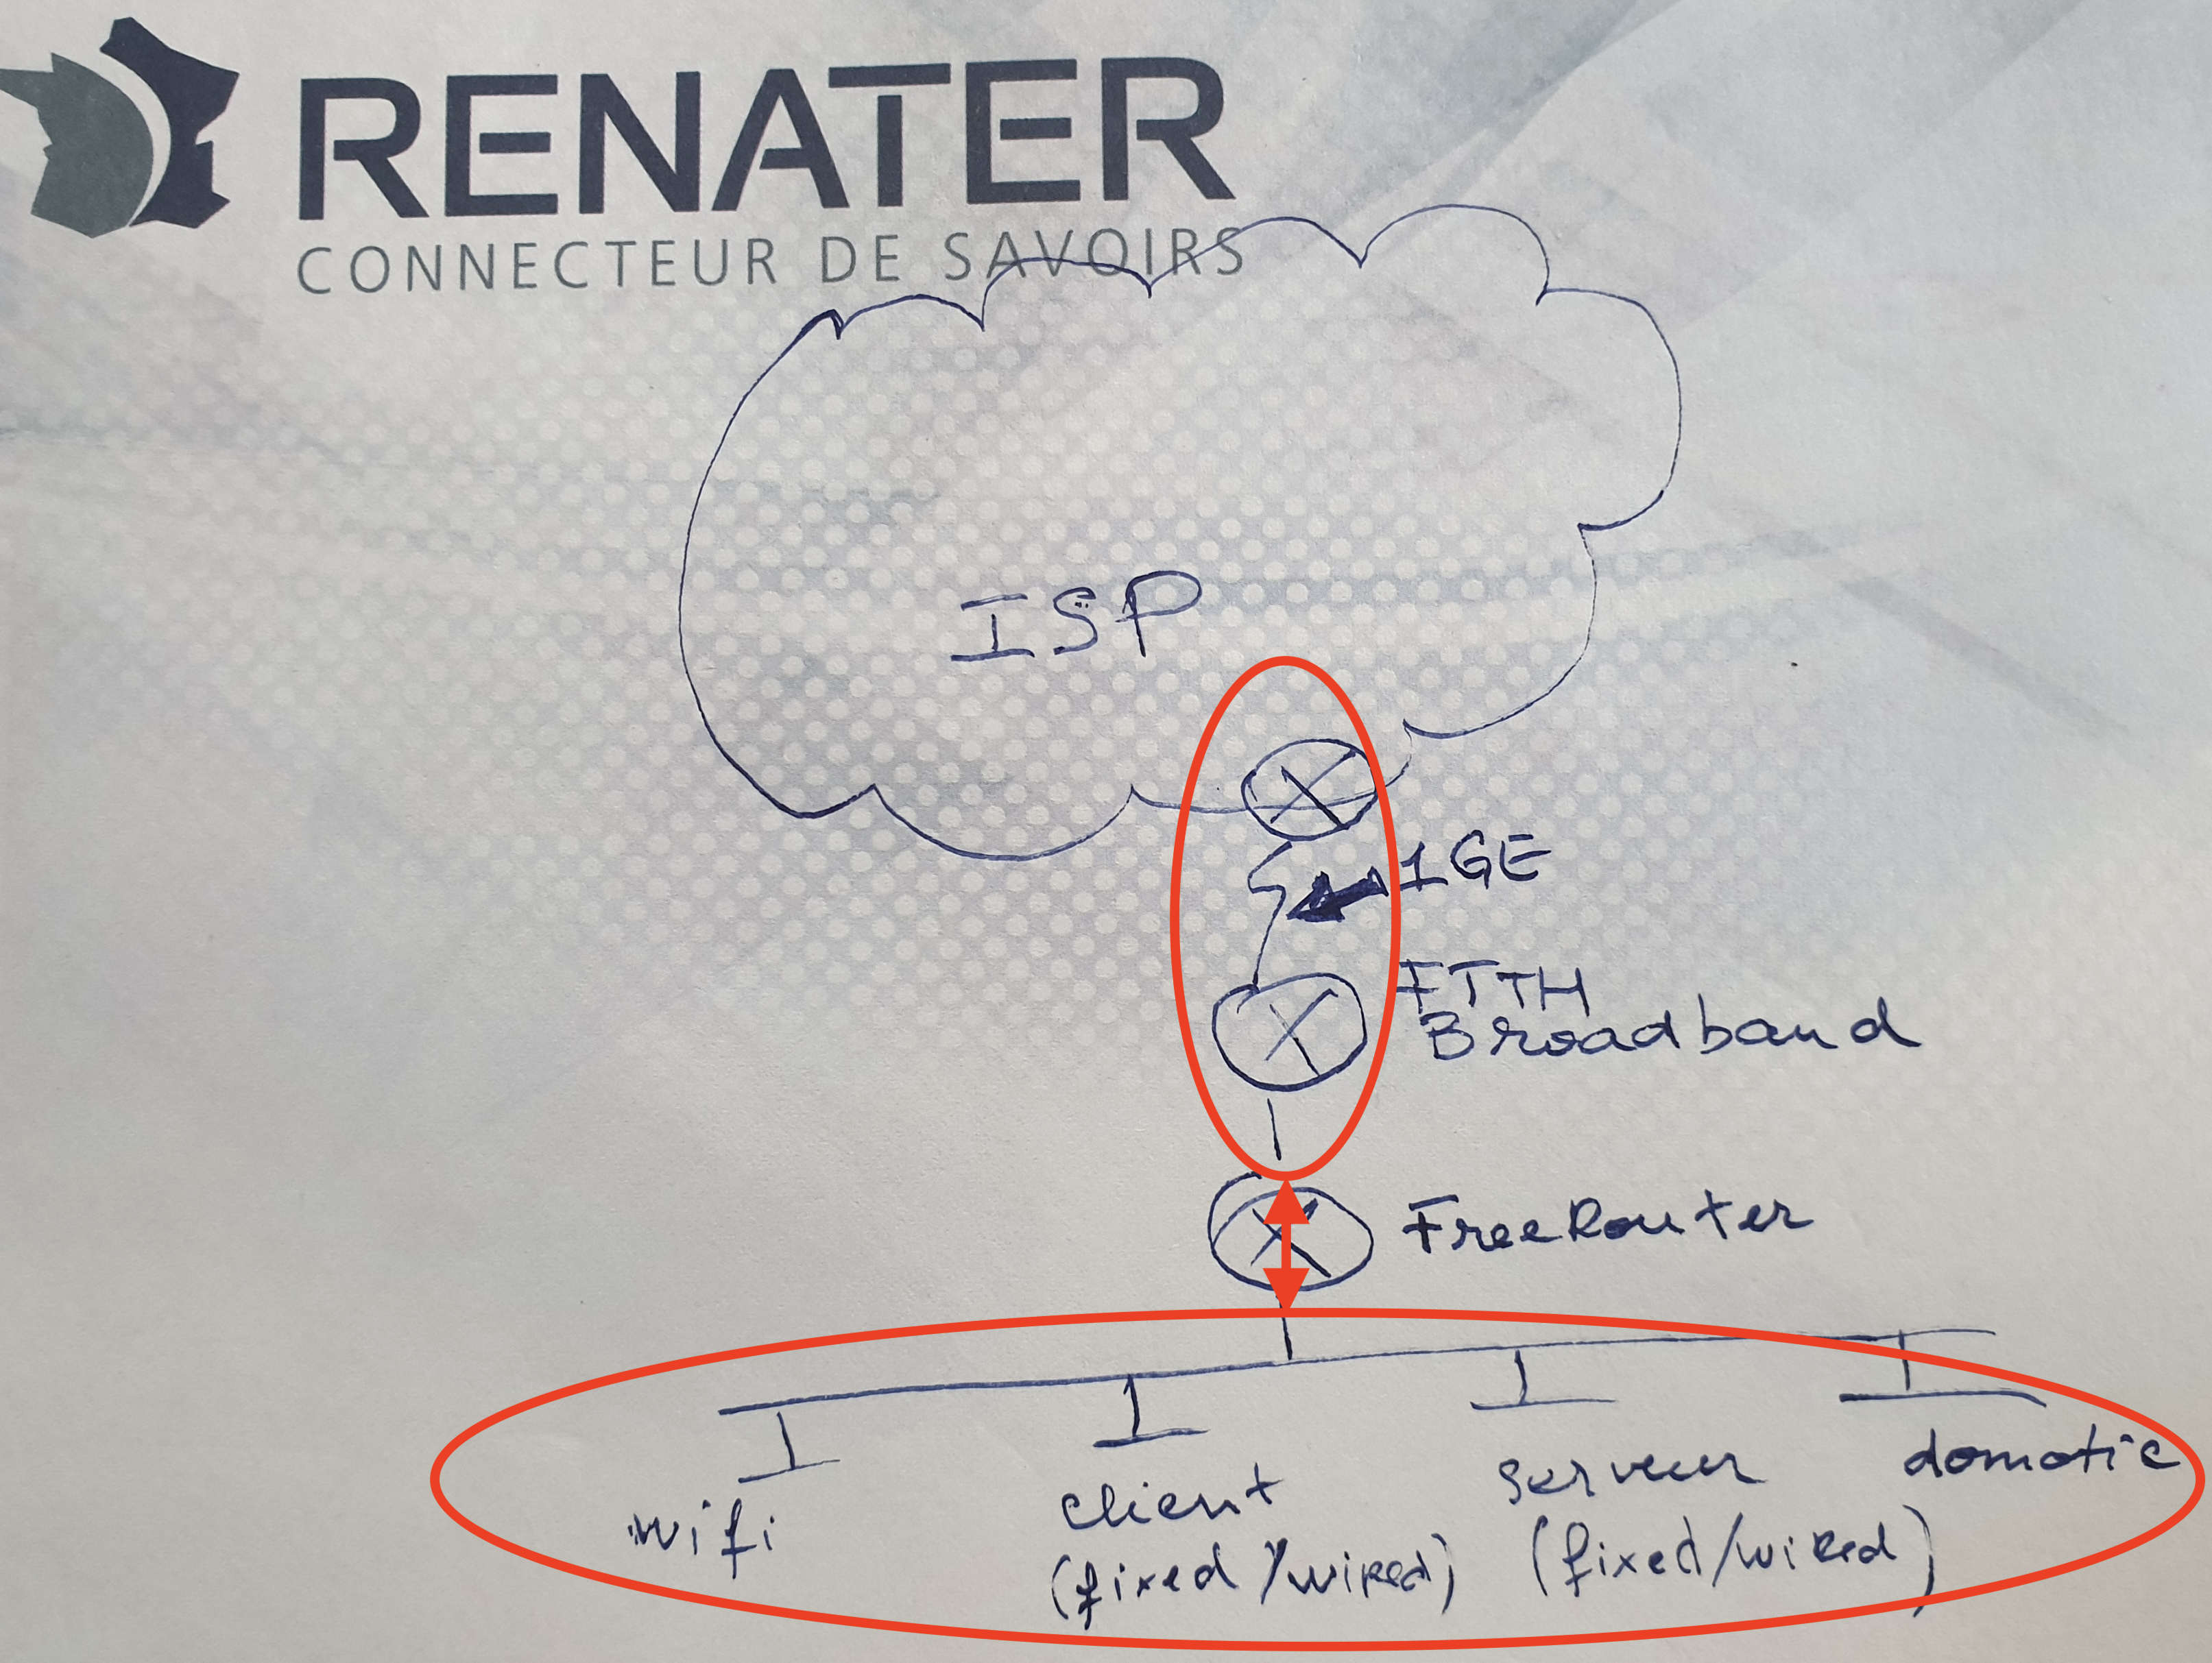
When installing RARE/freeRouter on x86, you have 2 choices:
- installation with a software dataplane
- installation with a DPDK dataplane
In this precise case, we will consider a DPDK dataplane installation as our hardware is compliant to the requirement listed below.
DPDK requirements
- CPU with SSE4 support
- DPDK compatible NIC
Note that freeRouter is available where JVM is available
- x86
- ARM
Article objective
In this article we will pursue the SOHO network appliance installation based on the diagram below, and freeRouter installation using DPDK dataplane. In this situation, the appliance is behind ISP FTTH box demarcation point. As it is typical to French FTTH domestic deployment.
Deployment consideration
In this case, RARE/freeRouter is connected to a ISP box demarcation point that deliver copper connectivity. Nothing prevents you, following your context, to deploy a similar equipment with with SFP uplinks directly connected to your Provider Edge backbone routers if you own also the dark fiber paths local to the MAN.
Diagrams

[ #003 ] - RARE/freeRouter DPDK SOHO installation
IPv6 addressing plan has not been forgotten. It is not mentioned here on purpose in order to not complicate explanations. IPv6 we be the object of further articles. It is not that IPv6 is a complex topic. It just that it deserves special attention. You might not realised it, but IPv6 is everywhere and is used by default between peers as soon as IPv6 is enable. So IMHO we need to get used to it as soon as possible especially if you are a network administrator.
Verification
Check Linux appliance local routes
root@mjolnir:~# route -n
Kernel IP routing table
Destination     Gateway         Genmask         Flags Metric Ref    Use Iface
0.0.0.0         192.168.128.1   0.0.0.0         UG    0      0        0 veth1a
Test local telnet access from linux/localhost

Conclusion
In this article
- we finally launched RARE/freeRouter with DPDK dataplane
- configure RARE/freeRouter with a vanilla config that takes into account all the appliance physical interfaces
- added veth pair in the config in order to take into account:
- Control plane / Data plane communication
- linux OOBM
- integrated WIFI
- Enabled and checked IPv4 connectivity between freeRouter@sdn1 and ISP demarcation point
- Check telnet access to freeRouter from localhost only
RARE validated design: [ SOHO #003 ] - key take-away
From this point you have a complete freeRouter connected to ISP box via SDN1 as uplink in 192.168.0.0/24 subnet. We will extend further this base configuration step by step in order to enrich user experience !
- Now you would want to enable IPv4/IPv6 connectivity to all potential hosts@home whether they are connected via RJ45 or via built-in WIFI.
- you would also want to distribute IPv4, IPv6 to all the of hosts@home
- IPv4/IPv6 connectivity is not enough, you would like to provide Domain Name Service to them
- Domain Name Service is not enough if they can't reach outside world. As we are using RFC1918 addressing plan we should figure out a way to ensure NAT/PAT address translation in order to enable egress traffic toward the Internet
- Your home might have several floors and only one WIFI access point is not enough ? Let's see how we can add additional WIFI AP in the network
- Maybe you have an outsourced network management service ? Let's see how connectivity can be enable via OpenVPN encrypted tunnel
- Last but not least, let's see how we can connect DN42 parallel network using a Wireguard tunnel relying on an IPv6 underlay.
You've guessed it, all of these points will be elaborated in the futures articles. Therefore stay tuned !
Requirement
|
|

Overview
I'm not sure if this is still the case now, but back in 1999, I had the opportunity to managed multiple VPNs at a very huge French Service Provider. I'm saying huge as in this type of MPLS muti-service core network, you could have hundreds of VRF in the same PE router connecting a myriads of CPE via X25 (XOT), frame-relay and ATM PVC at best. In that context, some companies could have several thousands of routers in their VPNs and it was not common to follow a high pace deployment which was at ~10 CPEs per day for a new customer VPN implementation. So one of my favorite CLI command was:
copy tftp run
Address or name of remote host []? <x.y.z.t>
Source filename []? <router-cpe-config-file-name>
Destination filename [running-config]?
...
That being said, I'm not sure if this has evolved since then as TFTP occurred inside a very protected out of band management network, it was very good and did a perfect job. Keep in mind that we could be hundreds of "VPN owner" deploying CPEs at the same time. This has to be highly available.
That was for the anecdote, but recently I attempted to upgrade my OpenWRT wifi router from 18.06.02 to the latest code train: 19.07.4. As a I'm lazy, I just sticked with OpenWRT web upgrade via LuCI. Not sure if I was right ... I don't know why and how but the upgrade failed and my wifi router got "bricked". ![]()
After a lot of googling and reading, i concluded that I had only one solution: restore from factory and re-install OpenWRT 19.07.04 installation by hand. You have guess the rest of the article, the factory-reset procedure requires a TFTP server. ![]()
Note
But before that, I had to solder an USB - UART module as described here.
Article objective
As again i was lazy on installing a TFTP server on my MAC and disconnect my current LAN access in order to have a direct connectivity with the OpenWRT box, I had an idea (this is not often ![]() ) off the top of my head: "Hey, maybe freeRouter has a TFTP server that I can activate in few lines ?"... Well, after a terminal connection to my home router let me introduce you to freeRouter/TFTP server:
) off the top of my head: "Hey, maybe freeRouter has a TFTP server that I can activate in few lines ?"... Well, after a terminal connection to my home router let me introduce you to freeRouter/TFTP server:

[ #004 ] - Saving private OpenWRT", thanks freeRouter's TFTP server !
sdn6 is the port #6 connected from my SOHO router to OpenWRT router.
sh run tftp
server tftp openwrt
 path /rtr/owrt/
 interface sdn6
 vrf inet
 exit
!
sh run sdn6
interface sdn6
 description mjolnir@LAN6[08:00.0]
 mtu 1500
 macaddr 004c.7307.0a77
 vrf forwarding inet
 ipv4 address 192.168.136.1 255.255.255.0
 ipv4 broadcast-multicast
 no shutdown
 no log-link-change
 exit
!
...
So the LAN port of my OpenWRT router is like this:
...
config interface 'lan'
        option type 'bridge'
        option proto 'static'
        option ipaddr '192.168.136.2'
        option netmask '255.255.255.0'
        option broadcast '192.168.136.255'
        option gateway '192.168.136.1'
        option ip6assign '60'
        list dns '192.168.254.1'
        option ifname 'eth0 eth0.1 eth0.2 wlan0 wlan1'
...
Basic connectivity check (well technically you could not ping as it is part if TFTP restore to factory process. Remember our box crashed ! ![]() )
)
ping 192.168.136.2 /vrf inet
pinging 192.168.136.2, src=null, vrf=inet, cnt=5, len=64, tim=1000, ttl=255, tos=0, sweep=false
!!!!!
result=100%, recv/sent/lost=5/5/0, rtt min/avg/max/total=0/1/2/5
...
Note
Discussion
You can deploy freeRouter manually in a VM or container and bind it to a linux interface if you need a TFTP server in order to apply configuration to all your equipment. When final staging are done in a secure Out of Band management network context having a TFTP server is a blessing as it correspond to a gain of time in a production environment. Imaging hundreds of people working in a SP environment and working at the same time.
Conclusion
In this 4th article:
- We presented freeRouter TFTP embedded server
- You can use it in order to undertake network equipment deployment requiring TFTP
- This TFTP server is compatible with IPv4/IPv6
TFTP is a basic but a common tool in SP environment (or it was? If it is still used, yes please confirm !) In this example, I demonstrated the use of TFTP server in order to flash a wifi router to factory default. I have 802.11ac back up and running !
Final words
freeRouter can be perceived not only as a router but it is a networking Swiss army knife. in further articles we will shed some lights in various treasures hidden into freeRouter... And for free !
Last but not least, you can play with these different servers from this sandbox: (You'll be able to spot amazing server that will be the object of further article.)
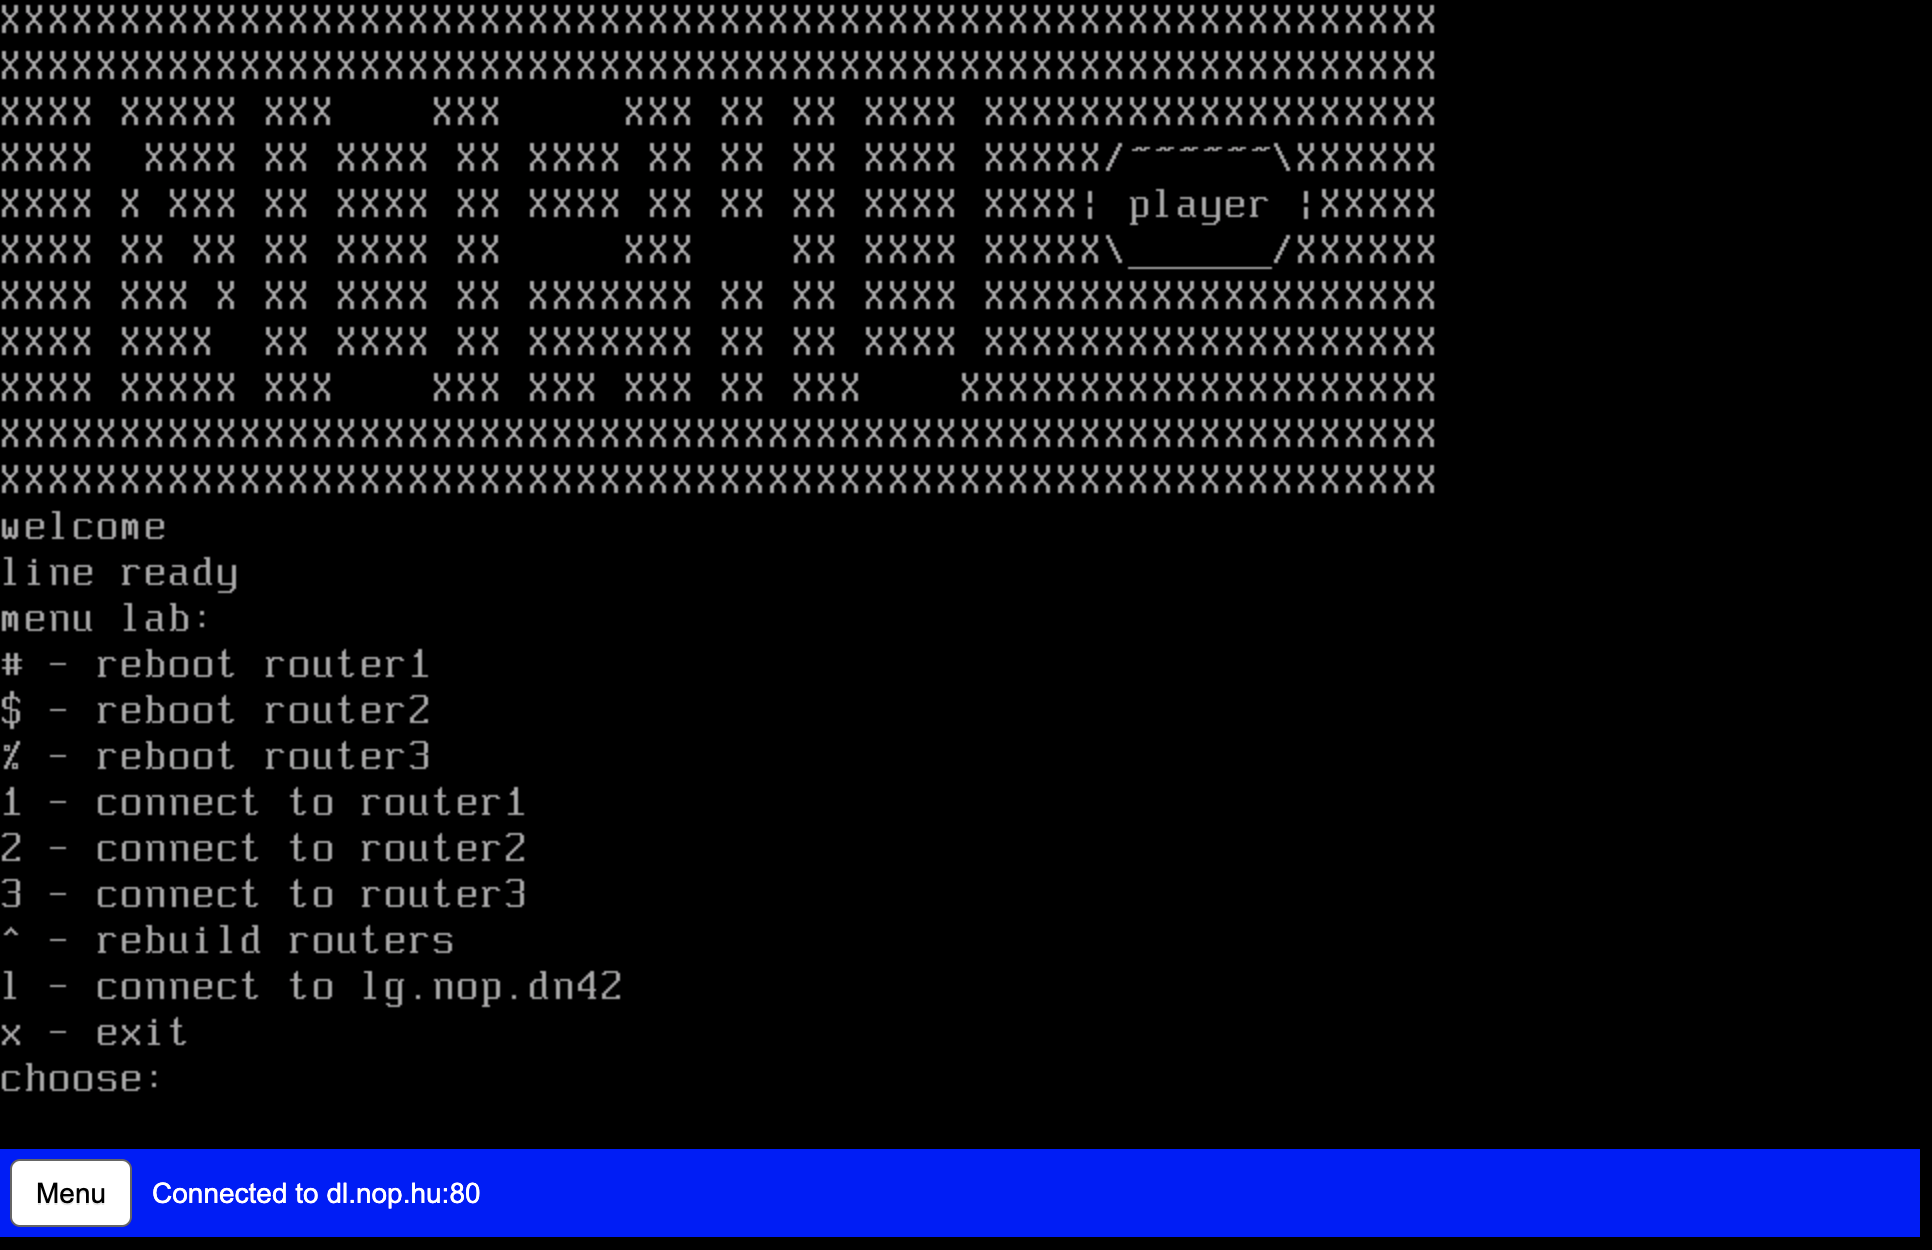
Trying 193.224.23.5...
Connected to dl.nop.hu.
Escape character is '^]'.
XXXXXXXXXXXXXXXXXXXXXXXXXXXXXXXXXXXXXXXXXXXXXXXXXXXXXXXXXXXX
XXXXXXXXXXXXXXXXXXXXXXXXXXXXXXXXXXXXXXXXXXXXXXXXXXXXXXXXXXXX
XXXX XXXXX XXX    XXX     XXX XX XX XXXX XXXXXXXXXXXXXXXXXXX
XXXX  XXXX XX XXXX XX XXXX XX XX XX XXXX XXXXX/~~~~~~\XXXXXX
XXXX X XXX XX XXXX XX XXXX XX XX XX XXXX XXXX| player |XXXXX
XXXX XX XX XX XXXX XX     XXX    XX XXXX XXXXX\______/XXXXXX
XXXX XXX X XX XXXX XX XXXXXXX XX XX XXXX XXXXXXXXXXXXXXXXXXX
XXXX XXXX  XX XXXX XX XXXXXXX XX XX XXXX XXXXXXXXXXXXXXXXXXX
XXXX XXXXX XXX    XXX XXX XXX XX XXX    XXXXXXXXXXXXXXXXXXXX
XXXXXXXXXXXXXXXXXXXXXXXXXXXXXXXXXXXXXXXXXXXXXXXXXXXXXXXXXXXX
XXXXXXXXXXXXXXXXXXXXXXXXXXXXXXXXXXXXXXXXXXXXXXXXXXXXXXXXXXXX
welcome
line ready
menu lab:
# - reboot router1
$ - reboot router2
% - reboot router3
1 - connect to router1
2 - connect to router2
3 - connect to router3
^ - rebuild routers
l - connect to lg.nop.dn42
x - exit
choose:1 - attach vdc lab1

welcome
line ready
yourname#conf t
warning user.userLineHandler.doExec:userLine.java:606 <nobody> configuring from tty1
yourname(cfg)#server ?
  bmp2mrt      - configure an bmp to mrt server
  bstun        - configure a bstun server
  chargen      - configure a chargen server
  daytime      - configure a daytime server
  dcp          - configure a dcp server
  dhcp4        - configure a dhcp4 server
  dhcp6        - configure a dhcp6 server
  discard      - configure a discard server
  dns          - configure a dns server
  echo         - configure an echo server
  etherip      - configure a etherip server
  forwarder    - configure a forwarder server
  ftp          - configure a ftp server
  geneve       - configure a geneve server
  gopher       - configure a gopher server
  gre          - configure a gre server
  gtp          - configure a gtp server
  honeypot     - configure a honeypot server
  http         - configure a http server
  irc          - configure an irc server
  iscsi        - configure an iscsi server
  l2f          - configure a l2f server
  l2tp2        - configure a l2tp v2 server
  l2tp3        - configure a l2tp v3 server
  loadbalancer - configure a loadbalancer server
  lpd          - configure a lpd server
  modem        - configure a modem server
  mplsip       - configure a mplsip server
  mplsudp      - configure a mplsudp server
  multiplexer  - configure a multiplexer server
  netflow      - configure an netflow server
  nrpe         - configure a nrpe server
  ntp          - configure a ntp server
  openflow     - configure an openflow server
  p4lang       - configure an p4lang server
  pcep         - configure a pcep server
  pckodtls     - configure a pckodtls server
  pckotcp      - configure a pckotcp server
  pckotxt      - configure a pckotxt server
  pckoudp      - configure a pckoudp server
  pop3         - configure a pop3 server
  pptp         - configure a pptp server
  prometheus   - configure a prometheus server
  quote        - configure a quote server
  radius       - configure a radius server
  rfb          - configure a rfb server
  rpki         - configure a rpki server
  sip          - configure a sip server
  smtp         - configure a smtp server
  snmp         - configure a snmp server
  socks        - configure a socks server
  streamingmdt - configure a streaming telemetry server
  stun         - configure a stun server
  syslog       - configure a syslog server
  tacacs       - configure a tacacs server
  telnet       - configure a telnet server
  tftp         - configure a tftp server
  time         - configure a time server
  udpfwd       - configure an udp forwarder server
  udptn        - configure an udptn server
  upnpfwd      - configure an upnp forwarder server
  upnphub      - configure an upnp hub server
  voice        - configure a voice server
  vxlan        - configure a vxlan server

yourname(cfg)#server
...
In order to exit the sandbox session use the following escape sequence: Ctrl-c + Ctrl-x

Requirement
|
|

Overview
In Greek mythology, Prometheus is a Titan that is credited mankind creation by stealing Fire from Gods and by giving it to human. In the RARE context, Prometheus is a the software from prometheus.io project. It became very popular in the IT industry as it is very simple to implement/configure while providing a great number of metrics without impacting application performance. It is heavily used in microservices environment such as docker and Kubernetes. The mythological reference gives us an indication of how Prometheus is operating. At a constant rate, Prometheus metric collector or server is stealing metrics from Prometheus agent. All the stolen metrics are then consolidated in Time Series database ready to be poured to a queueing system for proper visualization.
Before going further, allow me a brief digression by sharing with you a small anecdote that leds to this ongoing work related to network monitoring for RARE. As mentioned previously, our focus is to elaborate RARE/freeRouter solution the possibility to be monitored in an operational environment. In that context, we started with the implementation of a lightweight SNMP stack that provided relevant result via SNMP tools like LibreNMS. This is great for organisation that wouldn’t want invest time on anything but SNMP.
However, we felt a lack of flexibility due to SNMP inherent structure and we needed more versatile and instant monitoring capabilities. More importantly the need to export infinite metric type from Control Plane in a more flexible way arise. How metrics such as: Number of IPv4/IPv6 routes, IPv4 BGP prefix, IPv6 BGP prefix platform JVM memory etc. could be shared without too much hassle ?
After some internal discussion, I just said: "I’m not a monitoring expert but we have tools like ELK and PROMETHEUS and GRAFANA in NMaaS catalog … Shouldn’t we consider use this ?"
The answer was: « Let’s give it a try and fire up a Prometheus and Grafana instance from NMaaS platform !»
Some hacking at the control plane code level were initiated, after few hours freeRouter lead developer came up with a solution and said: Let me introduce you "freeRouter prometheus agent »
And thanks to the great support of NMaaS team, in few minutes and some point and clicks (it took longer than expected as I’m not good with GUI) we were able to test this agent.
Why is it important you might say ? It is just that with prometheus simplicity and low resource overhead with have full control plane metrics visibility !
As a side note this is not a replacement for INT/Telemetry/Netflow/IPFIX that provide different type of data that are to at the same scale…
People with INT/TELEMETRY/NETFLOW/IPFIX are talking about a "data lake" or "data deluge". Which is correct, if you think about the complexity of resolving a gigantic producer/consumer data problem. This needs the relevant IT infrastructure in order to process all of the data provided by these protocol at the NREN scale.
While in our case, we are just focusing on exposing CONTROL PLANE METRICS at the network element level. We simply monitor and ensure a router operation by using prometheus metrics
Note
While he above might be true, the number of metrics exported from a prometheus target can be very high. Fine tuning might be necessary in order to make sure that all metrics are really necessary for network monitoring purpose. This explosion of metrics exposure can add unnecessary workload at the control plane level.
Again, kudos to NMaaS team that made this happen so that we could test this on the P4 LAB with — ZERO — effort.
Article objective
In this article, we will present freeRouter and Prometheus integration and as an example we will implement one of the 22 grafana dashboard that we developed and published here. In the rest of the article we will assume that you are a running one or more freeRouter nodes.
Diagram

[ #001 ] - Cookbook
In this example let's focus our interest interface metrics. Please note that this configuration should be deployed on each freeRouter and connectivity should be available between all targets and the prometheus server.
- The objective is to tell freeRouter control plane to expose hardware and software counter interface metric using the sensor object.
- You have 2 types of sensor:
- Universal sensor: Sensor definition that you can cut/paste anywhere
- User specific sensor: Sensor definition that you need to adjust depending freeRTr configuration implemented by user
!-------------------------------------------------------------------------------
! Example of universal sensor:
! That can be copy paste as is.
!-------------------------------------------------------------------------------
!
sensor ifaces-hw
path interfaces-hw/interface/counter
prefix freertr-ifaces
key name interfaces-hw/interface
command sho inter hwsumm
prepend iface_hw_byte_
name 0 ifc=
replace \. _
column 1 name st
column 1 replace admin -1
column 1 replace down 0
column 1 replace up 1
column 2 name tx
column 3 name rx
column 4 name dr
.
exit
!
!-------------------------------------------------------------------------------
! Example of sensor you need to adjust:
! You need to adapt your BGP process number:
! Here replace 65535 by your BGP process number)
!-------------------------------------------------------------------------------
!
sensor bgp4peer
path bgp4/peer/peer
prefix freertr-bgp4peer
key name bgp4/peer
command sho ipv4 bgp 65535 summ
prepend bgp4_peer_
name 0 peer=
replace \. _
column 2 name state
column 2 replace false 0
column 2 replace true 1
column 3 name learn
column 4 name advert
.
exit
!
So this basically means:
- From freeRouter CLI, issue the following command:
sho inter hwsumm
interface   state  tx          rx          drop
hairpin41   up     67404       0           0
hairpin42   up     153134      0           0
sdn1        up     412319805   1057514903  1152305
sdn2        up     1038840147  407307558   202
sdn3        admin  0           0           0
sdn4        admin  0           0           0
sdn5        admin  0           0           0
sdn6        admin  0           0           0
sdn998      up     9154        0           0
sdn999      up     199178      262939      0
tunnel1965  up     0           9122896     0
- prepend to the metric name: "iface_hw_byte_"
- column 0 will have prometheus label ifc=
- replace all dots "." by "_" . (so interface bundle1.123 will become bundle1_123)
- column 1 defines a metric name "iface_hw_byte_" concatenated to "st" => "iface_hw_byte_st" which is essentially interface status
- if column 1 "state" value is admin/down/up we associate value -1/0/1
- column 2 defines a metric name "iface_hw_byte_" concatenated to "tx" => "iface_hw_byte_tx" which is essentially interface bytes transmitted counter
- column 3 defines a metric name "iface_hw_byte_" concatenated to "rx" => "iface_hw_byte_rx" which is essentially interface bytes received counter
- column 4 defines a metric name "iface_hw_byte_" concatenated to "dr" => "iface_hw_byte_dr" which is essentially interface bytes dropped counter
- Then you need to bind the configured sensor to prometheus server:
!-------------------------------------------------------------------------------
! Example of Prometheus agent configuration
! And sensor bindings
!-------------------------------------------------------------------------------
!
server prometheus pr
 sensor ifaces-hw
 sensor bgp4peer
 interface <prometheus_agent_interface_binding>
 vrf <prometheus_agent_vrf_bingind>
 exit
!
And if you followed this correctly, we are repeating these lines for software interface counter metric.
Tip
You can view Prometheus configuration for various Grafana dashboard here. Feel free to study these Prometheus configuration and activate them as you see fit depending on your requirements. The set of dashboard is not exhaustive and is by no means absolute. Feel free to submit additional dashboard ! We would gladly add them in the current list of freeRouter Dashboard.
Note
After this definition a freeRouter level you should have:
4 metrics related to hardware counters
- iface_hw_byte_st
- iface_hw_byte_tx
- iface_hw_byte_rx
- iface_hw_byte_dr
4 metrics related to software counters
- iface_sw_byte_st
- iface_sw_byte_tx
- iface_sw_byte_rx
- iface_sw_byte_dr
Which is a total of 8 metrics
Tip
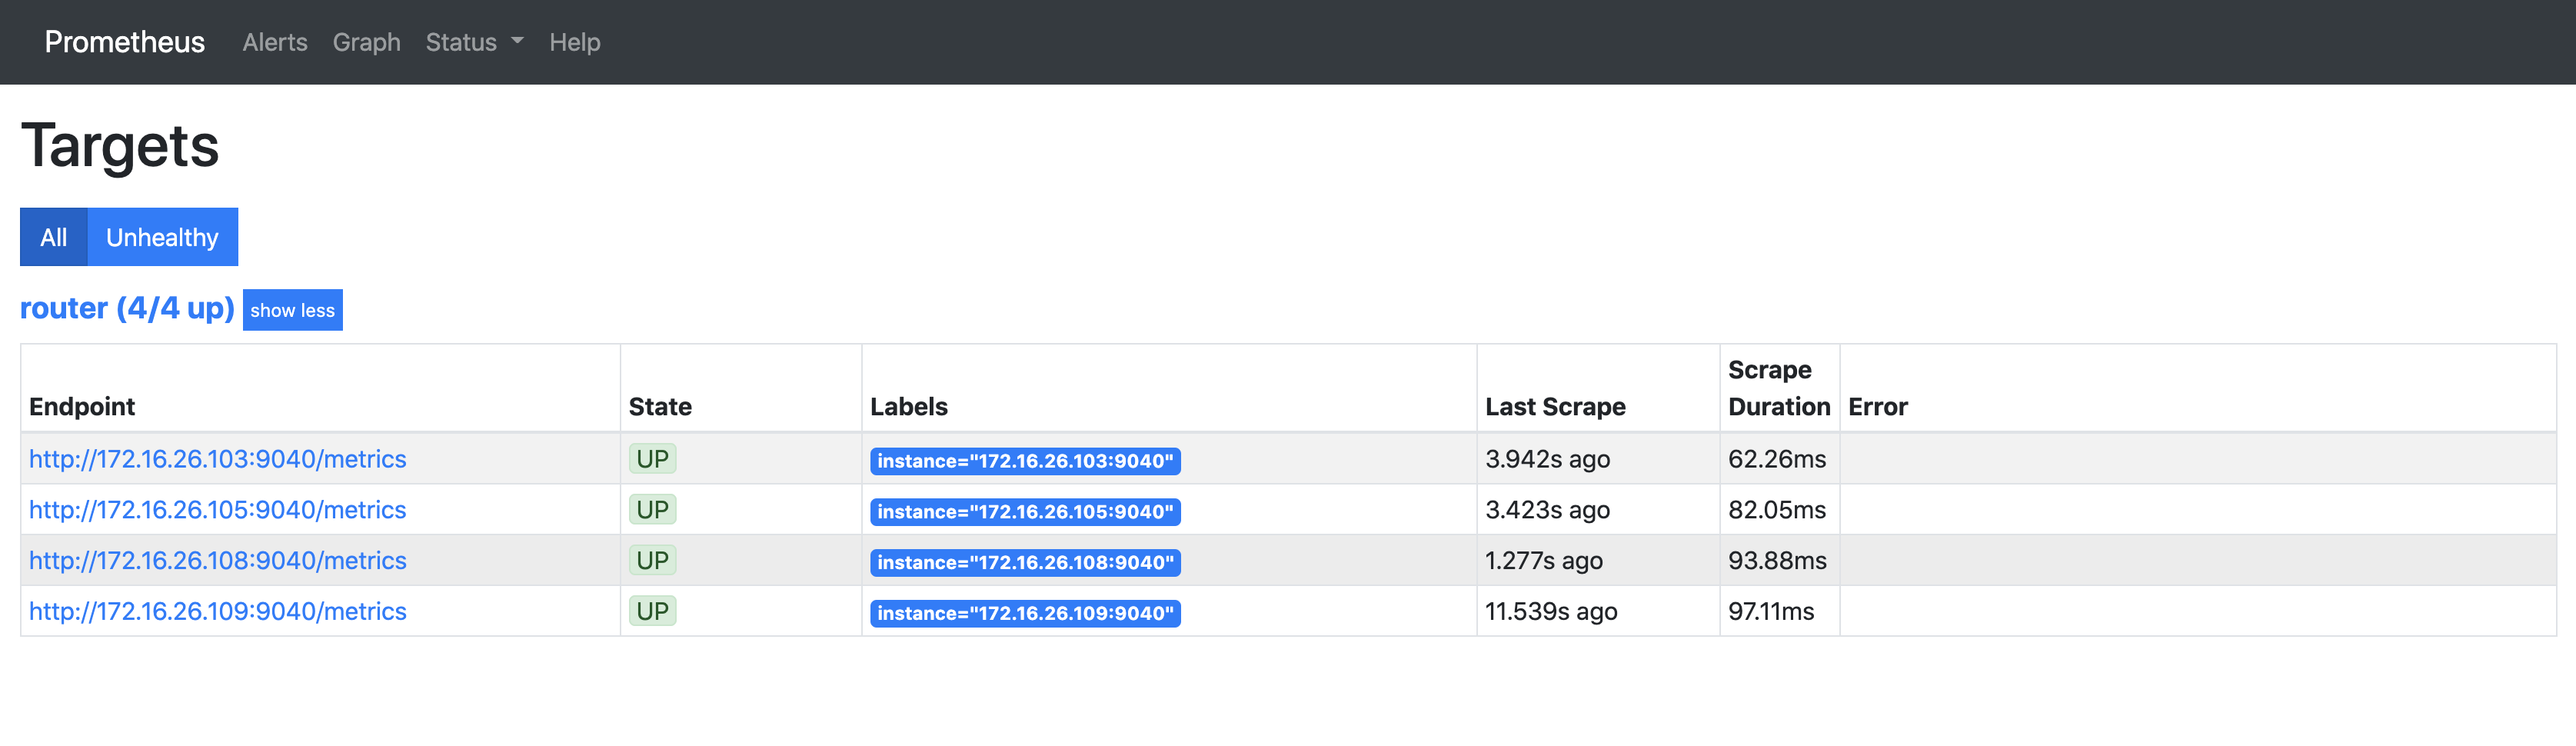
From that point you can check via prometheus console:
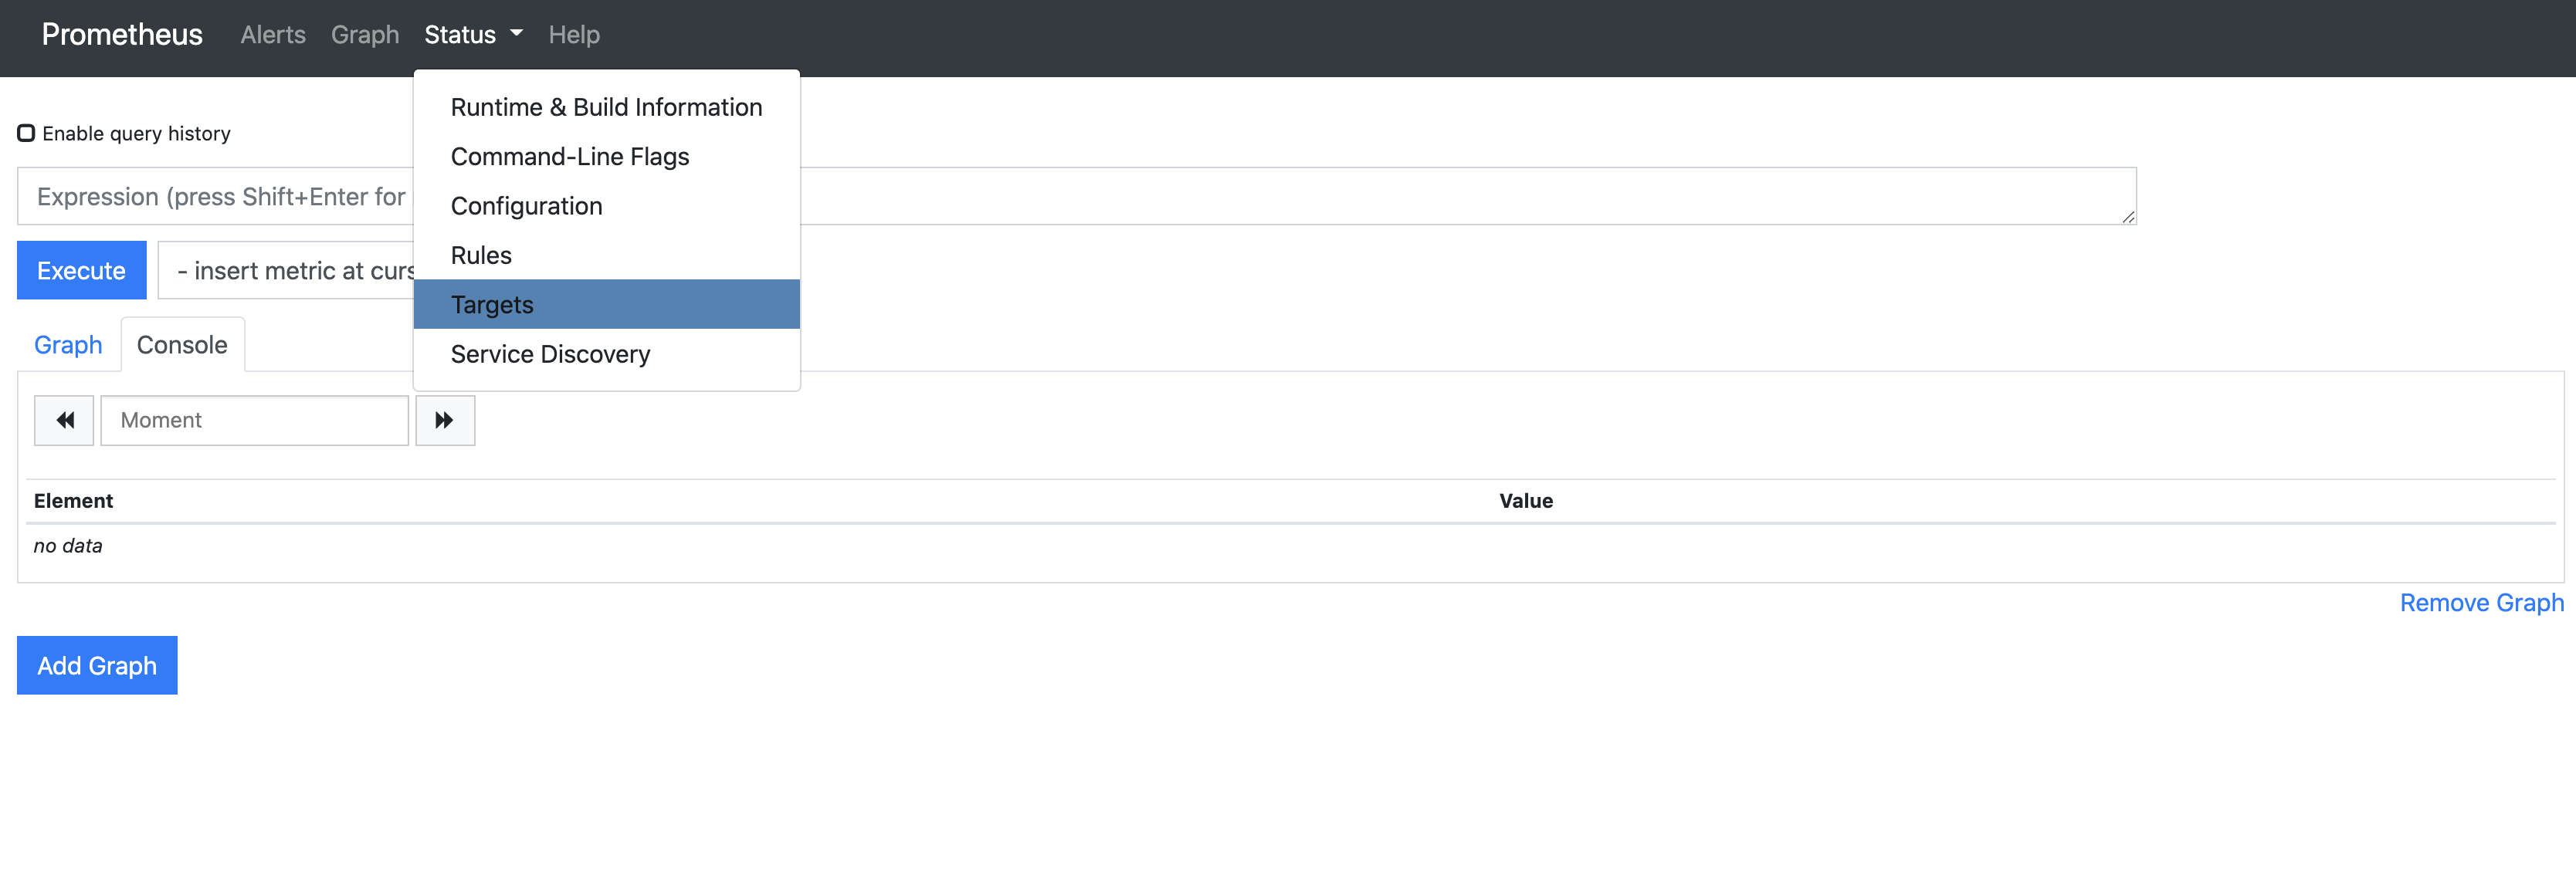
check the "Targets" menu drop down selection
From that point you should be able to use PromQL query filed in order to check that you can retrieve the metrics we defined above.
For metric visualisation, we will use Grafana. Therefore:
- install Grafana from official web site.
- Once installed configure Prometheus as Grafana data source:
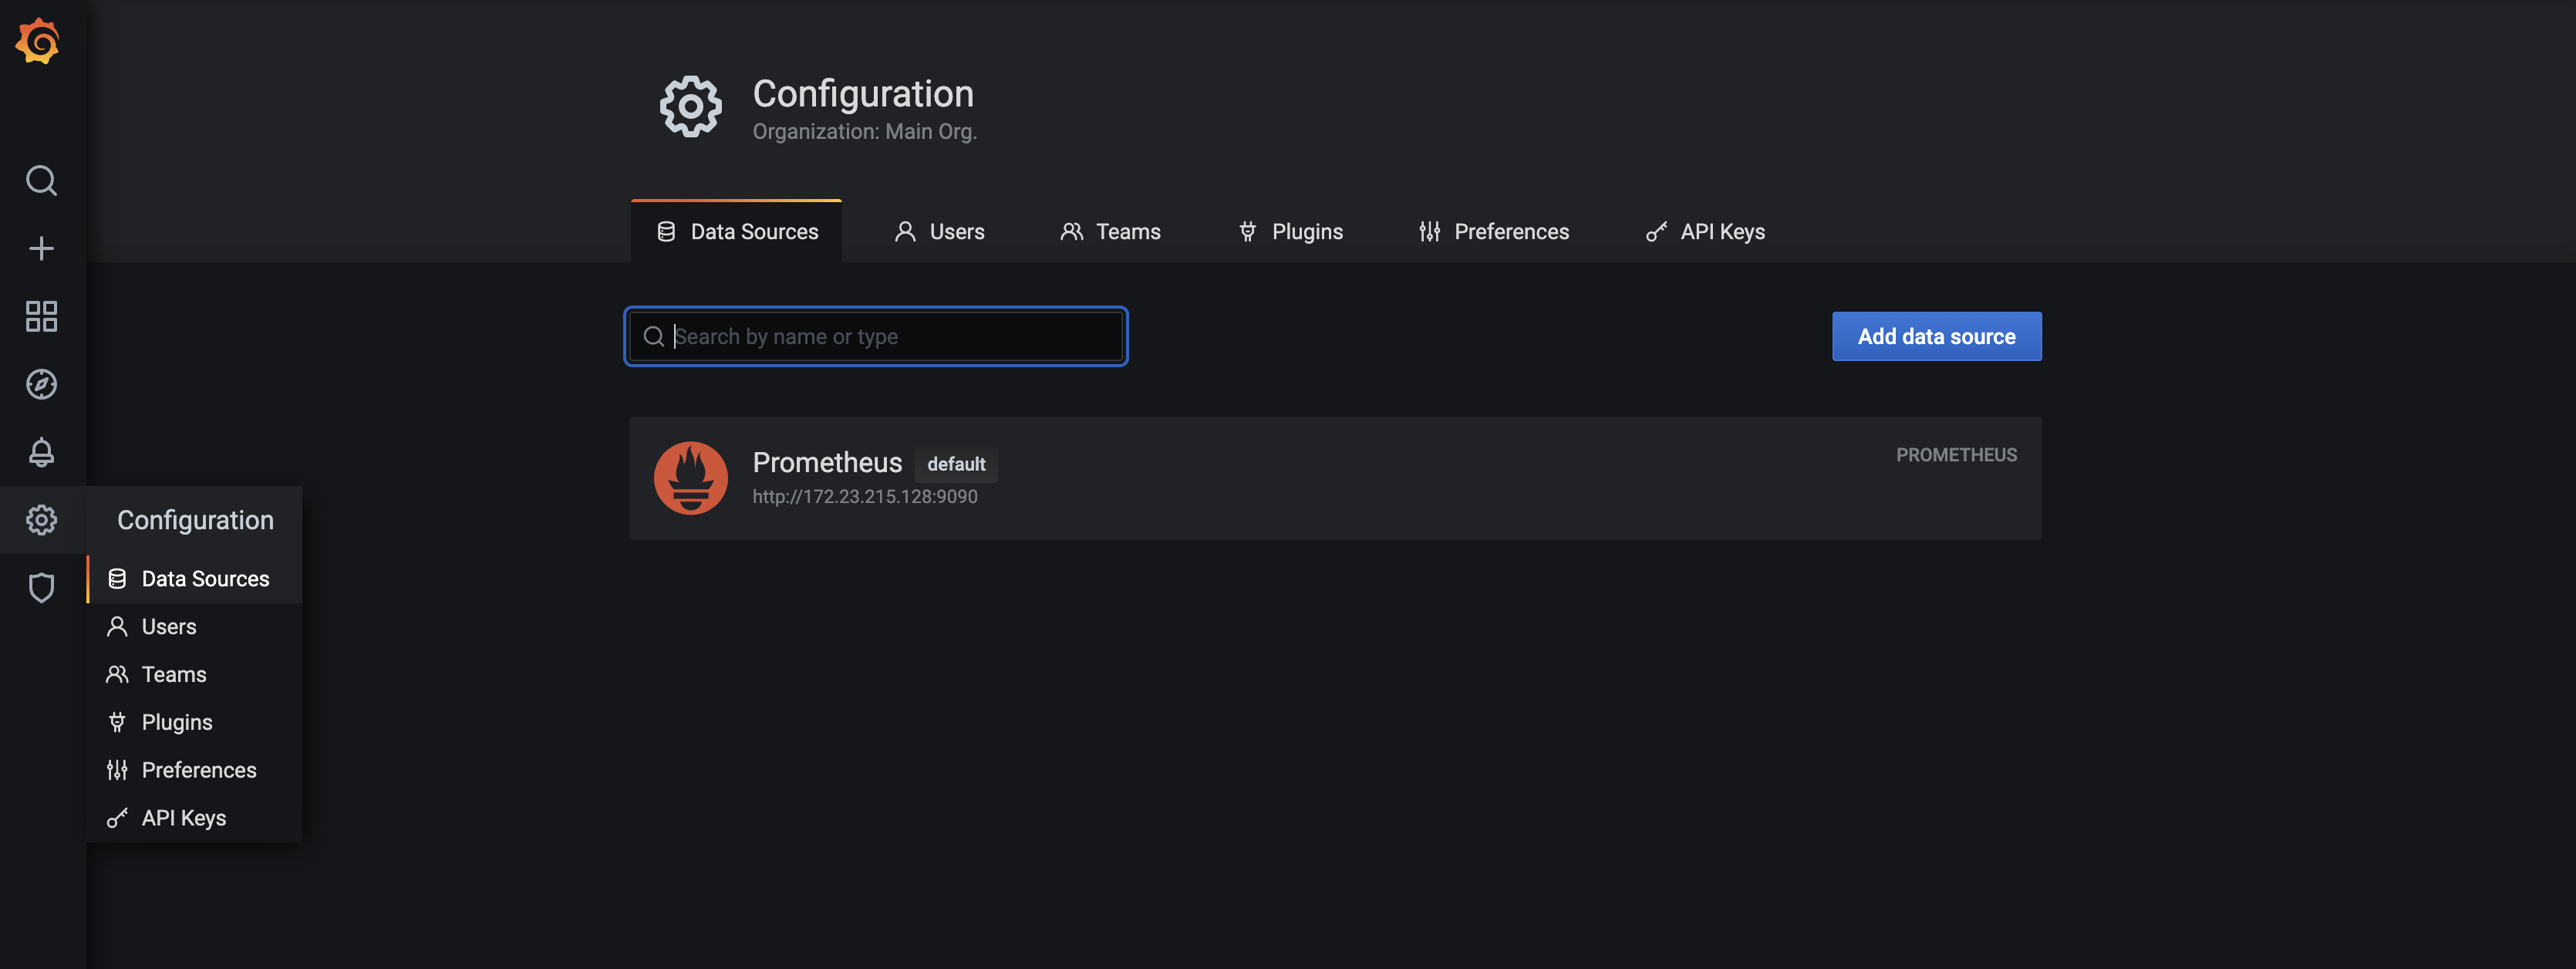
- fill in all the prometheus server information
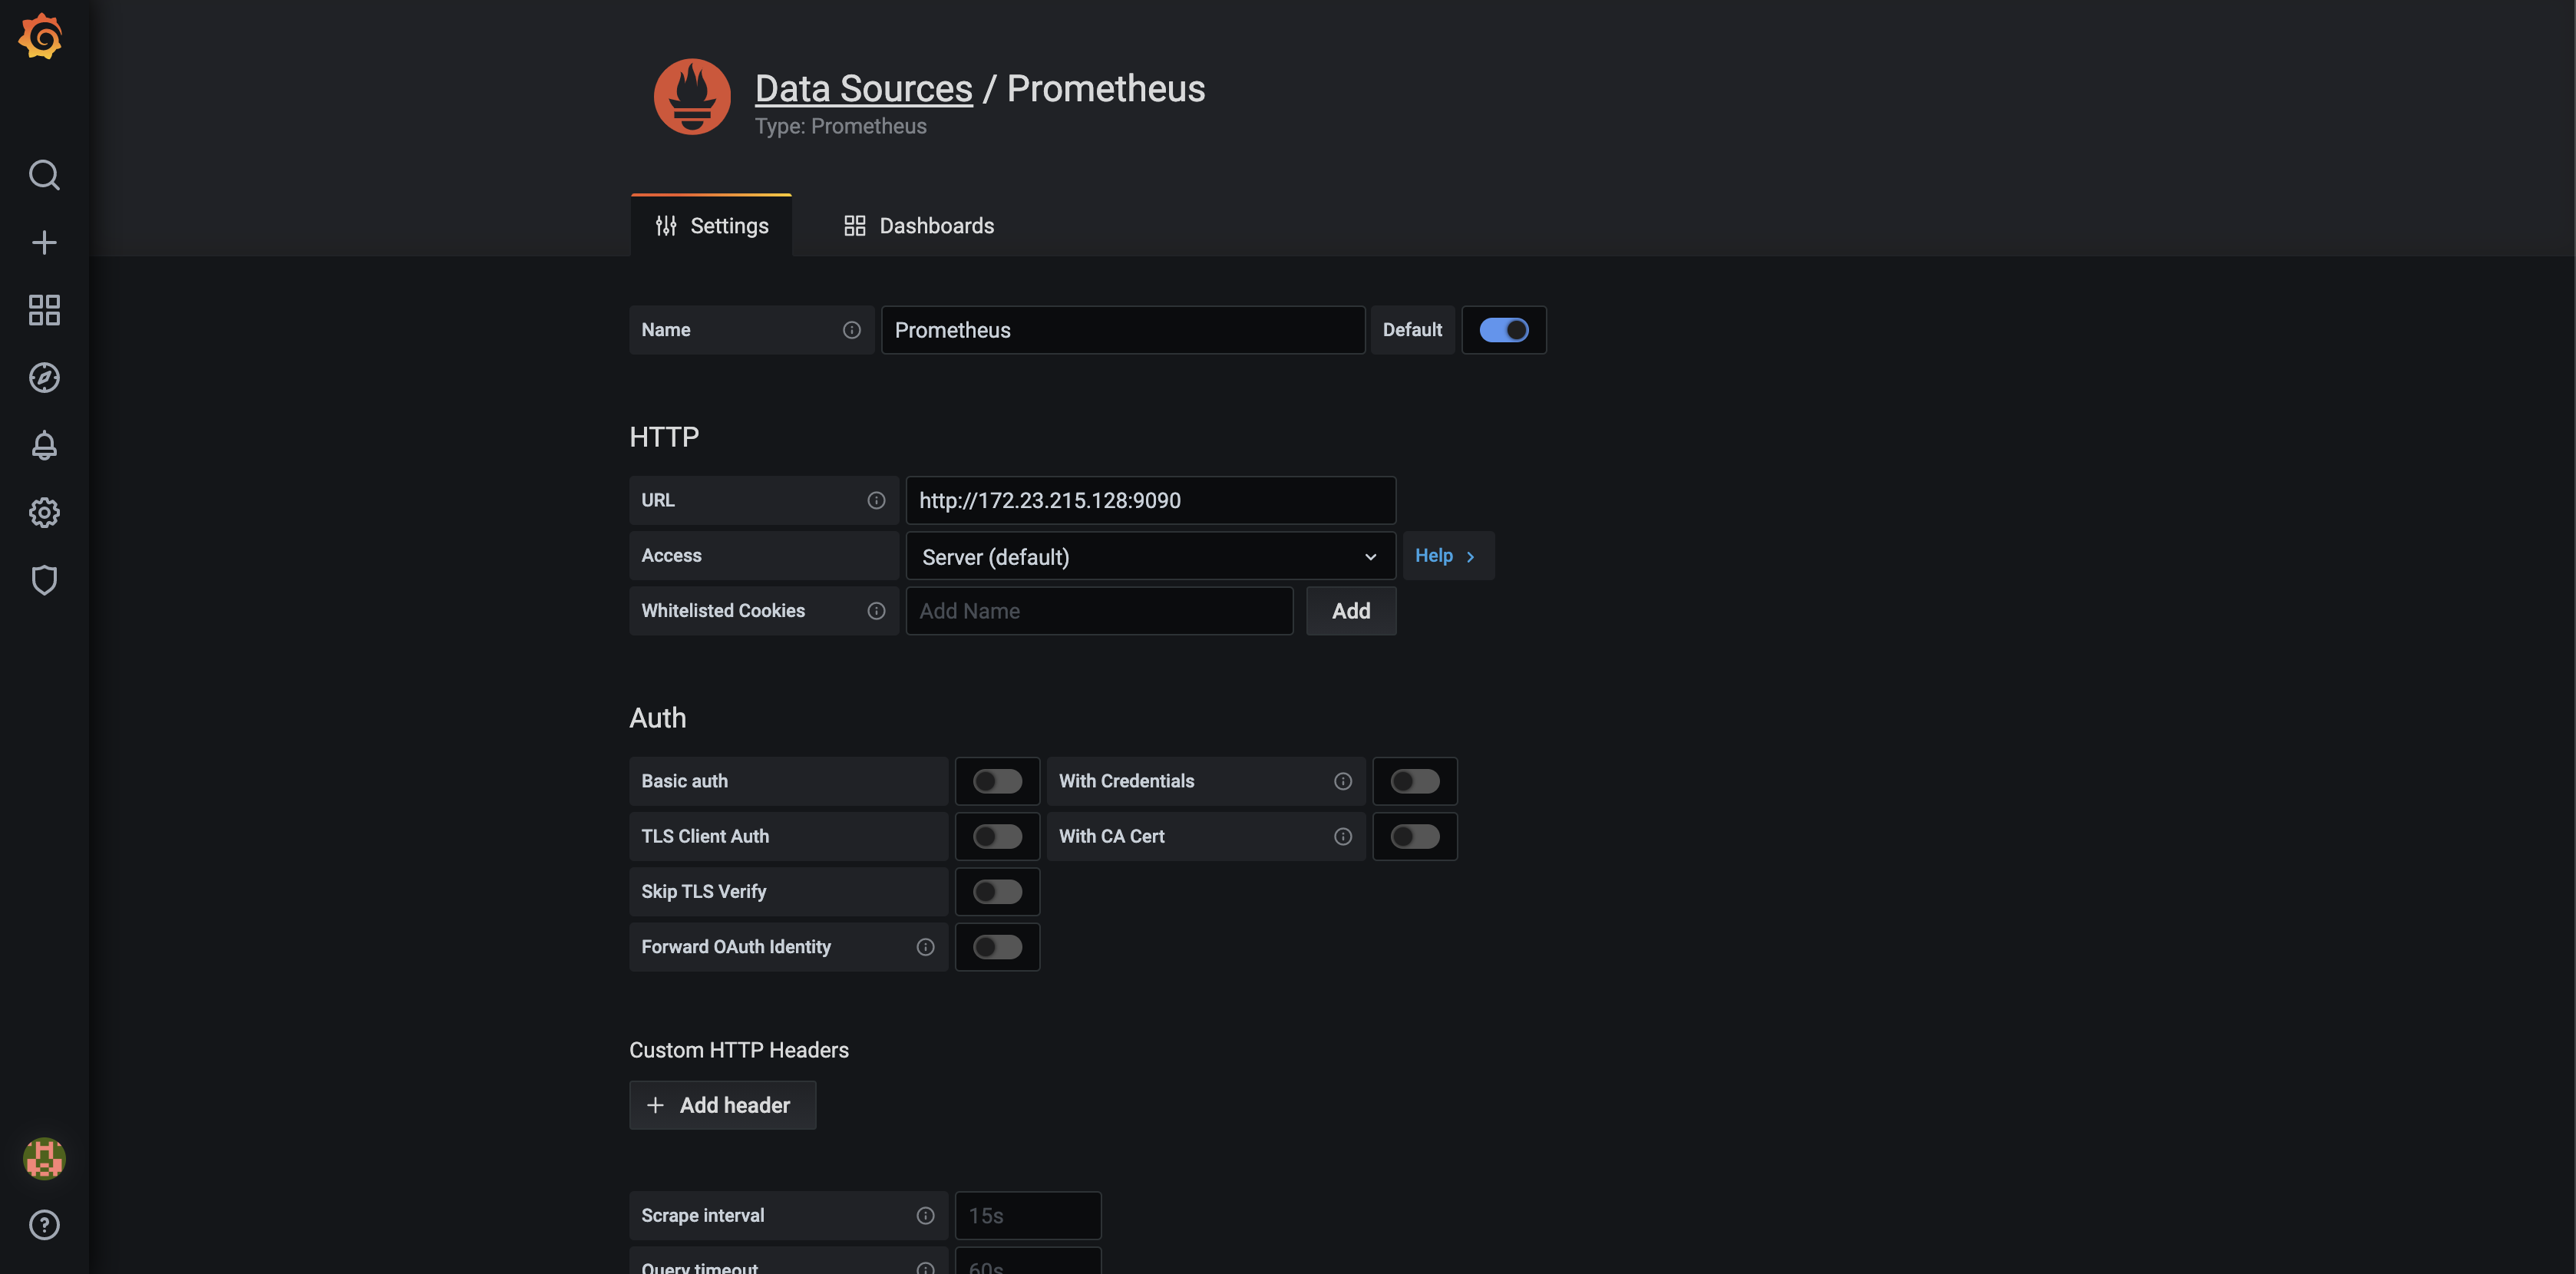
- check the the data source is defined correctly by clicking the "Save & test" button
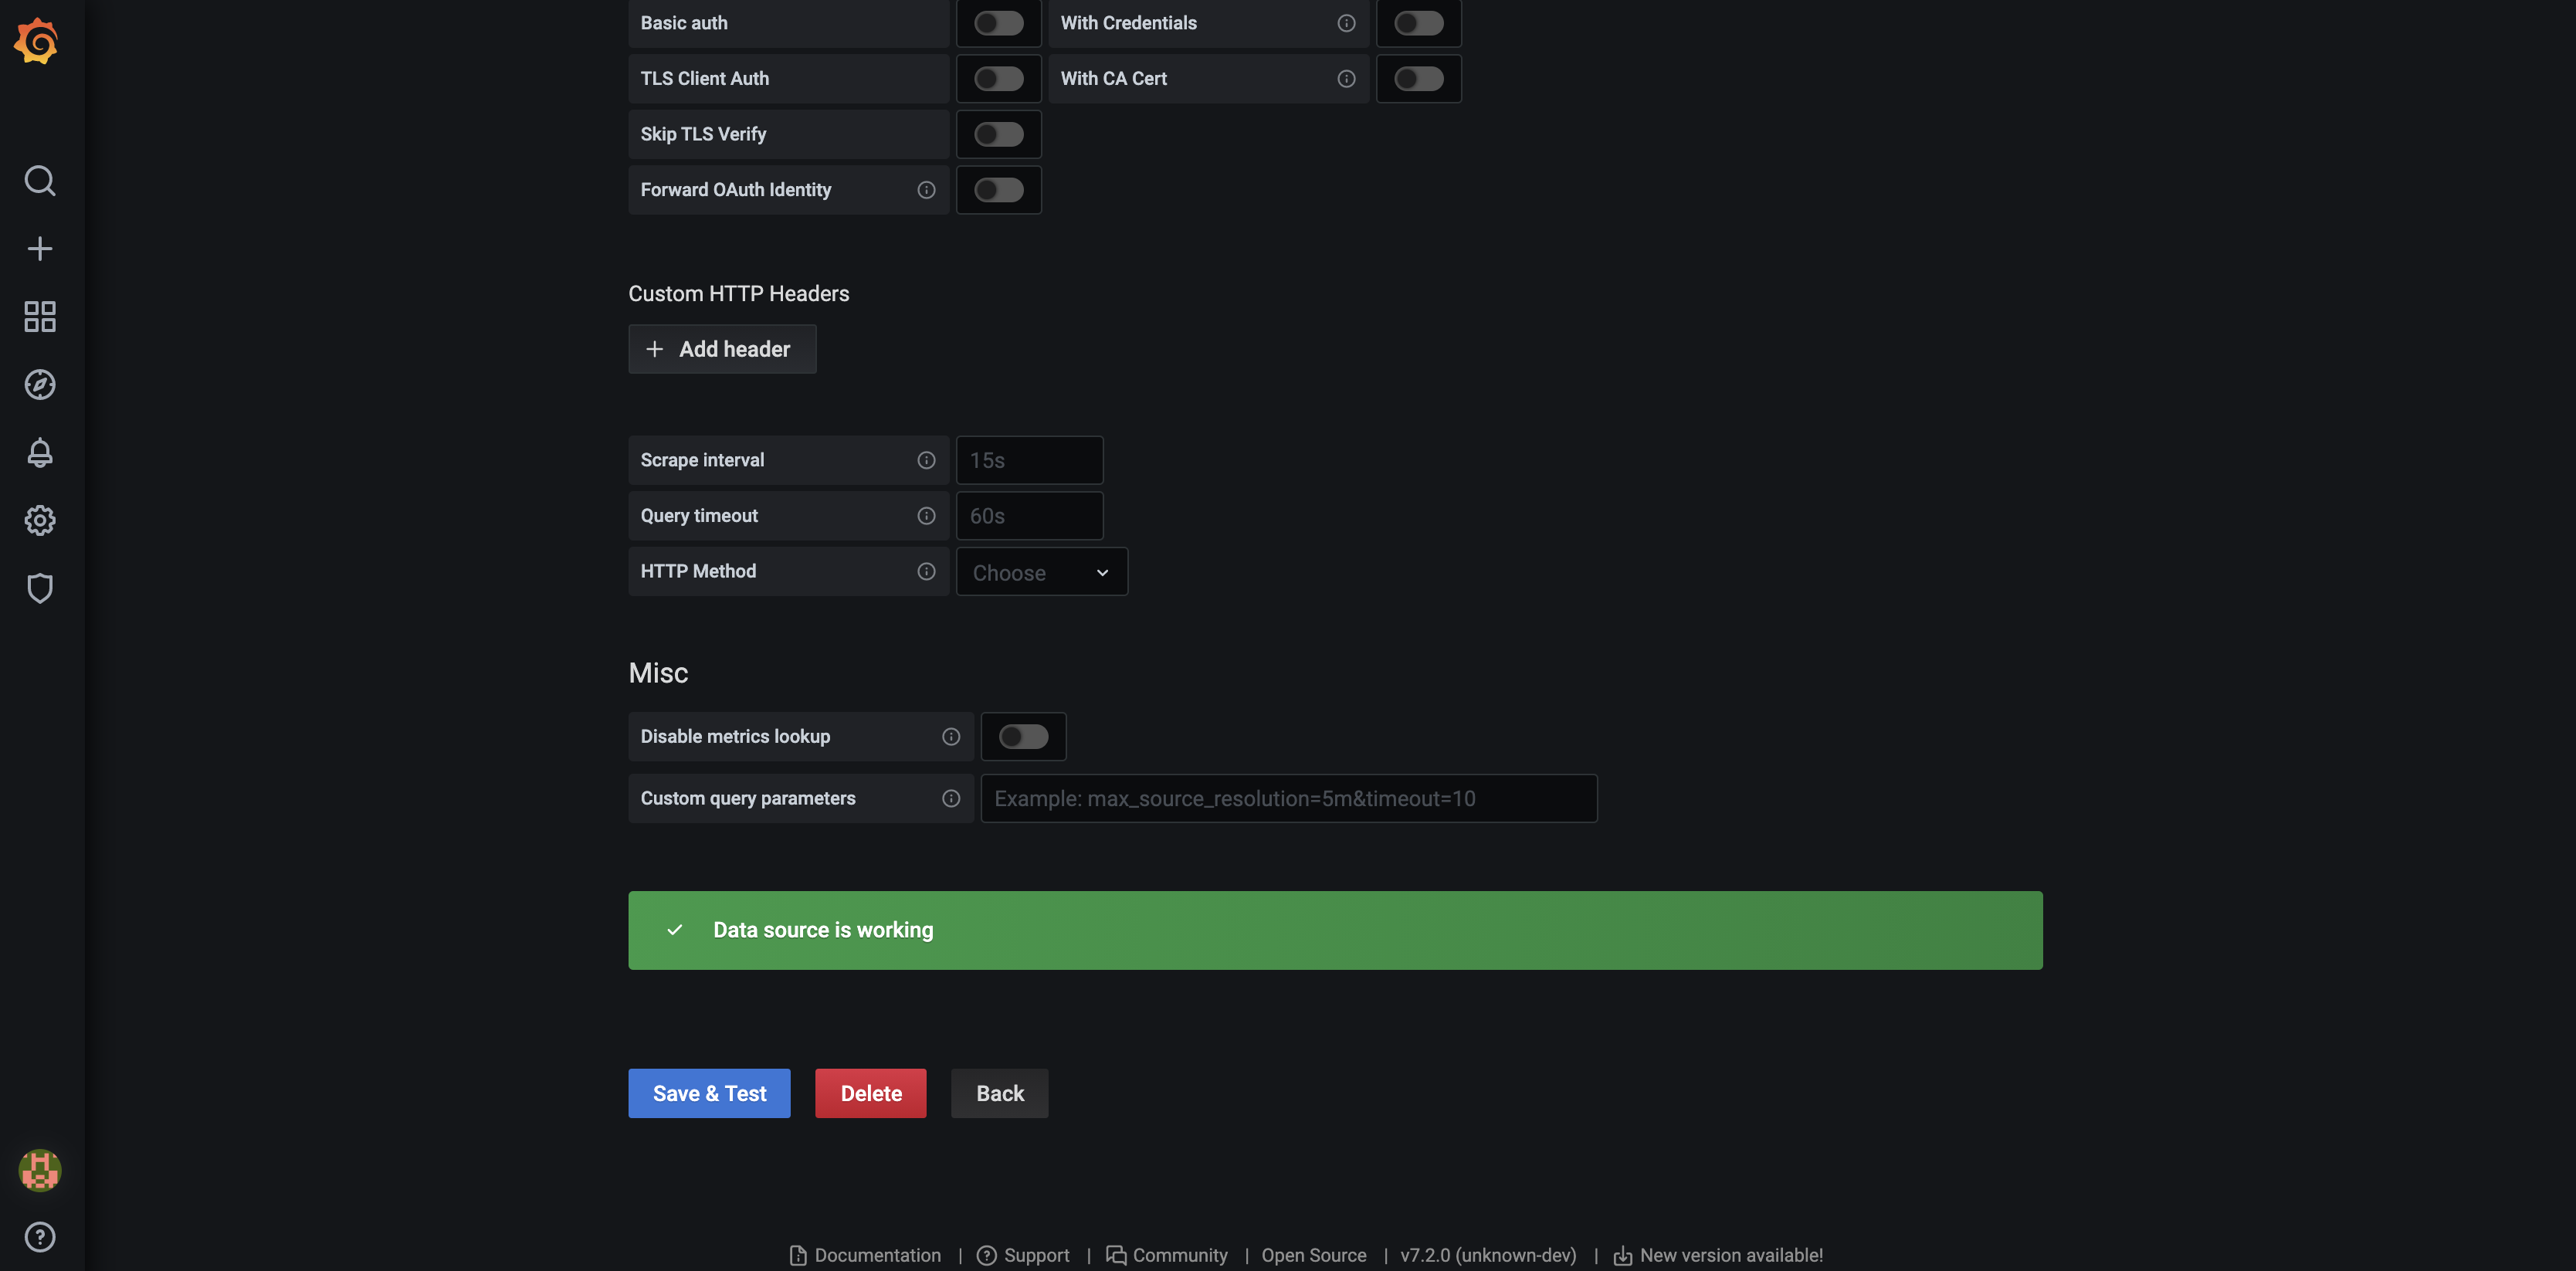
At that point your Grafana and Prometheus are correctly binded.
- now you need to import "RARE/freeRouter interface bytes" dashboard

- download freeRouter interface bytes dashboard here
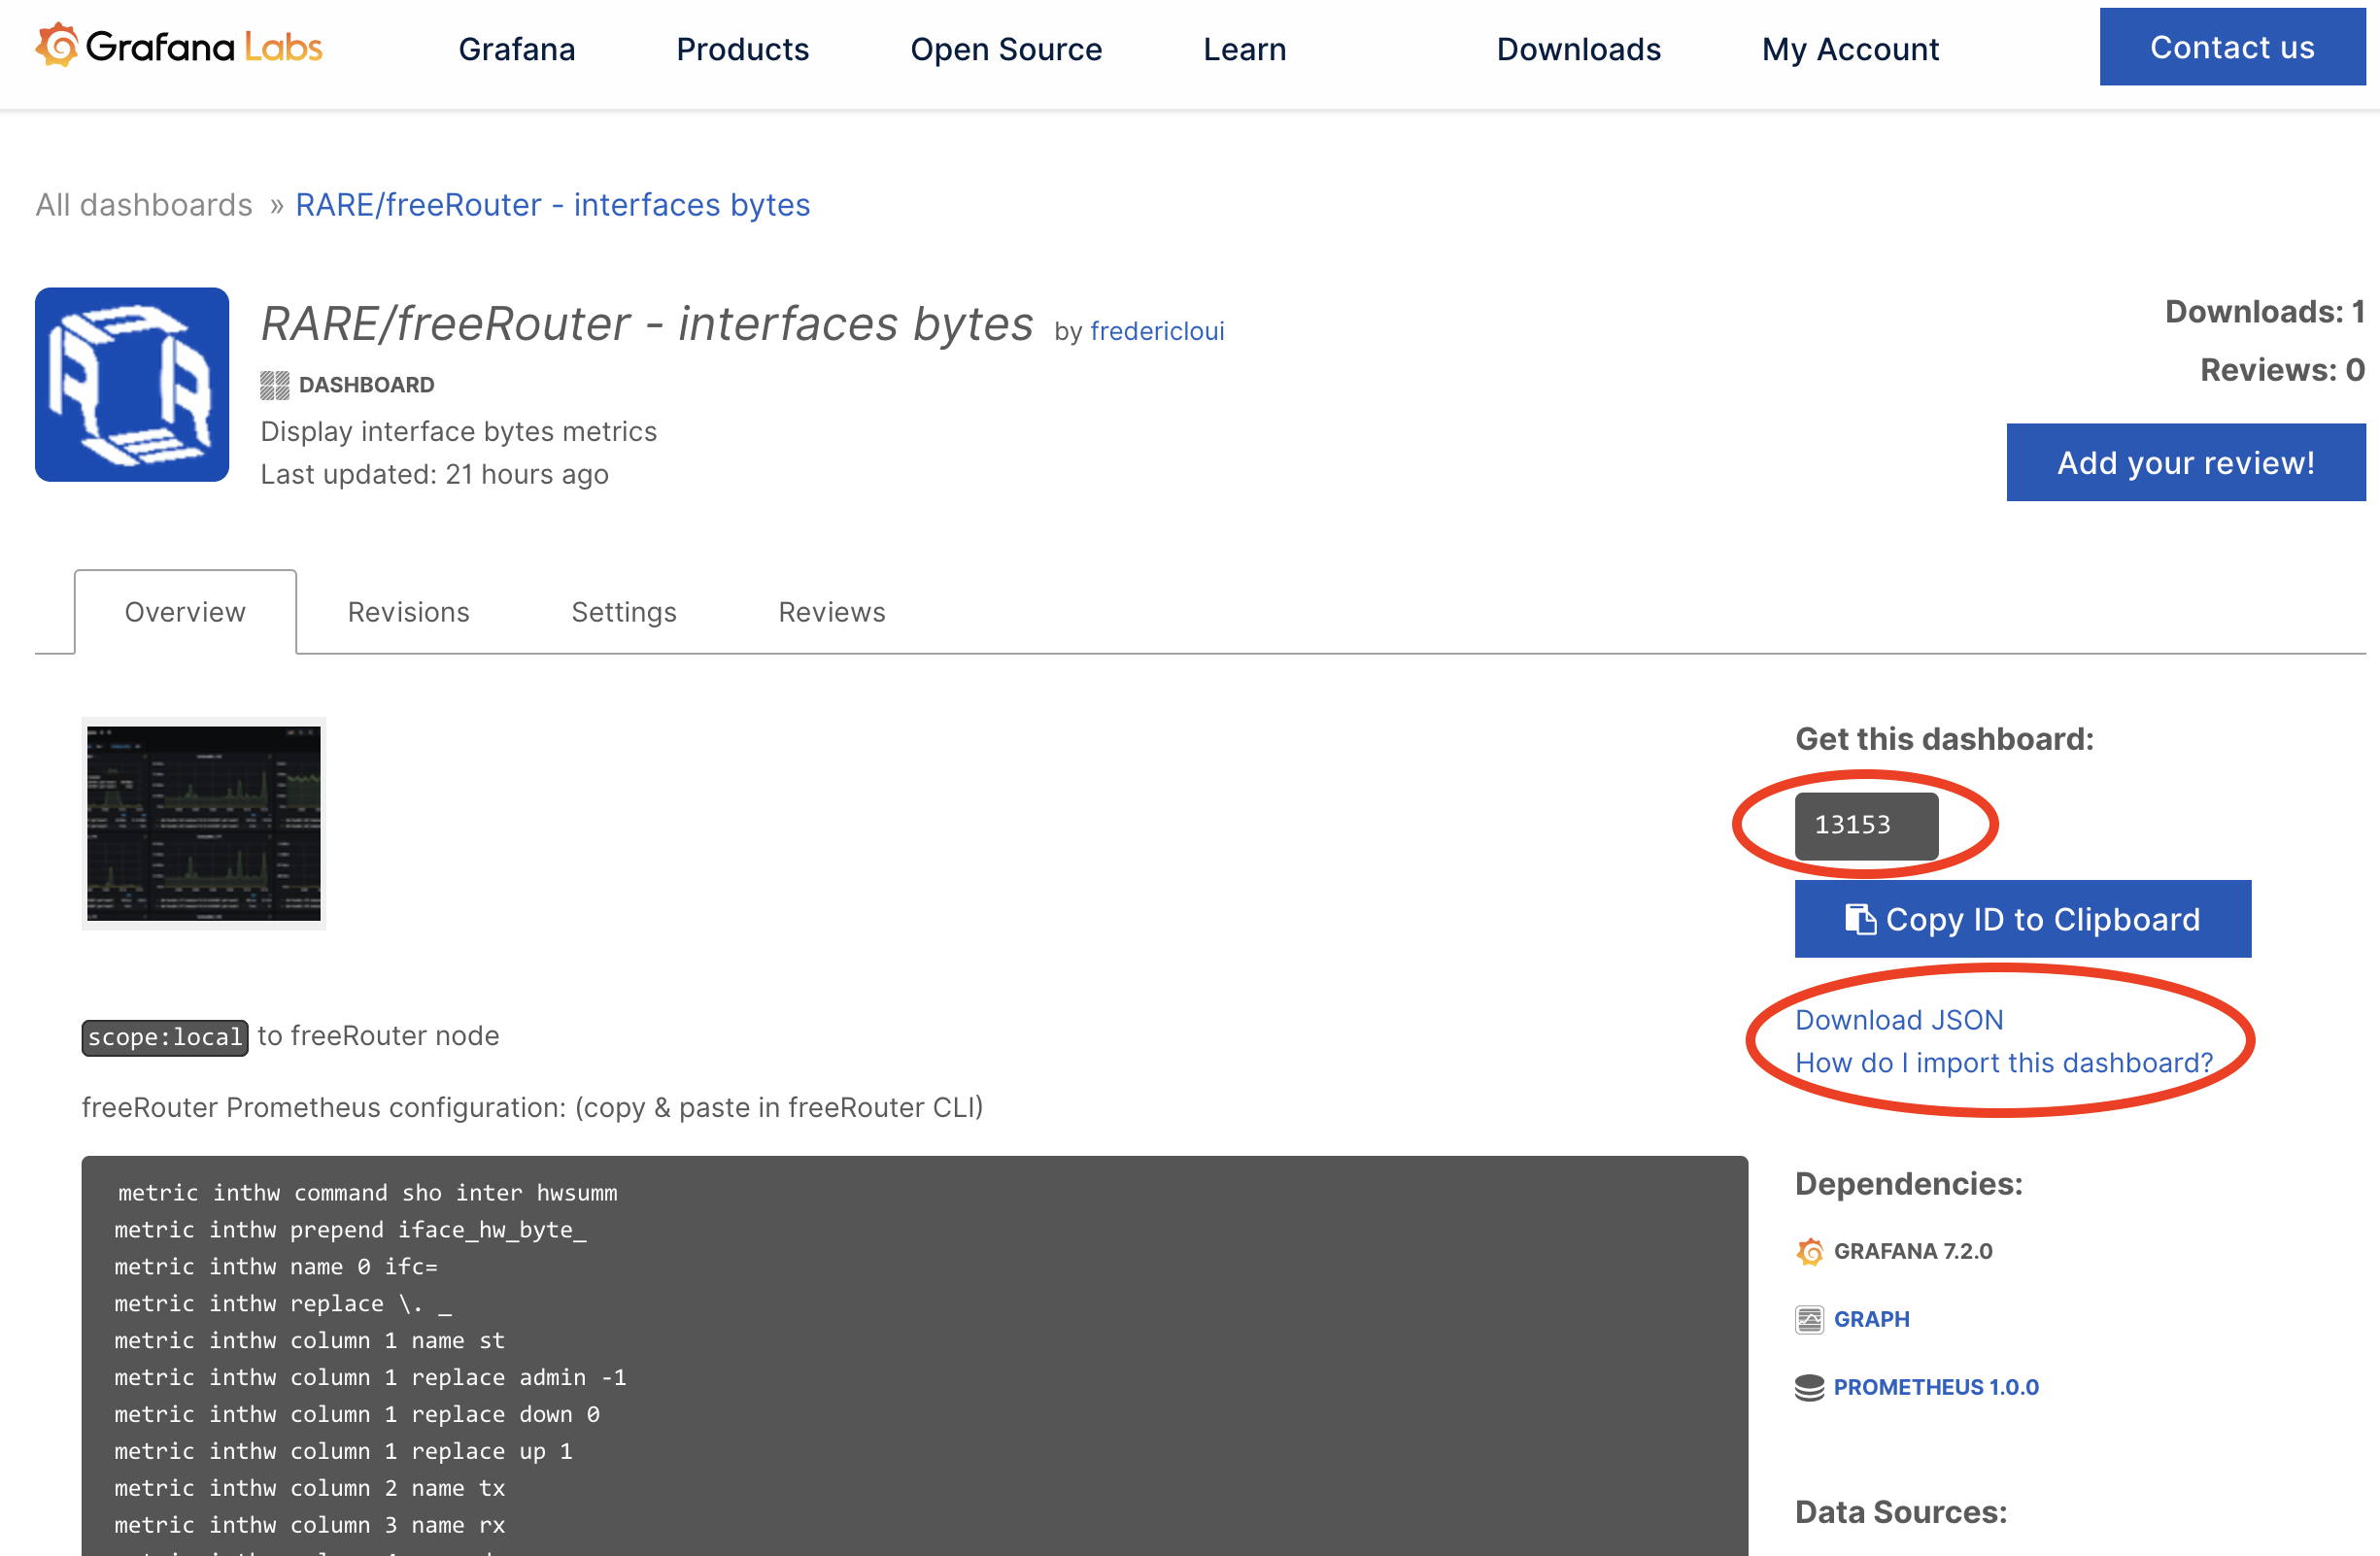
- import the dashboard via ID or simply download JSON or use JSON panel

And Voila !
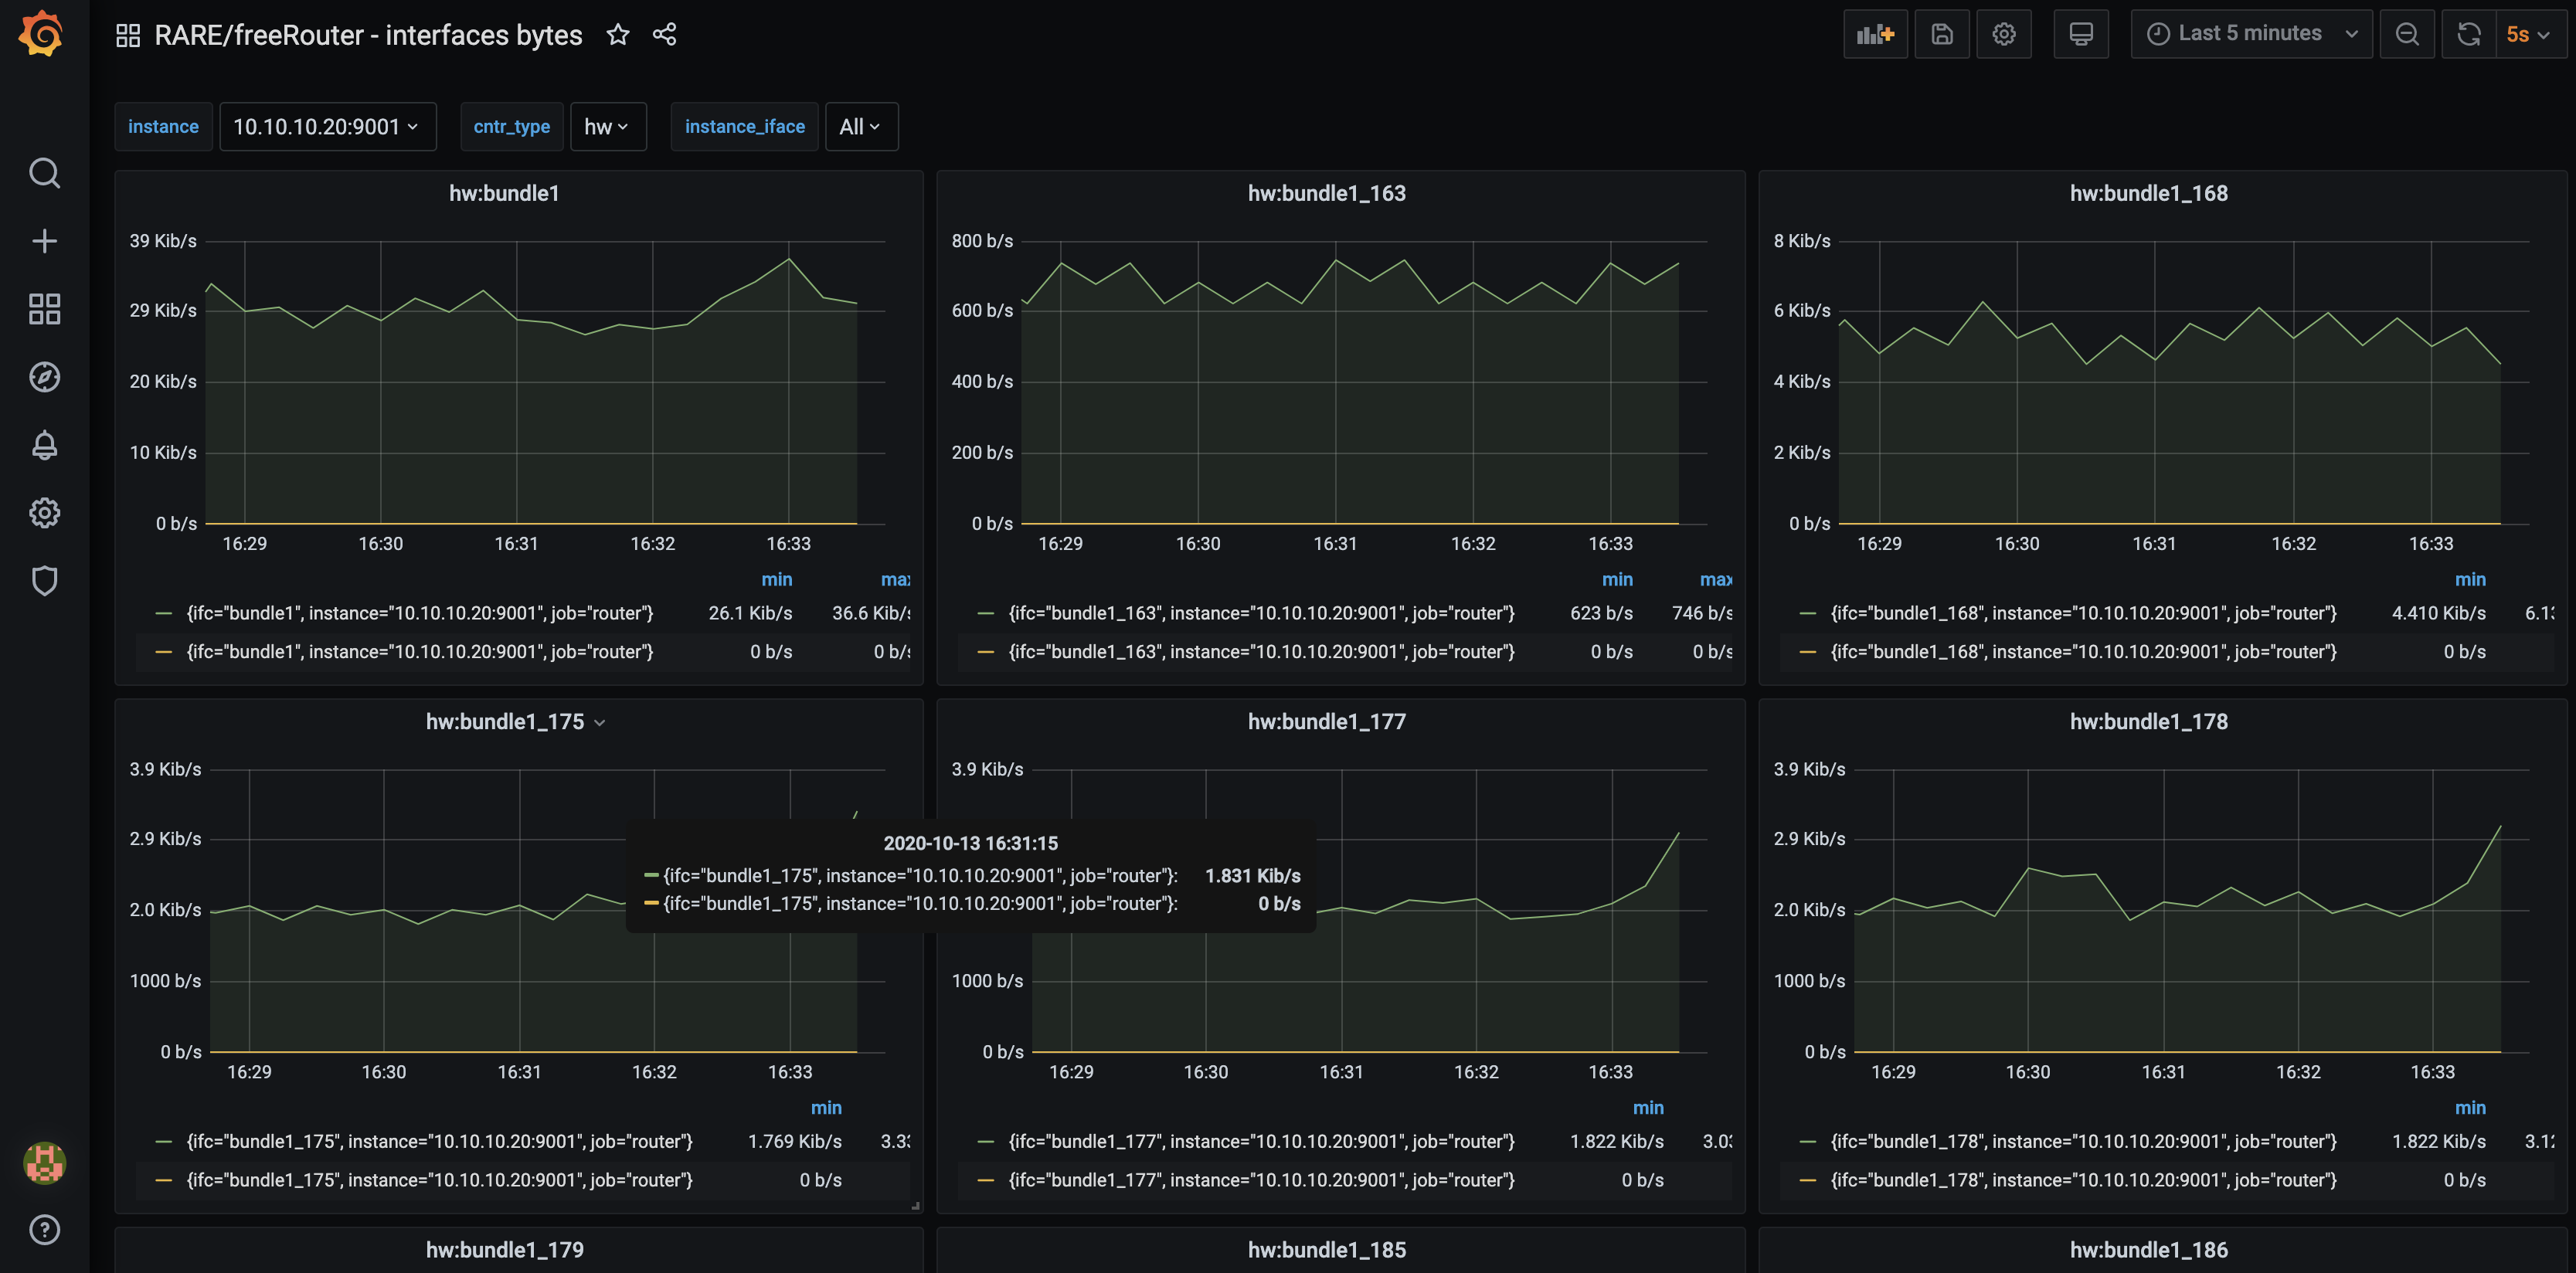
In order to immediately see the graph zoom in to 5m period with a refresh of 5s and you should see automagically the interface bytes TX/RX on all interface for each targets.
Discussion
This example related to interface metrics is universal, as the metrics at freeRouter level are yielded through a generic CLI command:
- "show interface hwsummary"
- or "show interface swsummary".
However some metrics cannot be retrieved by generic interface. Some metrics will be tied to specificities of your network. These can be the AS number, IGP process name, VRF name etc.
Let me give you a couple of examples:
Conclusion
In this 1st article, you were presented :
- freeRouter/Prometheus integration
- How to add a new router in the list of Prometheus target
- How to integrate a RARE/freeRouter Grafana Dashboard. (Feel free to adapt the other available dashboard query to your context !)
Final words
In Prometheus philosophy, normally the user should do only the minimum of tweaking regarding configuration. Ultimately, he should be only be able to enable a metric or simply disable it if the scrape cost is too high. However in freeRouter/Prometheus integration process, you see that some metric are issued using specific $variable (VRF, BGP/IGP process number ...) Which makes impossible to maintain this universality. However, from the network operator point of view this should not be a showstopper. On the contrary, it is a powerful choice to be able to alter these command via $variables.
Remember in freeRouter philosophy you can have multiple VRF, multiple IGP and multiple BGP process number ! (Which is not the case for all routing platform)
Last but not least, this Prometheus agent was developed quickly because of one reason, all the objects at the control plane level were already well structured in table form as previously described in this article. So implementing this table row/column logic in order to derive a prometheus metric was technically possible without too much hassle.
Requirement
|
|

Overview
We all have our habits that are inherited from our past experience. Some people are used to IOS, IOS-XR, NX-OX, IOS-XE others prefer Junos etc. Using freeRouter provides a different user experience. Some feature such as show/view/watch/differ diagnosis commands are pretty unique to freeRouter. However, freeRouter have some cards in its sleeves in order to provide you a familiar experience.
Article objective
In this article, we will focus on these features:
- monitor
- length
- width
- spacetab
- tablemode
- timestamps
- colorized
Basically these commands are accessed through freeRouter user mode. If you need to use them from config mode, please use the "do" keyword.
[ #003 ] - "monitor/length/width/spacetab/tablemode/timestamps/colorized"
"terminal colorized" will simply color your prompt

Discussion
monitor/length/width/spacetab/tablemode/timestamps/colorized is a set of feature meant to ease your experience with freeRouter in mimic'ing well know behaviour and proposing you additional convenient features. One main behaviour is that all command issue from the CLI is instantly taken into account.
Conclusion
In this 3rd article:
- We presented freeRouter monitor/length/width/spacetab/tablemode/timestamps/colorized terminal customization command
- These are very useful if you come from Cisco or Junos world as it mimic some termnal behaviour.
Final words
As said, these are terminal commands are not specific to freeRouter. Some behaviour are mimic'ed from IOS and Junos. Anyway, these have been developed for one purpose:
"Make network engineers feel at ease and provide then an enjoyable operation experience "
Feel free to try and use them according to your environment taste!
Last but not least, you can play with these different mode from this sandbox:
telnet dl.nop.hu
Trying 193.224.23.5...
Connected to dl.nop.hu.
Escape character is '^]'.
XXXXXXXXXXXXXXXXXXXXXXXXXXXXXXXXXXXXXXXXXXXXXXXXXXXXXXXXXXXX
XXXXXXXXXXXXXXXXXXXXXXXXXXXXXXXXXXXXXXXXXXXXXXXXXXXXXXXXXXXX
XXXX XXXXX XXX    XXX     XXX XX XX XXXX XXXXXXXXXXXXXXXXXXX
XXXX  XXXX XX XXXX XX XXXX XX XX XX XXXX XXXXX/~~~~~~\XXXXXX
XXXX X XXX XX XXXX XX XXXX XX XX XX XXXX XXXX| player |XXXXX
XXXX XX XX XX XXXX XX     XXX    XX XXXX XXXXX\______/XXXXXX
XXXX XXX X XX XXXX XX XXXXXXX XX XX XXXX XXXXXXXXXXXXXXXXXXX
XXXX XXXX  XX XXXX XX XXXXXXX XX XX XXXX XXXXXXXXXXXXXXXXXXX
XXXX XXXXX XXX    XXX XXX XXX XX XXX    XXXXXXXXXXXXXXXXXXXX
XXXXXXXXXXXXXXXXXXXXXXXXXXXXXXXXXXXXXXXXXXXXXXXXXXXXXXXXXXXX
XXXXXXXXXXXXXXXXXXXXXXXXXXXXXXXXXXXXXXXXXXXXXXXXXXXXXXXXXXXX
welcome
line ready
menu lab:
# - reboot router1
$ - reboot router2
% - reboot router3
1 - connect to router1
2 - connect to router2
3 - connect to router3
^ - rebuild routers
l - connect to lg.nop.dn42
x - exit
choose:1 - attach vdc lab1

welcome
line ready
yourname#terminal ?
  colorized  - sending to ansi terminal
  length     - set terminal length
  monitor    - log to this terminal
  no         - negate a parameter
  spacetab   - treat space as tabulator
  tablemode  - select table formatting mode
  timestamps - put time before each executed command
  width      - set terminal width

yourname#terminal
...
In order to exit the sandbox session use the following escape sequence: Ctrl-c + Ctrl-x

Requirement
|
|

Overview
As previously mentioned in the precedent article, when you log into a network equipment such as a router, you tend to have some automatic reflex. You usually:
- Check router configuration: show run or sh conf
- Check ipv4 / ipv6 / or LFIB forwarding table
- So you basically issue diagnosis, troubleshooting command
- An then you want to configure the router
Article objective
In this article, we will focus on the 3rd bullet point and will present you freeRouter available diagnosis command. They are grouped into 5 categories:
- show
- view
- watch
- display
- differ
Basically these commands are accessed through freeRouter user mode. If you need to use them from config mode, please use the "do" keyword.
[ #002 ] - "show/view/watch/display/differ"
You would mostly be familiar with the "show" command. It is very good and can basically be used to get output from control plane object. Most of the time this can be used against static object like config.
Let's assume that I would like to get BGP config from my home router:
show running-config bgp4
router bgp4 42
 vrf dn42
 local-as 4242421975
 router-id 172.22.105.65
 address-family unicast multicast other flowspec vpnuni vpnmlt vpnflw ovpnuni ovpnmlt ovpnflw vpls mspw evpn mdt srte mvpn omvpn
 neighbor 172.23.215.177 remote-as 4242421955
 neighbor 172.23.215.177 description NOP.DN42
 neighbor 172.23.215.177 local-as 4242421975
 neighbor 172.23.215.177 address-family unicast multicast other flowspec vpnuni vpnmlt vpnflw ovpnuni ovpnmlt ovpnflw vpls mspw evpn mdt srte mvpn omvpn
 neighbor 172.23.215.177 distance 20
 justadvert loopback42
 exit
But I can also check the status of BGP peering into VRF dn42
show ipv4 bgp 42 summary
as          learn  done  ready  neighbor        uptime
4242421955  517    518   true   172.23.215.177  00:38:18
Check the same BGP peering but now for IPv6
r1#show ipv6 bgp 42 summary
as          learn  done  ready  neighbor             uptime
4242421955  351    352   true   fd40:cc1e:c0de::151  00:40:40
show ipv4 bgp 42 summary
as          learn  done  ready  neighbor        uptime
4242421955  517    518   true   172.23.215.177  00:38:18
Let's see some BGP prefix received in VRF dn42 bgp table:
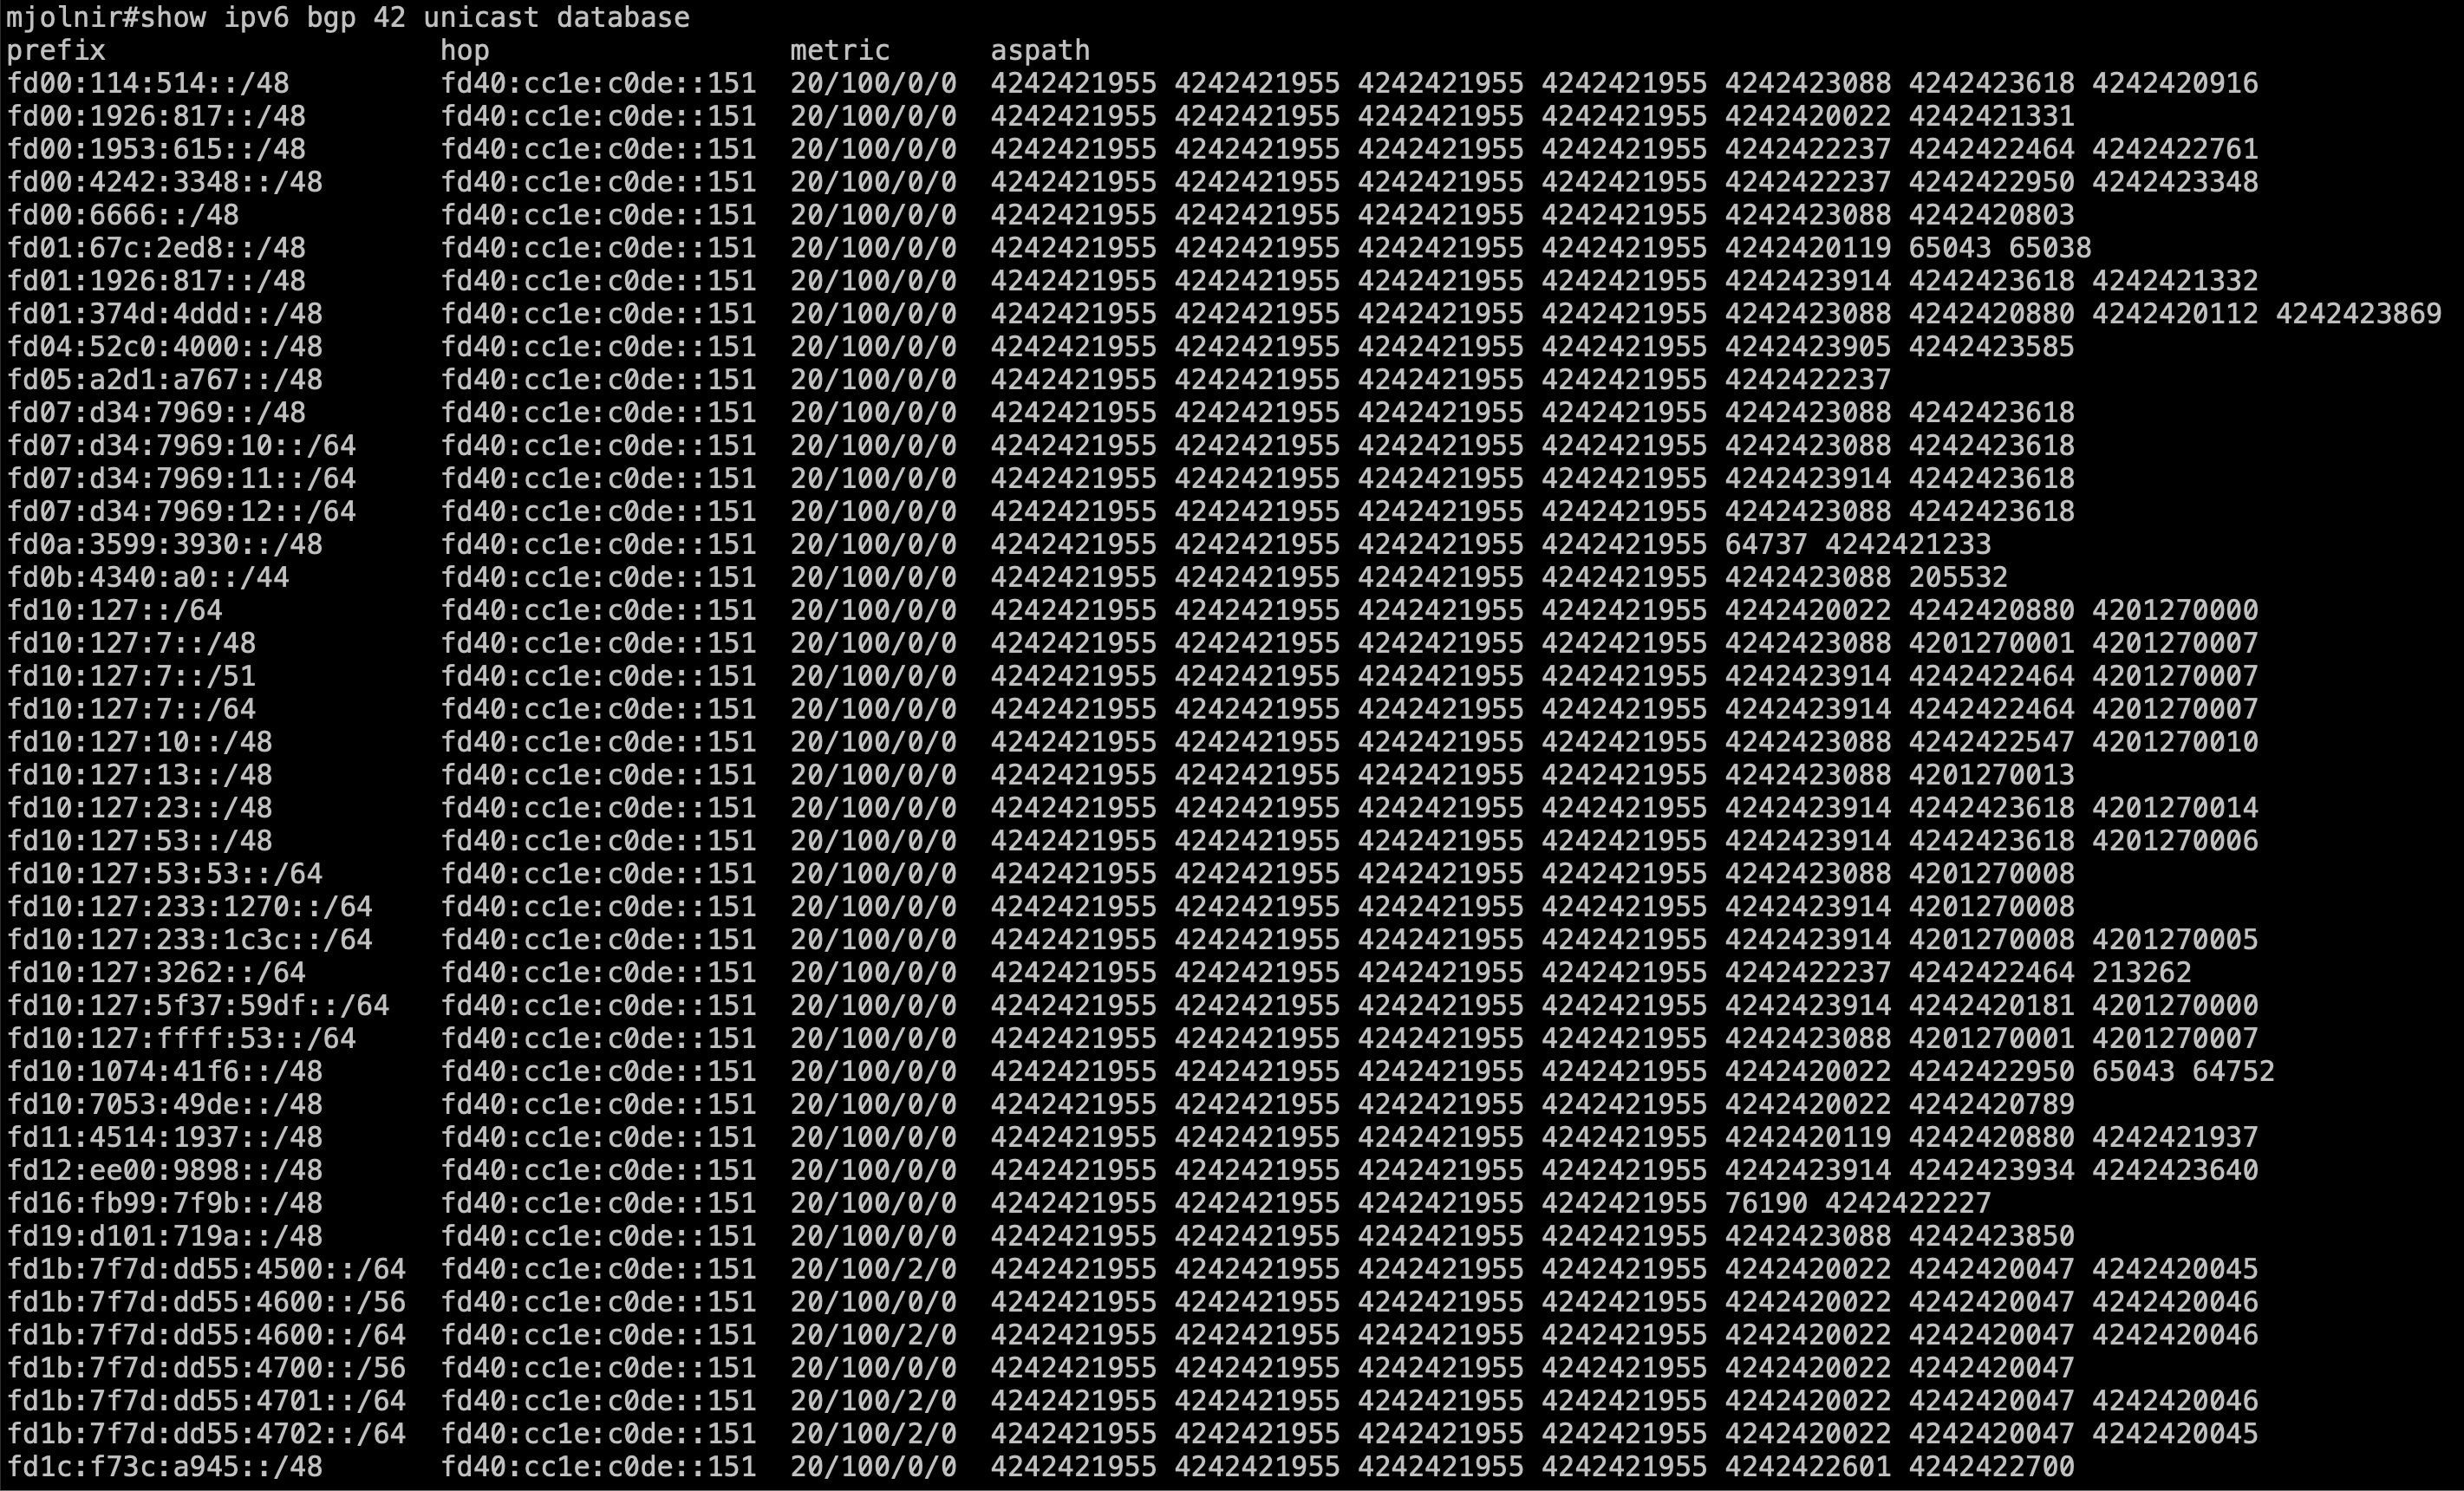
so my screen is too small for all the IPv6 BGP prefix into DN42 VRF
As a last example, something we usually do as network operators is to check ongoing interface traffic level:
r1#sh int sdn1
sdn1 is up (since 09:41:21, 2 changes)
 description: mjolnir@LAN1[01:00.0]
 type is sdn, hwaddr=003b.7671.764f, mtu=1500, bw=8000kbps, vrf=inet
 ip4 address=192.168.0.90/24, netmask=255.255.255.0, ifcid=10013
 ip6 address=2a01:e0a:159:2850::666/64, netmask=ffff:ffff:ffff:ffff::, ifcid=10013
 received 52013 packets (17638316 bytes) dropped 5 packets (448 bytes)
 transmitted 80765 packets (15101696 bytes) promisc=false macsec=false

r1#sh int sdn1
sdn1 is up (since 09:41:22, 2 changes)
 description: mjolnir@LAN1[01:00.0]
 type is sdn, hwaddr=003b.7671.764f, mtu=1500, bw=8000kbps, vrf=inet
 ip4 address=192.168.0.90/24, netmask=255.255.255.0, ifcid=10013
 ip6 address=2a01:e0a:159:2850::666/64, netmask=ffff:ffff:ffff:ffff::, ifcid=10013
 received 52013 packets (17638316 bytes) dropped 5 packets (448 bytes)
 transmitted 80766 packets (15101778 bytes) promisc=false macsec=false

r1#sh int sdn1
sdn1 is up (since 09:41:24, 2 changes)
 description: mjolnir@LAN1[01:00.0]
 type is sdn, hwaddr=003b.7671.764f, mtu=1500, bw=8000kbps, vrf=inet
 ip4 address=192.168.0.90/24, netmask=255.255.255.0, ifcid=10013
 ip6 address=2a01:e0a:159:2850::666/64, netmask=ffff:ffff:ffff:ffff::, ifcid=10013
 received 52015 packets (17638418 bytes) dropped 5 packets (448 bytes)
 transmitted 80766 packets (15101778 bytes) promisc=false macsec=false
In the last example we repeatedly issue the "sh int sdn1" command and try to see if TX/RX packets counters increment or not.
This command can be improved in order to be less chatty:
r1#sh int sdn1 | i received|transmitted
 received 52256 packets (17681204 bytes) dropped 5 packets (448 bytes)
 transmitted 81130 packets (15162642 bytes) promisc=false macsec=false

r1#sh int sdn1 | i received|transmitted
 received 52256 packets (17681204 bytes) dropped 5 packets (448 bytes)
 transmitted 81130 packets (15162642 bytes) promisc=false macsec=false

r1#sh int sdn1 | i received|transmitted
 received 52260 packets (17681496 bytes) dropped 5 packets (448 bytes)
 transmitted 81132 packets (15162790 bytes) promisc=false macsec=false
Same goes if want want interface traffic for all interface
show interfaces summary
interface   state  tx        rx        drop
loopback0   up     65856     0         0
loopback42  up     65856     0         0
ethernet0   up     31071917  33183183  0
hairpin41   up     85806     85552     0
hairpin42   up     85806     85552     0
sdn1        up     15200591  17703953  448
sdn2        up     15563546  8000994   794
sdn3        admin  0         0         0
sdn4        admin  0         0         0
sdn5        admin  0         0         0
sdn6        admin  0         0         0
sdn998      up     5850      0         0
sdn999      up     23268     18666     0
tunnel1965  up     5222281   7124950   0
Above was to check interface status related to software switched packet. What if I want to check hardware switched packet counters switched by P4 or DPDK ?
show interfaces hwsummary
interface   state  tx         rx         drop
hairpin41   up     0          0          0
hairpin42   up     0          0          0
sdn1        up     317902736  590402538  1162971
sdn2        up     574923844  310497399  203
sdn3        admin  0          0          0
sdn4        admin  0          0          0
sdn5        admin  0          0          0
sdn6        admin  0          0          0
sdn998      up     9062       0          0
sdn999      up     103804     64470      0
tunnel1965  up     0          1301312    0
Note
As a network operator, the "show" command is your best friend, your wingman. Just explore now from freeRouter CLI using "show ?" and you'll understand the amazing list of diagnosis command available.
In my previous examples, the output of "show ipv4 bgp 42 unicast database" command could not fit my window. Say hello to "view" keyword then !
Let's now try to get hardware counters as above:
r1#view ipv4 bgp 42 unicast database
...
Then you'll be able to see READ-ONLY text buffer where you can navigate and check the output that are beyond boundaries of your screen !

Note
"view" is similar to "show" but it will let you deal with a fixed buffer. "view" buffer won't be refreshed.
As mentioned above, "show" gives you diagnosis instant photo of a control plane object. In order to see counter increment, you'd have to issue "show" repeatedly. In order to avoid that, let me introduce you the "watch" command
Let's now try to get hardware counters as above:
r1#watch interfaces hwsummary
...
It will clear the terminal session and gives you the same outout as above but with counter updated in a regular basis

So in this example you'll see a live output with counter incrementing. In the screenshot it is not noticeable, but in real life this is bluffing. See watch interface pretty much like Junos "monitor" keyword.
So needless to say that "watch" is applicable to every control plane object such as BGP:

Amazing, don't you think ?
In my previous examples, the output of "show ipv4 bgp 42 unicast database" command could not fit my window. Say hello to "display" keyword then !
r1#display ipv4 bgp 42 unicast database
...
Then you'll be able to see READ-ONLY text buffer where you can navigate and check the output that are beyond boundaries of your screen !

As a side note, you can benefit from online help by pressing <f1>

You can press Ctrl+q in order to exit the editor. As the viewer is a READ-ONLY buffer
Note
Use "display" for output that have output that does not fit into your screen. "display" shows a buffer that is auto-refreshed similar to "watch". But instead the output is thrown into a buffer where you can navigate. But display, very useful to diagnoses object such as huge:
- ACL
- prefix-list
- route policy list
- route-map
As opposed to "view", "display" proposes an auto-refresh version of the buffer !
Last but not list. "differ" , this will split the window in 2 buffers reflecting the same output but with different version and it it signal line lines that have changed.
r1#diff ipv4 bgp 42 bestpath
...

With this view you can easily spot the differences between 2 advertisements interval.
To be honest, when i used this feature for the first time I was totally stumbled and said: Waouw ...
Simply amazing ...
Discussion
show/view/watch/display/differ is pretty unique to freeRouter, and is really meant to provide you the best user experience as a network operator ! These command have proven to be helpful, especially if you deal with huge feed. However, be careful when you are working with very big output such BGP full feed. This won't crash the router of course as we used to when we issued "debug ip packet" but it will for sure imply a high CPU usage due to regular refresh at the control plane level.
Conclusion
In this 2nd article:
- We presented freeRouter show/watch/display/differ diagnisis command
- These are very useful when you have to deal with huge command output buffer.
Final words
As said, these are diagnosis commands are specific to freeRouter. 2 decades of know how and network experience have been pushed into these feature codes. These have been developed for one purpose:
"Provide a unique operation experience to network engineers"
Feel free to try and use them according to your environment taste!
Last but not least, you can play with these different mode from this sandbox:
ssh dl.nop.hu -l random_user
Warning: Permanently added 'dl.nop.hu,193.224.23.5' (RSA) to the list of known hosts.
random_user@dl.nop.hu's password:
XXXXXXXXXXXXXXXXXXXXXXXXXXXXXXXXXXXXXXXXXXXXXXXXXXXXXXXXXXXX
XXXXXXXXXXXXXXXXXXXXXXXXXXXXXXXXXXXXXXXXXXXXXXXXXXXXXXXXXXXX
XXXX XXXXX XXX    XXX     XXX XX XX XXXX XXXXXXXXXXXXXXXXXXX
XXXX  XXXX XX XXXX XX XXXX XX XX XX XXXX XXXXX/~~~~~~\XXXXXX
XXXX X XXX XX XXXX XX XXXX XX XX XX XXXX XXXX| player |XXXXX
XXXX XX XX XX XXXX XX     XXX    XX XXXX XXXXX\______/XXXXXX
XXXX XXX X XX XXXX XX XXXXXXX XX XX XXXX XXXXXXXXXXXXXXXXXXX
XXXX XXXX  XX XXXX XX XXXXXXX XX XX XXXX XXXXXXXXXXXXXXXXXXX
XXXX XXXXX XXX    XXX XXX XXX XX XXX    XXXXXXXXXXXXXXXXXXXX
XXXXXXXXXXXXXXXXXXXXXXXXXXXXXXXXXXXXXXXXXXXXXXXXXXXXXXXXXXXX
XXXXXXXXXXXXXXXXXXXXXXXXXXXXXXXXXXXXXXXXXXXXXXXXXXXXXXXXXXXX
welcome
line ready
menu lab:
# - reboot router1
$ - reboot router2
% - reboot router3
1 - connect to router1
2 - connect to router2
3 - connect to router3
^ - rebuild routers
l - connect to lg.nop.dn42
x - exit
choose:l - telnet 172.23.199.110 23 /telnet
 - connecting to 172.23.199.110 23
 - securing connection

hi there!
try the following:
  show ipv4 route dn42
  show ipv6 route dn42
  show ipv4 bgp 65535 vpnuni summary
  show ipv6 bgp 65535 vpnuni summary
  show ipv4 bgp 65535 vpnuni database
  show ipv6 bgp 65535 vpnuni database
  show ipv4 bgp 65535 vpnuni allroute <prefix> 65535:42
  show ipv6 bgp 65535 vpnuni allroute <prefix> 65535:42
  show ipv4 logger 42 flapstat 10
  show ipv6 logger 42 flapstat 10
  show ipv4 bgp 65535 vpnuni flapstat 10
  show ipv6 bgp 65535 vpnuni flapstat 10
  show ipv4 bgp 65535 vpnuni flappath <prefix> 65535:42
  show ipv6 bgp 65535 vpnuni flappath <prefix> 65535:42
have fun!
mc36
welcome
line ready
player-dn42>
player-dn42>
...
Then issue a "diff" command:
player-dn42>diff ipv4 bgp 65535 vpnuni database 10.11.160.0/20 65535:42
...
You'll be rewarded by this diff out related to the command which means:
"show me the prefix status of 10.11.160.0/20 within BGP process 65535 with rd: 65535:42"
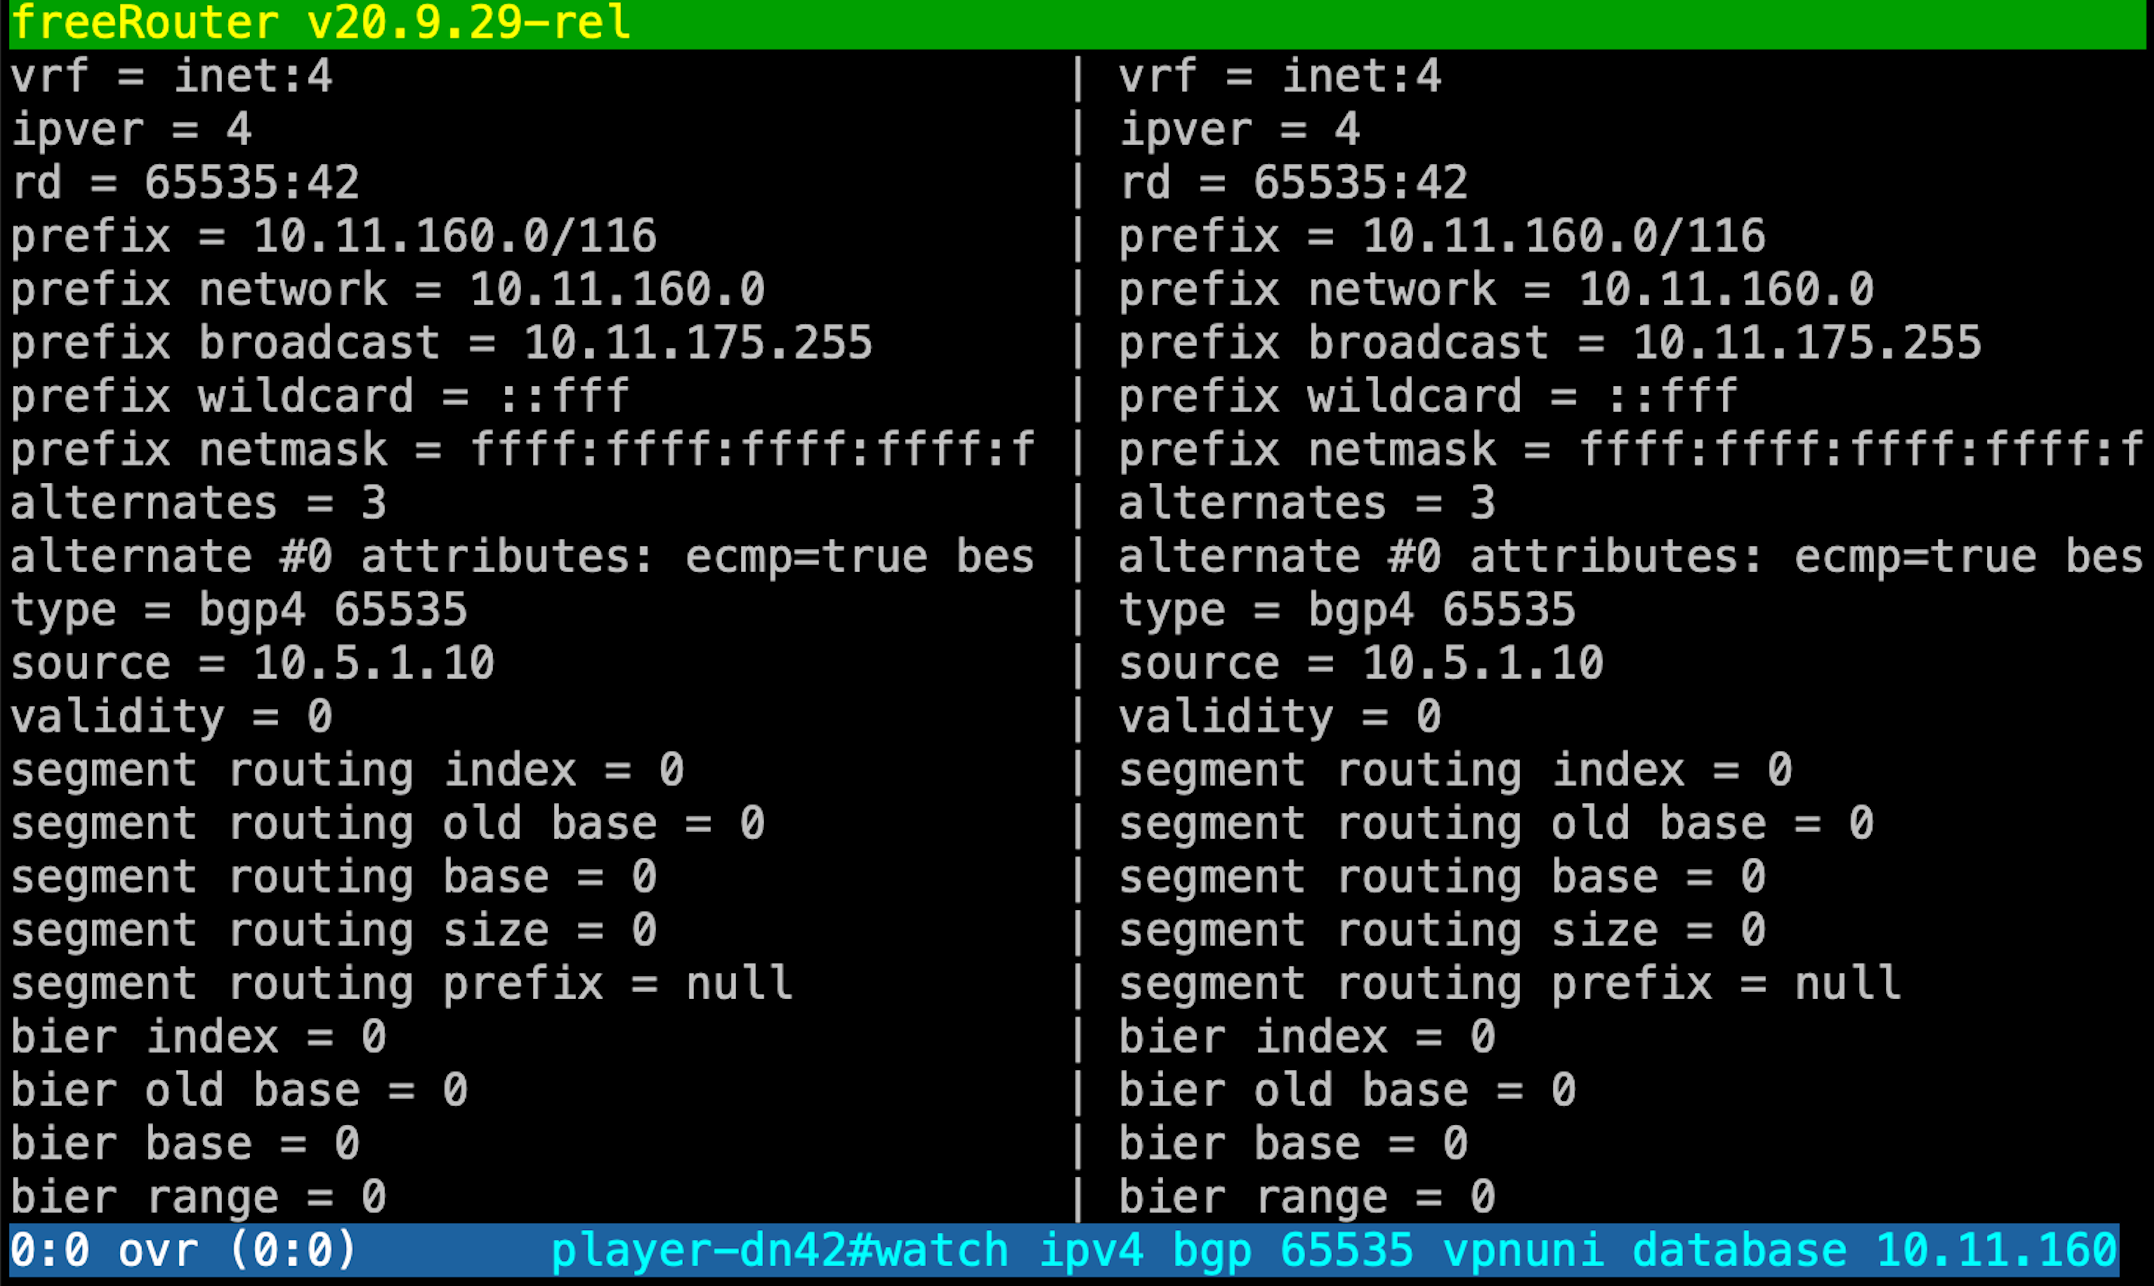
After a quick look at VRF definition indicates that rd 65535:42 is tied to VRF dn42:
player-dn42>sh start vrf
vrf definition dn42
 rd 65535:42
 rt-import 65535:42
 rt-export 65535:42
 source4route all
 source6route all
 mdt4
 mdt6
 exit
vrf definition rtbh
 rd 65535:666
 rt-import 65535:666
 rt-export 65535:666
 exit
vrf definition vpn
 rd 65535:1
 rt-import 65535:1
 rt-export 65535:1
 mdt4
 mdt6
 exit
...
In order to exit the sandbox session use the following escape sequence: Ctrl-c + Ctrl-x

Requirement
|
|

Overview
Even in the era of zero touch configuration where everything can be modelled by YANG and automated by Ansible, CLI configuration mode is essential and will take a special important place into network engineers' heart.
Any network engineer in the room who never issued this command ?
conf t
...
Article objective
In this article, we will present you freeRouter available configuration mode. This is an essential article as it will help you in your potential daily operation task.
Diagram

[ #001 ] - "configure <mode>"
"configure viewer" is a very interesting mode as it gives you the possibility to review the router configuration from a viewer inspired from "mcedit" (Norton Midnight Commander)
r1#configure viewer
...
Then you'll be able to read your configuration from a READ-ONLY text buffer:

As a side note, you can benefit from online help by pressing <f1>

But what if I just want to view a specific object ? Let's find out how to check ONLY BGP configuration @ home:
r1#configure viewer bgp4
...
So in this case It'll just throw my IPv4 bgp config snippet onto the viewer buffer

Same if I want to only view all interface sdn<x> from the router config:
r1#configure viewer sdn
...

This is so cool, isn't ?
Note
In big TELCO Service Provider environment, most of the time you have Technical Project Manager that just need to perform some checks related to specific customer VPN deployment. So some times, I received some calls: "Can you please that from customer the HUB site prefix 1.2.3.0/24 is configured and advertised into BGP for customer ABC in VRF YXZ ?" With "configure viewer <object>", the TPM can just check it for himself without bothering you at all ! And this without the fear to alter router configuration by accident.
PS: For that you'll need to create a aaa security config with:
- proper router aaa security policy with privilege level 1
- with or without TACACS/RADIUS authentication / authorisation and accounting
- and apply it to a specific OOBM SSH/telnet server in a specific VRF,
but this is not in the scope of the the present article and it will be the object of further articles.
In SP environment, you should not be surprised to see router configuration that has 100k lines or even more. In these environment, I've seen config with countless amount of VRF, NAT, DLSW, GRE, IPSEC tunnels, BGP peers ... "config viewer" is a great tools when you want to verify a specific stanza on a per customer or object basis and in bonus without any risk the Provider Edge router configuration.
"configure viewer" gives you the possibility to view the config or some parts of the config in read-only mode. "configure editor" gives you simply the possibility to edit also the specific running-config config stanza.
r1#configure editor
...
Then you'll be able to edit your configuration from a READ-WRITE text buffer:

As a side note, you can benefit from online help by pressing <f1>

You can press Ctrl+q in order to exit the editor. As you did not change anything it will exit the editor.
But what if I just want to edit a specific object ? Let's find out how to check ONLY BGP configuration @ home:
r1#configure editor bgp4
...
So in this case I'll just throw my IPv4 bgp config onto the editor buffer

In this buffer let's just create a description for BGP neighbor 172.23.215.177.

Now just press Ctrl-q (as per the online help accessible using <f1>). However, freeRouter detect the buffer changed has we added BGP description configuration. Therefore it will ask you if you want to save the buffer change into the running-config and apply it.

At that moment you'll be displayed a small recap of what has been applied.

Even more cool no ?
Warning
Even if "config editor" is seducing and seems more appealing especially for beginners. This is absolutely not the case. "configure editor" mode is meant for advanced users who knows freeRouter CLI by heart. Why, you might say ? Just try to edit a gigantic BGP configuration without any contextual help just by writing a textual file and you'll understand the risk behind using "config editor". Therefore it is no recommend to use it against complex control plane object.
Please take note that "config editor" alter the running-configuration directly when you saved the editor buffer !
Note
So what's the point of having this cool feature ? This feature is powerful when it comes to simple control plane object or big repetitive object. This is very practical to use this feature against: ACL / Prefix-List / Route Policy Object / Route Map etc.
- ACL
- prefix-list
- route policy list
- route-map
but nothing to prevent you to edit BGP stanza if you feel that your freeRouter-fu needs to be challenged ![]()
Same as "config editor", but instead of working against the running-config you are editing the startup-config. Which is more safe ... till the next reload ![]()
r1#configure startup
...
"configure reload" as its name implies is not about reloading a router whatsoever ![]()
r1#configure reload ?
  <url> - source url

r1#configure reload
...
This command take a <url> as argument. Basically it will fetch router configuration from the specified <url> and load it into the startup-config. It is an equivalent to Cisco "copy <url> start". From that point:
- it is up to the network operator to check the startup configuration
- and issue a reload warm in order to restart the router and test that connectivity is resuming as expected
- Check the running-config is aligned to startup-config
Warning
(repetition is not harmful) As said before "configure reload" does not reload the router. It just load the config from specified <url> into the startup-configuration. And this steps precedes a reload that has to be triggered manually by the operator after having checked the config.
Note
in day to day operation, startup-config is usually not altered directly. In TELCO SP environment, IIRC, I used it mainly to retrieve configuration from a CMDB server during 2 situations:
- Router first time installation after basic configuration staging enabling minimum connectivity
- Router hardware replacement
Note that in SP environment, as VPN owner we could handle a portfolio of customer (~10). Each customer could have ~ 2000 CPEs. You can see why "config reload" can be very handy.
"configure banner" is one of my favorite mode. It will display an editor allowing you to edit the banner of your router.
r1#configure banner
...

Press Ctrl-q and then y in order to save the banner.

Log in to you router again in order to check your new banner:

Note
in day to day operation, this banner can be written in configuration using banner encoded command
banner encoded ICAgX18gICAgICAgICAgICAgICBfX19fICAgICAgICAgICAgIF8NCiAgLyBffF8gX18gX19fICBfX198ICBfIFwgX19fICBfICAgX3wgfF8gX19fIF8gX18NCiB8IHxffCAnX18vIF8gXC8gXyBcIHxfKSAvIF8gXHwgfCB8IHwgX18vIF8gXCAnX198DQogfCAgX3wgfCB8ICBfXy8gIF9fLyAgXyA8IChfKSB8IHxffCB8IHx8ICBfXy8gfA0KIHxffCB8X3wgIFxfX198XF9fX3xffCBcX1xfX18vIFxfXyxffFxfX1xfX198X3wNCiAgXyBfXyBfX18gICBfX198IHwgX19fX18gIHwgfA0KIHwgJ19fLyBfIFwgLyBfX3wgfC8gLyBfX3wgfCB8DQogfCB8IHwgKF8pIHwgKF9ffCAgIDxcX18gXCB8X3wNCiB8X3wgIFxfX18vIFxfX198X3xcX1xfX18vIChfKQ0KDQo=
the command corresponds to the banner mentioned above.
Discussion
Most of you will simply use the basic "conf t" mode, but keep in mind that depending on your context, all the other modes are proven to be very handy. The possibility to configure 1000 router with one single config file using "config network" is a savior. Having the possibility to trigger automatic definitive router staging using "conf reload" is tremendously useful when you have to deploy 10 routers a day. As said "config view" can give non operation staff to check if some configs are there or not ... "config editor" is very powerful when you want to edit a never ending access-list, but remember to avoid to use it for complex BGP config... You have been warned !
Conclusion
In this 1st article:
- We presented freeRouter config mode
- Most of these are useful in various different context
Final words
All these modes are not new. IOS, IOS-XR, IOX-XE, NW-OX, JUNOS have their own config mode that are somewhat similar. In any case freeRouter config mode implementation is meant to address all needs from the network operators perspective. As you can observe, configure mode has an impressive list of mode. Feel free to try and use them according to your environment taste!
Last but not least, you can play with these different mode from this sandbox:
 telnet dl.nop.hu                                                                                                                                                 1 ↵
Trying 193.224.23.5...
Connected to dl.nop.hu.
Escape character is '^]'.
XXXXXXXXXXXXXXXXXXXXXXXXXXXXXXXXXXXXXXXXXXXXXXXXXXXXXXXXXXXX
XXXXXXXXXXXXXXXXXXXXXXXXXXXXXXXXXXXXXXXXXXXXXXXXXXXXXXXXXXXX
XXXX XXXXX XXX    XXX     XXX XX XX XXXX XXXXXXXXXXXXXXXXXXX
XXXX  XXXX XX XXXX XX XXXX XX XX XX XXXX XXXXX/~~~~~~\XXXXXX
XXXX X XXX XX XXXX XX XXXX XX XX XX XXXX XXXX| player |XXXXX
XXXX XX XX XX XXXX XX     XXX    XX XXXX XXXXX\______/XXXXXX
XXXX XXX X XX XXXX XX XXXXXXX XX XX XXXX XXXXXXXXXXXXXXXXXXX
XXXX XXXX  XX XXXX XX XXXXXXX XX XX XXXX XXXXXXXXXXXXXXXXXXX
XXXX XXXXX XXX    XXX XXX XXX XX XXX    XXXXXXXXXXXXXXXXXXXX
XXXXXXXXXXXXXXXXXXXXXXXXXXXXXXXXXXXXXXXXXXXXXXXXXXXXXXXXXXXX
XXXXXXXXXXXXXXXXXXXXXXXXXXXXXXXXXXXXXXXXXXXXXXXXXXXXXXXXXXXX
welcome
line ready
menu lab:
...
ssh dl.nop.hu -l random_user                                                                                                                                     1 ↵
Warning: Permanently added 'dl.nop.hu,193.224.23.5' (RSA) to the list of known hosts.
random_user@dl.nop.hu's password:
XXXXXXXXXXXXXXXXXXXXXXXXXXXXXXXXXXXXXXXXXXXXXXXXXXXXXXXXXXXX
XXXXXXXXXXXXXXXXXXXXXXXXXXXXXXXXXXXXXXXXXXXXXXXXXXXXXXXXXXXX
XXXX XXXXX XXX    XXX     XXX XX XX XXXX XXXXXXXXXXXXXXXXXXX
XXXX  XXXX XX XXXX XX XXXX XX XX XX XXXX XXXXX/~~~~~~\XXXXXX
XXXX X XXX XX XXXX XX XXXX XX XX XX XXXX XXXX| player |XXXXX
XXXX XX XX XX XXXX XX     XXX    XX XXXX XXXXX\______/XXXXXX
XXXX XXX X XX XXXX XX XXXXXXX XX XX XXXX XXXXXXXXXXXXXXXXXXX
XXXX XXXX  XX XXXX XX XXXXXXX XX XX XXXX XXXXXXXXXXXXXXXXXXX
XXXX XXXXX XXX    XXX XXX XXX XX XXX    XXXXXXXXXXXXXXXXXXXX
XXXXXXXXXXXXXXXXXXXXXXXXXXXXXXXXXXXXXXXXXXXXXXXXXXXXXXXXXXXX
XXXXXXXXXXXXXXXXXXXXXXXXXXXXXXXXXXXXXXXXXXXXXXXXXXXXXXXXXXXX
welcome
line ready
menu lab:
# - reboot router1
$ - reboot router2
% - reboot router3
1 - connect to router1
2 - connect to router2
3 - connect to router3
^ - rebuild routers
l - connect to lg.nop.dn42
x - exit
choose:1 - attach vdc lab1

yourname#
yourname#configure ?
  <cr>
  banner            - edit the banner
  editor            - configure from editor
  file              - append to running configuration
  network           - append to running configuration
  overwrite-network - overwrite the running configuration
  reapply           - !!!EXPERiMENTAL!!! try to reapply current configuration
  reload            - overwrite the startup configuration
  replace           - overwrite the running configuration
  revert            - revert to startup configuration
  rollback          - configure within auto-revert session
  startup           - edit the startup configuration
  terminal          - configure from this terminal
  viewer            - view current configuration

yourname#configure
...
In order to exit the sandbox session use the following escape sequence: Ctrl-c + Ctrl-x
Another method to access the sandbox, by click here, this will open a terminal webapp into your browser:

Requirement
|
|

Overview
RARE project objective is to provide a routing platform proposing various solutions addressing multiple use cases in the R&E landscape. In the picture below you see in purple the different use cases:
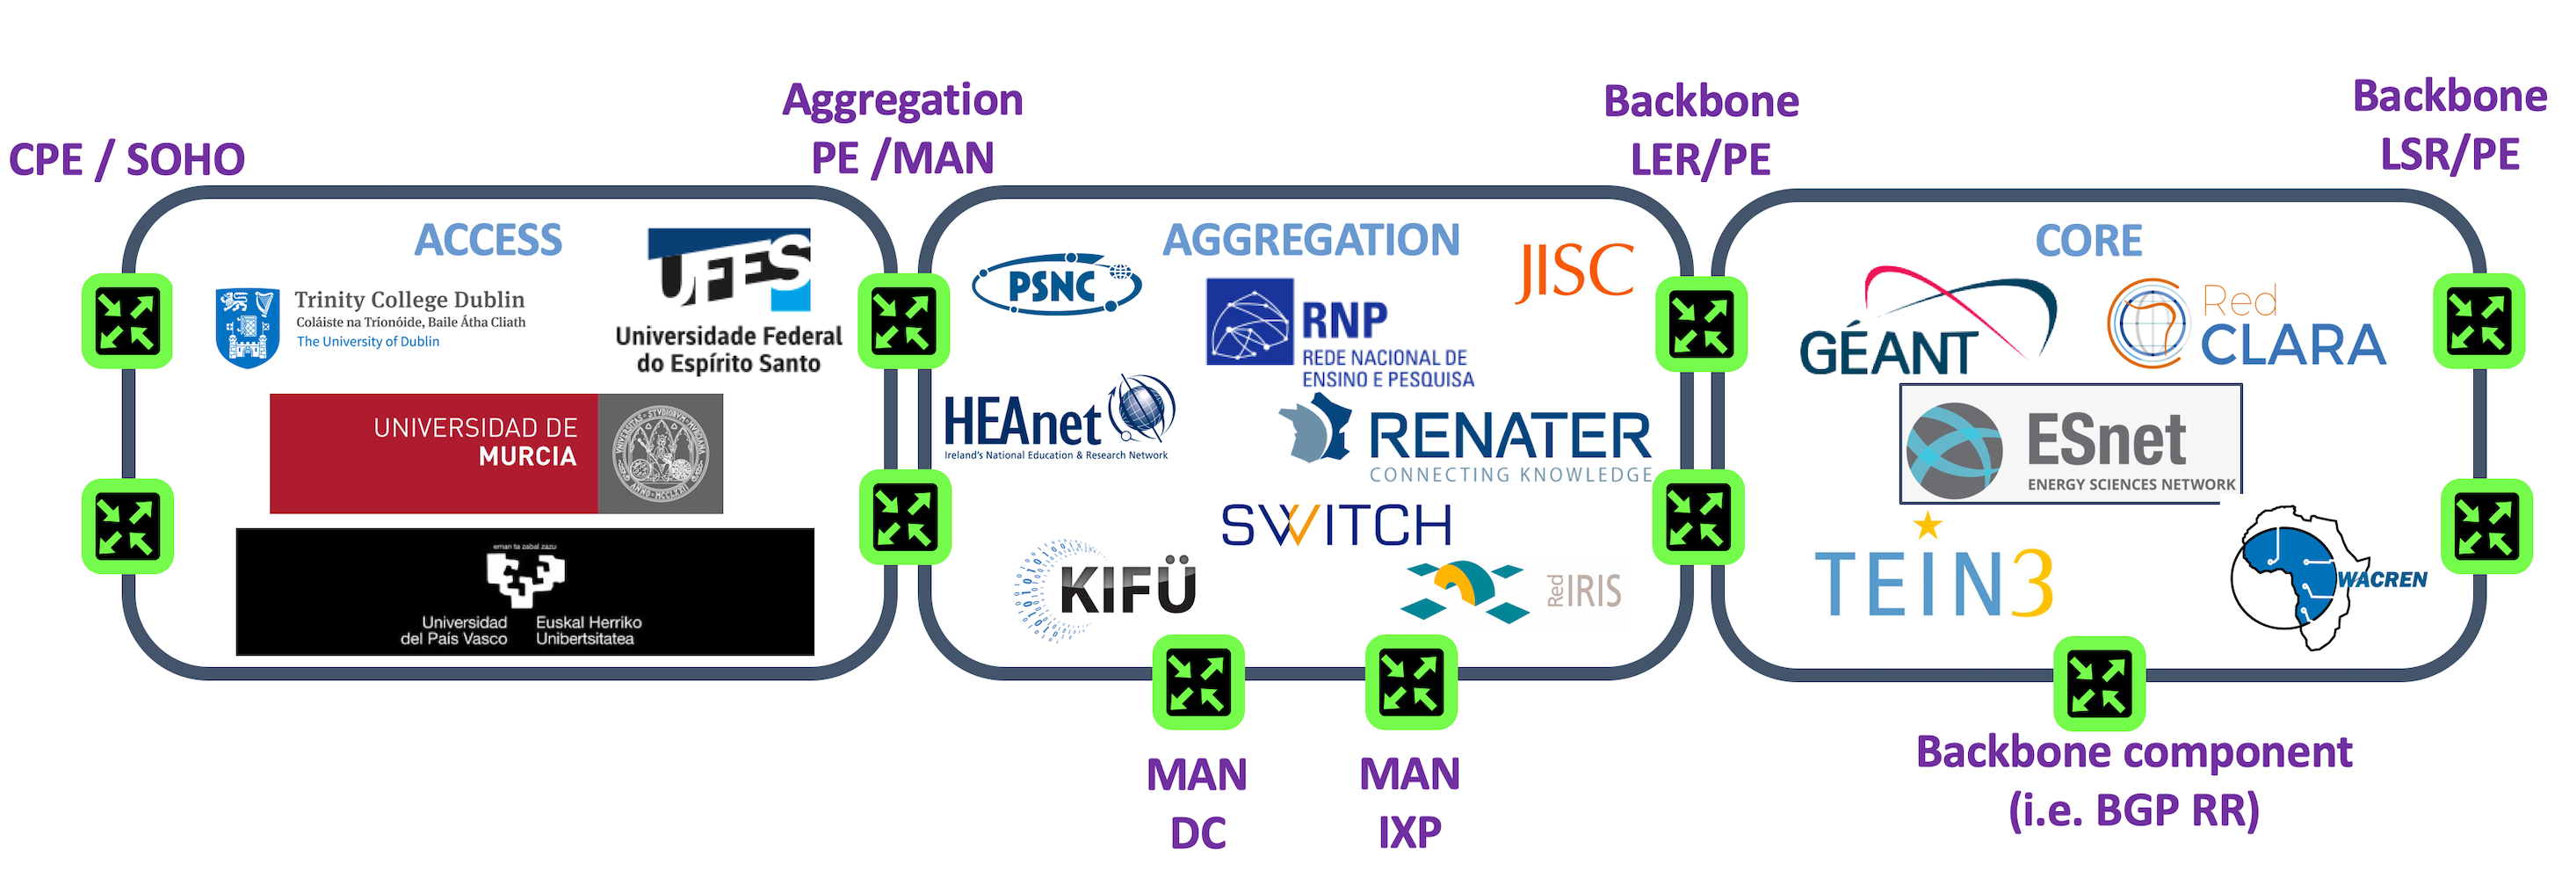
As you can notice, each use case will run on different hardware that potentially can have different dataplanes. As we were starting from a clean slate environment without much choice, especially with P4 programmability - the first dataplane or P4 target considered was BMv2. BMv2 is an excellent way to learn P4, it is also the first target we use in order to program and validate new features. After 6 months of practising our "P4-fu" we developed:
- a P4lang repository for ubuntu bionic and focal
- a debian 10 repository
- had our first RARE/FreeRouter prototype powered by a P4 BMv2 dataplane !
Our initial work, considering FreeRouter's Java nature, was to write a Java P4Runtime GRPC client that would be able to program the entries in the tables exposed by BMv2 via the P4Info file. However, this would have intimately tied FreeRouter code to P4Runtime gRPC code. Even if it's more natural to choose this solution, going in that direction implied that dataplanes other than BMv2 would be compliant to P4Runtime. It turns out that this is not the case. We then opted for a simple message API via a bi-directional raw UNIX socket. We will see what this means later in this blog.
Motivated by the successful experience with BMv2, we then decided to move forward and started to study TOFINO as a target. We were greedy and eager to apply our P4 code against multi-terabits traffic. After a few P4 program compilations, the first impression from my personal perspective was ... mind blowing ! INTEL/BAREFOOT TOFINO effectively opened the door to multi-terabits packet processing... Just to have at the tip of your finger the possibility to process traffic at these traffic levels was exciting !
As a side note, the journey was not without suffering and pain... ![]() We had to port our BMv2 code - and to port to TOFINO was not "Une lettre à la poste"... It is not that TOFINO programming is gratuitously painful. It is just that it is p4c-tofino's job to make sure that our packets are processed at silicon lighting speed. Imagine you are asked to convey parcels by driving from Paris to Amsterdam with a car that has an infinitely sized trunk, with an infinite gas tank and no particular speed constraint along the road. And then you are asked to do the same trip, but with an actual real car that has a trunk with a fixed size and with a 50 litre gas tank, and of course you'll have to follow speed signs along the road.
We had to port our BMv2 code - and to port to TOFINO was not "Une lettre à la poste"... It is not that TOFINO programming is gratuitously painful. It is just that it is p4c-tofino's job to make sure that our packets are processed at silicon lighting speed. Imagine you are asked to convey parcels by driving from Paris to Amsterdam with a car that has an infinitely sized trunk, with an infinite gas tank and no particular speed constraint along the road. And then you are asked to do the same trip, but with an actual real car that has a trunk with a fixed size and with a 50 litre gas tank, and of course you'll have to follow speed signs along the road.
In the first case, you would put as many parcels as you would like and you even won't bother looking at your gas tank level and maybe you'd set the speed to 200 Km/h. The second case forces you to carefully think about how many parcels you can put in your trunk, check to see if one completely full tank can be sufficient for the trip and of course, you would have to follow the speed signs.
If you allow me this comparison, this is where BMv2 and TOFINO programming differs.
But, this pain was not in vain, it was for the greater good... You can't imagine the inherent joy when you see the TOFINO compiler displaying the DONE word ! For the veterans who can remember, it is the same feeling when you manage to compile your first program in the ADA language. The compiler is not so strict that compiling an ADA program is in itself a feat. No wonder why this language is used in Spatial rocket (Ariane).
Back to our dataplane interface story, even TOFINO and BMv2 share some roots, while BMv2 had P4Runtime as a northnound interface, INTEL/BAREFOOT pushed into TOFINO platform with P4_16 their gRPC interface counterpart: BfRuntime.
Our best bet paid off as FreeRouter message API was unchanged and without much effort we could add a new dataplane "wingman" to the FreeRouter control plane.
To recap:
- For BMv2: Our interface yields P4Runtime RPC calls. This program is called: forwarder.py
- For TOFINO: Our interface yields BfRuntime RPC calls. This program is called witout too much originality: bf_forwader.py
At that point we were starting to have a decent LSR/LER router for CORE and Aggregation use cases.
But we still had nothing at the EDGE/AGGREGATION layer in terms of a solution proposal, deploying P4 hardware might be way too expensive in specific contexts such as small R&E institutions like primary schools or small R&E labs. To that purpose, we started to study new targets such as VMWARE XDP and a very promising project: T4P4S ELTE. While we could not use XDP without a lot of P4 code rewriting and compromise, T4P4S ELTE was from our perpective very promising. But due to a compilation issue, we could not move forward.
FPGA was also a solution that we considered but had no access to any FPGA hardware that was P4 compliant.
As a result, we were a little bit bitter and started to read the DPDK library. And we started to play with DPDK examples... These examples were tremendously useful as it sparked some DPDK development into the RARE team. Csaba, the FreeRouter lead developer, step by step came up with this GENIUS idea: why don't we just use emulate P4 RARE P4 dataplane program ? We can still revert to using T4P4S ELTE when it will be ready ?
P4emu/P4dpdk was then born !
To conclude this short story, RARE/FreeRouter has now 3 completely different dataplanes: (in order of appearance)
- BMv2
- TOFINO
- DPDK
Unique RARE/FreeRouter feature
However, please note that FreeRouter message API is common to the three dataplanes listed above. You'll see further how this structure make the solution: an open modular, interchangeable solution.
Article objective
In this article, let's present RARE/FreeRouter platform structure and focus on the interface(S) between FreeRouter control plane and various dataplane.
Diagram

[ #001 ] - Modular design
As said in the beginning of the article, freeRouter control plane would have to deal with dataplane of different nature. And we concluded in mentioning that for now, freeRouter has three dataplanes. Each of these dataplanes have their own northbound interface, whether this is P4Runtime for BMv2, BfRuntime for TOFINO or P4DPDK for system compatible with DPDK and having DPDK complinnt NIC.
For BMv2 we just had to write an interface that would translate freeRouter API message into P4Runtime GRPC calls. For BMv2 this interface is called forwarder.py:
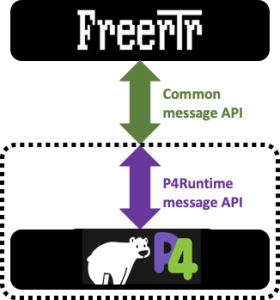
For TOFINO we just had to write an interface that would translate freeRouter API message into BfRuntime GRPC calls. For TOFINO this interface is called bf_forwarder.py:
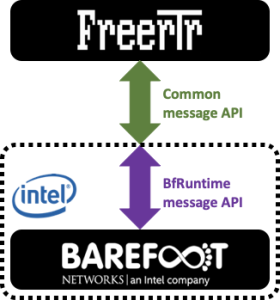
For DPDK we just had to write an interface that would translate freeRouter API message into DPDK primitives. This interface is included into DPDK dataplane bundled into freeRouter binaries: p4dpdk.bin
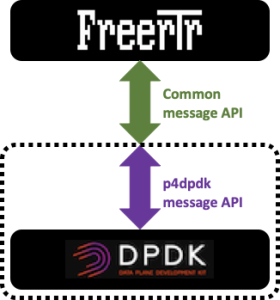
It is just as simple as that !
Discussion
One thing that we did not experience, but this can be maybe one day a reality.
What if you have your own control plane and that you absolutely want to keep it, but would like to re-use BMv2/TOFINO or DPDK RARE dataplane ?
Well this is possible !
Long time ago I met Thomas MANGIN (yet another cool and nice French guy ![]() ) which is the author of Exa-BGP, i did not talk to him about this and I don't want to give him bad idea, but what if he would like to hook a TOFINO P4 dataplane to Exa-BGP ?
) which is the author of Exa-BGP, i did not talk to him about this and I don't want to give him bad idea, but what if he would like to hook a TOFINO P4 dataplane to Exa-BGP ?
Well, he actually would just have to teach exaBGP to handle entry ADD/DELETE/MODIFY message according to the message API above.
I also love the work DONE at the SoNIC project level and I know that SoNIC has already a P4 dataplane called switch.p4. I doubt it will be the case one day but, what if SoNIC project wanted to re-use RARE dataplane for especially for Service Provider capability ?
OK, this sounds crazy, but the modular design we proposed here is valid and can make the RARE dataplane available for other control plane.
Of course, we strongly suggest you to stick with FreeRouter as you will just realize IMHO that in the TELCO Service Provider space there is no match. You'll have the venerable IOS-XR and JUNOS, but these are not Open Source counterparts.
Conclusion
In this 1st article you:
- had a 10K feet view description of RARE/FreeRouter modular design
- This design allow rapid dataplane addtion without altering whatsoever FreeRouter code base
- In case you would like to re-use BMv2/TOFINO/P4DPDK dataplane, this has been never implemented but this is possible !
Message API documentation
From the time being this API message is not yet publicly documented. However, it is available and buried inside forwarder.py or bf_forwarder.py source code. This is work in progress but if you feel an urgent need to use it feel free to read the code.
PS: We will publish this document ASAP, but time plays against us ...