Introduction
A common requirement for research organizations is to provide access via SSH to command line tools hosted on Unix-based systems. Provisioning and deprovisioning the accounts required for access, and leveraging the researcher's existing credentials to authenticate the access, are common challenges in providing this access.
Goals
Leverage COmanage to enroll a researcher to a collaboration, collect the researcher's SSH public key, and create a Unix account for the researcher.
- Configure an Enrollment Flow to allow a researcher to join a collaboration.
- Configure an LDAP provisioner to write Unix account information to LDAP.
- Enroll the researcher.
- Upload the researcher's SSH keys.
- Login to the unix server as the researcher.
Architecture and Components
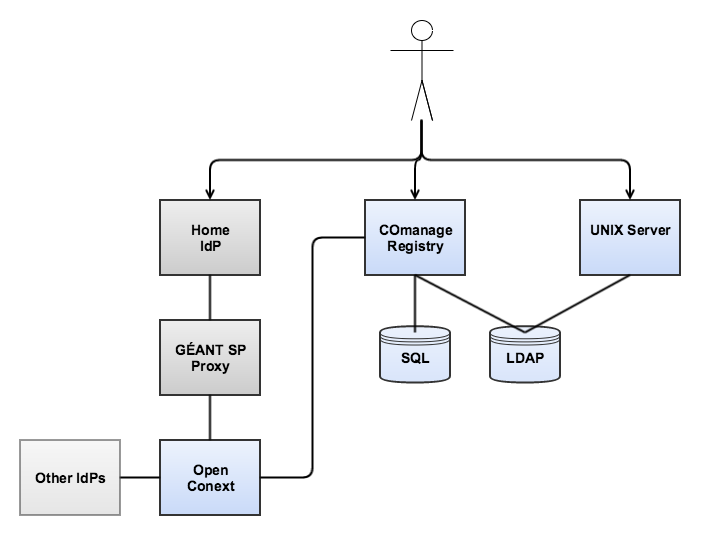
The major components involved in this pilot are
- COmanage Registry, used to manage participant registration in the collaboration
- SQL database backend, used by COmanage
- UNIX Server, on which the command line tools run and to which the researcher desires access
- Home IdP, used by the researcher to authenticate to the collaboration
- SP Proxy and OpenConext, used to manage connectivity to federated identity and other authentication services
- LDAP Server, provisioned by COmanage and used by the UNIX Server as a source of account information
Configuration
This section assumes that each component is already installed and configured for basic connectivity.
LDAP Server
The following schemas must be enabled on the LDAP server, if not already enabled:
COmanage
First, set up a suitable enrollment flow for onboarding participants. Various configurations are possible, but a typical configuration might be Self Signup With Approval:
- Petitioner Enrollment Authorization: Authenticated User
- Identity Matching: None
- Require Approval For Enrollment: Yes
- Email Confirmation Mode: Review
- Require Enrollee Authentication: Yes
- Notify On Approved Status: Yes
- Approval Email Body: The approval message can be configured to include the information necessary to login to the server, by referencing the known server address and the assigned identifier (configured below). Here is a sample message:
Your request for access to (@CO_NAME) has been approved!
In order to access our Linux VM, you must do the following:
(1) Login to https://co.pilots.aarc-project.eu/registry
(2) From the dropdown menu with your name (at the top,
near the logout button), select "My AARC Demo VO Identity".
(3) Scroll down to "SSH Keys" and click "Add".
(4) Upload your SSH Key.
You will now be able to login to 145.100.181.52.
Your assigned userid is: (@IDENTIFIER:uid).
- Enrollment Attributes
- Name, Official, Organizational Identity, Copy To CO Person, Required
- Email, Official, Organizational Identity, Required
- Affiiliation
- Other attributes as desired
") COmanage can be configured to prepopulate with certain attributes released from the home IdP.
COmanage can be configured to prepopulate with certain attributes released from the home IdP.
Next, configure identifier assignment. Because the Unix account provisioning support is currently experimental, it is necessary to use identifier assignment to set up some of the attributes used by the posixAccount schema. (It may be necessary to define some of these types as extended types before the identifier assignments can be configured.) Sample identifier assignments:
- uidNumber, minimum: 2000, format: (#)
- gidNumber: Use the same configuration as uidNumber (which means each user will get their own group; this is a requirement of the PoC implementation)
- homeDirectory: format: /home/(g:7)(#)
- uid: format: (g:7)(#)
Finally, configure a provisioning target using the LDAP provisioner. Enable both posixAccount and ldapPublicKey objectclasses, but be sure to read the notes in the documentation for considerations and restrictions.
Unix VM
Configure the VM to read account information from LDAP, according to the installed distribution and local requirements. Here are some pointers:
Only name service information should be collected via LDAP as passwords will not be written to LDAP. (Make sure to have a way to login as root and/or sudo, and test that before logging out.) Authentication will instead be handled by SSH. Depending on the installed version, a helper script may or may not be required:
Usage
Enrollment takes place with the following steps:
- Assuming the self signup enrollment flow, the researcher begins the flow by authenticating using their home IdP. If the IdP is configured to release attributes and COmanage is appropriately configured, those attributes will be prepopulated into the signup form. Otherwise, and for any additional attributes, the researcher completes the signup form.
- The researcher will be asked to confirm control of their asserted email address by clicking a link sent to it.
- The collaboration administrator reviews the application and approves the enrollment.
- Once approved, COmanage will assign a login ID and write the researcher's record to the LDAP server, effectively creating the researcher's Unix account. As part of the approval process, a notification is sent to the researcher regarding the approval and including the login ID and server address.
- The researcher logs into COmanage and uploads their SSH public key.
- COmanage adds the public key to the LDAP record.
- The research may now log in to the Unix server, using the provided address, login ID, and their existing SSH private key.
Video on this work
Resources
