eduroam SP
Basic deployment considerations for wireless LANs
An eduroam wireless network is a wireless network. This sounds trivial, but it is important to keep in mind that
- a poorly managed Wireless LAN won't magically become better by naming it eduroam. Before diving into eduroam-specific configuration, make sure you understand how to manage
- WiFi coverage
- bandwidth requirements
- enough DHCP addresses to accomodate all clients
- by naming the network eduroam, you are becoming part of a world-wide recognised brand. Arriving users will think of this being an eduroam network, with a set of expectations for such networks. If your wireless network fails to deliver in the points mentioned above, users will consider this an eduroam failure and your installation will hurt the global brand eduroam, not only your own site and users.
This section provides general advice regarding wireless LAN deployment. It is not meant as a replacement for further literature; there are many books and online publications regarding good wireless LAN planning, and you are encouraged to familiarise yourself with this topic.
(Editor's note: place all your helpful advice HERE! :-) )
Administrative obligations of eduroam SPs
Set up of WiFi hotspots
All of the solutions presented below support the basic requirements for an eduroam SP: support for IEEE 802.1X authentications, WPA2/AES support. When deploying eduroam, deployers often want to make use of additional features such as multi-SSID support, dynamic VLAN assignment and others. Every section contains a table with a short overview of their support of such additional useful features.
Cisco (controller-based solutions)
Feature | supported? |
|---|---|
multi-SSID | yes |
VLANs | yes |
dynamic VLAN assignment | partial; not with IPv6 |
Initial settings and defining the IP address
In the first phase the controller must be accessed through the Command Line Interface (CLI). When an IP address has been assigned to the controller, further configuration can be done using the web interface, but the CLI can be continued to be used.
Establish access to the controller by using a serial console and configure the initial settings for example as follows.
Welcome to the Cisco Wizard Configuration Tool
Use the '-' character to backup
System Name [Cisco_b2:e2:83]: <your_system_name>
Enter Administrative User Name (24 characters max): <your_username>
Enter Administrative Password (24 characters max): <your_password>
Re-enter Administrative Password                 : <your_password>

Service Interface IP Address Configuration [none][DHCP]: DHCP

Enable Link Aggregation (LAG) [yes][NO]: NO

Management Interface IP Address: esim. xxx.yyy.zzz.1
Management Interface Netmask: <your_network_mask>
Management Interface Default Router: <your_router's_IP_address>
Management Interface VLAN Identifier (0 = untagged): <0 or 1>
Management Interface Port Num [1 to 2]: 1
Management Interface DHCP Server IP Address: esim. xxx.yyy.zzz.2

AP Transport Mode [layer2][LAYER3]: <layer2 if controller and access points are on same subnet; layer3 if routing in between>
AP Manager Interface IP Address: esim. xxx.yyy.zzz.3

AP-Manager is on Management subnet, using same values
AP Manager Interface DHCP Server (xxx.yyy.zzz.2):

Virtual Gateway IP Address: xxx.yyy.zzz.www

Mobility/RF Group Name: <choose a suitable name if you have more than one controller. Otherwise, don't care>

Enable Symmetric Mobility Tunneling [yes][NO]: NO

Network Name (SSID): <Define a test SSID at first>
Allow Static IP Addresses [YES][no]: no

Configure a RADIUS Server now? [YES][no]: no #Will be done later
Warning! The default WLAN security policy requires a RADIUS server.
Please see documentation for more details.

Enter Country Code list (enter 'help' for a list of countries) [US]: <your country abbreviation>

Enable 802.11b Network [YES][no]: no
Enable 802.11a Network [YES][no]: YES
Enable Auto-RF [YES][no]: YES

Configure a NTP server now? [YES][no]: no #Will be done later
Configure the system time now? [YES][no]: no #Will be done later

Warning! No AP will come up unless the time is set.
Please see documentation for more details.

Configuration correct? If yes, system will save it and reset. [yes][NO]: yes

#When the system has rebooted, familiarize yourself with the CLI by defining
(Cisco Controller) >config time ntp server 1 xyz.zyx.zzy.wyz
(Cisco Controller) >config time ntp server 2 xyz.zzz.zzy.wyz
Access Control Lists
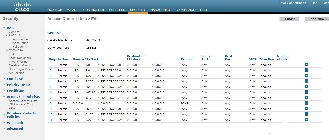
After the initial setup, the access control (ACL) list needs to be configured, in order to prohibit unauthorized access to the controller. Choose SECURITY and then Access Control Lists | Access Control Lists and create an ACL by pressing New... The ACL shoud include at least
- the networks from which maintenance is carried out
- the address(es) of the monitoring server(s)
- the network(s) from which the APs and the WLAN clients get their addresses
- the address(es) of the RADIUS server(s)
- a rule to always answer ping commands
An example of an ACL is shown below. Inbound means packets towards the controller and outbound means packets towards the WLAN clients.
After you have specified the ACL you need to take it into use by first selecting Access Control Lists from the side bar and by choosing your ACL and specifying the CPU ACL Mode to Wired or Both.
Access Point configuration
If the access points are connected to the same subnet as the controller, they will automatically find the controller and connect to it. If this is not the case, the IP address of the controller must be find from the name server by the name CISCO-LWAPP-CONTROLLER. Once the access point has found the controller, it stores the IP of the controller, and it can connect to it from any network, as long as the network allowed access in the ACL (see previous section).
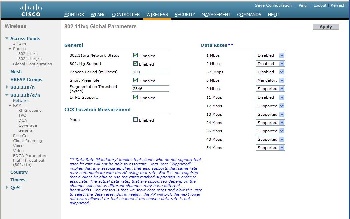
The next step is to define the wireless network, which has to be done separately for 2,4 GHz and 5 GHz. First, choose WIRELESS and then 802.11b/g/n | Network. Enabling the 802.11b-standard will result in less available capacity on your network and therefore it is recommended to enable only the standards 802.11g and 802.11n. Enable 802.11g according to the figure shown below. If you want to support also the 802.11-b standard, set _Mandatory_ for the lowest 802.11b-rate that you want to support (1 Mbps, 2 Mbps, 5.5 Mbps or 11 Mbps), set _Supported_ for all data rates higher than this rate and _Disabled_ for all rates lower than this rate. If 802.11b needs to be supported, it may pay off to disable the lowest rates, in order to avoid clients being attach to an AP far away, unwilling to roam.
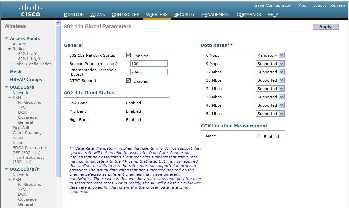
Next, switch to enable the standard 802.11a for 5 GHz by selecting 802.11a/n | Network. Configure the settings according to the figure below.
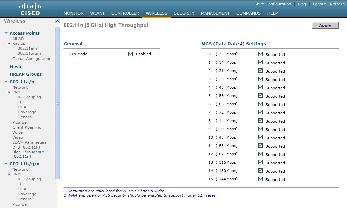
The only standard left to enable is the standard 802.11n. You can choose to enable it for either 2,4 GHz or 5 GHz. It has been suggested that 802.11n is enabled only on the 5 GHz band, in order to utilise the radio resources effectively, see the Campus Best Practice document on "WLAN network planning and setup" Chapter 6.3. That document, along with a wealth of other WLAN resource planning advice, can be found at GEANT Campus Best Practices - Wireless. To enable 802.11n in the network select 802.11a/n | High throughput (802.11n) and/or 802.11b/g/n | High throughput (802.11n) and configure the settings according to the figure below.
At this point you have enabled the radios, but you have not yet defined any network, so don't try to use the access points just yet.
Defining the RADIUS server
Define the RADIUS server to be used in the eduroam network by selecting SECURITY and then AAA | RADIUS | Authentication. Define the IP address, the shared secret and the other parameters according to figure. Please note that your first server will naturally have a server index of one.
Defining a wireless network
Select WLANs and then WLANs | WLANs from the sidebar. Create a new network and name it as shown in the figure below.
After defining the eduroam network, click on the WLAN ID number to start defining the settings for the network. Set the General settings according to the figure below, then click the Security tab.

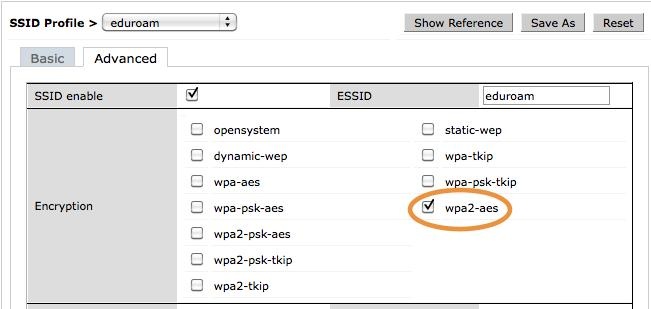
In order to enable only WPA2-AES, fill in the security settings as shown in the figure below.
After this, click on the AAA Servers tab and select the RADIUS server that you defined earlier to be used in eduroam.

Next, click on the QoS tab and make sure that you have set the WMM Policy to either Required or Allowed. Otherwise, the higher transmission rates associated with the 802.11n-standard will not work. Then select the Advanced tab and adjust the settings as shown in the figure below. By choosing the parameter P2P Blocking Action to have the value Forward-UpStream, you can prevent WLAN clients to communicate directly, without involving the AP, as recommended in the Campus Best Practice document on "WLAN Information Security" Chapter 2.2 and 2.3. MFP Client Protection is known to have caused problems and can be disabled.

At this stage, click Apply. In the Advanced-tab, the Client Exclusion timeout value was set to 60s. While this is a suitable value, the rules for client exclusion are a bit too strict. Hence, it pays off to adjust the rules by selecting SECURITY and then Wireless Protection Policies | Client Exclusion Policies from the sidebar and uncheck all other options except for "IP Theft or IP Reuse".
These are the basic settings for the Cisco controller. More advanced settings can be found from the upcoming Campus Best Practice document on "WLAN infrastructure", to be published in the first half of 2011.
Cisco (stand-alone APs with IOS)
Feature | supported? |
|---|---|
multi-SSID | yes |
VLANs | yes |
dynamic VLAN assignment | yes |
Aruba
Configuring Aruba Wireless controllers for eduroam is no different than any other 802.1x wireless network on your campus.
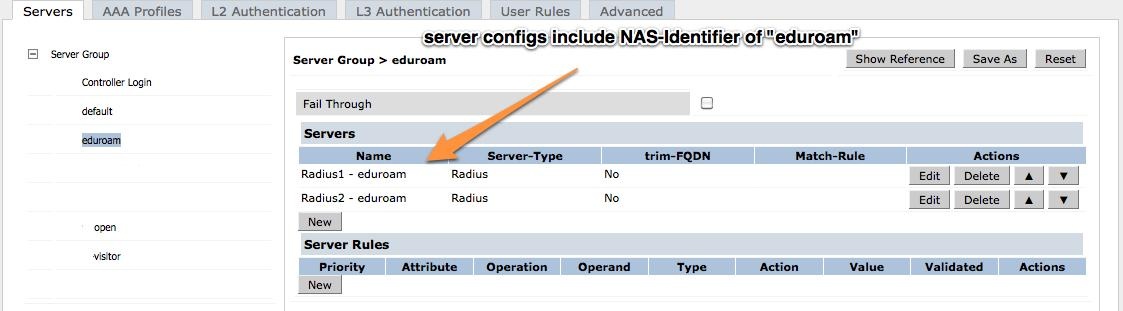
- Create RADIUS Server(s)
Configuration > Authentication > Servers > RADIUS Server > Add - Create RADIUS Server Group
Configuration > Authentication > Servers > Server Group > Add - Create 802.1x Group Auth. Profile
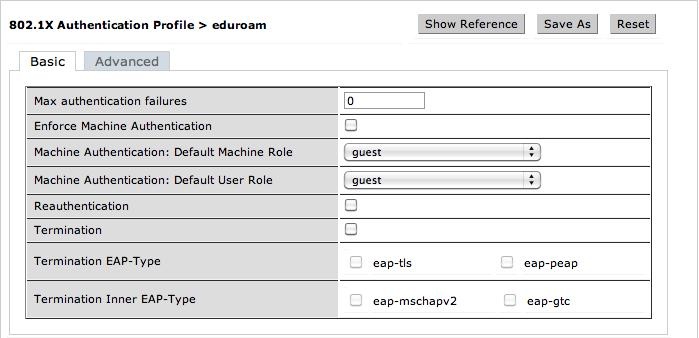
Configuration > Authentication > L2 Auth. > 802.1x Auth. Profile > Add - Create User Roles
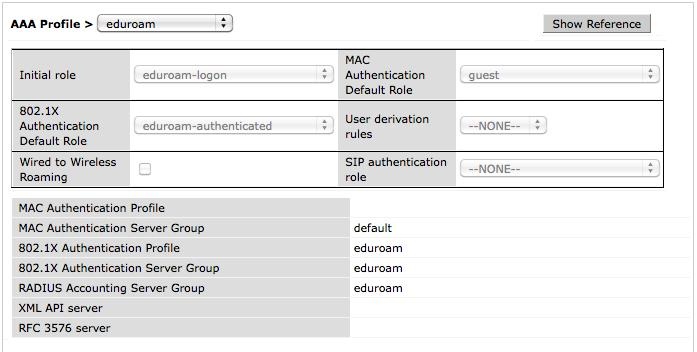
Configuration > Access Control > User Roles > Add - Create AAA Profile
Configuration > Authentication > AAA Profiles > Add - Create SSID Profile
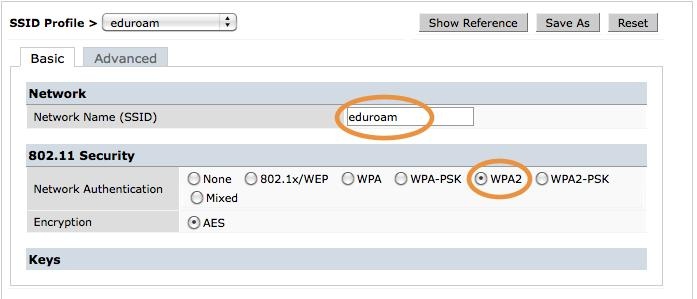
Configuration > All Profiles > Wireless LAN > SSID Profile > Add - Create Virtual AP
Configuration > All Profiles > Wireless LAN > Virtual AP Profile > Add
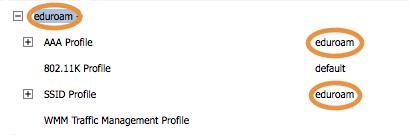
Select SSID and AAA Profiles created above
The following screenshots show these steps in the web configuration interface:
Step 1:
Step 2:
Step 3:
Step 4:

Step 5:
Step 6:
Step 7:
Trapeze (Juniper)
Meru
Feature | supported? |
|---|---|
multi-SSID | yes |
VLANs | yes |
dynamic VLAN assignment | yes |
Lancom
Feature | supported? |
|---|---|
multi-SSID | yes |
VLANs | yes |
dynamic VLAN assignment | yes |
The following steps are needed to set up eduroam on a Lancom L-54 or L-300 series access point. It describes the setup via the web interface and is current as of LCOS Version 8.0. The starting point of this tutorial is a factory-reset device, i.e. it is not configured at all and set up to its defaults.
Initial provisioning
After connecting the device to mains power, it will boot with the Power LED on the front becoming steadily green. The LEDs on top flash green-yellow-blank to indicate that the device is unconfigured.
The Access Point defaults to being a DHCP server on a private subnet. For configuration access, simply connect a PC with a cross-over cable and make the PC a DHCP client. After connecting, the client will have an IP address in the 172.23.56.0/24 network. For configuration access, point your PC's browser to https://172.23.56.254
A wizard will ask you basic questions about your intended configuration which are non eduroam-specific. Please complete the wizard by answering all the questions.
Pay special attention to step 6, where you configure the IP address. Remember to check the box "Configure default gateway" since the access point needs to talk to RADIUS, NTP and syslog servers, which may lie in a different subnet!
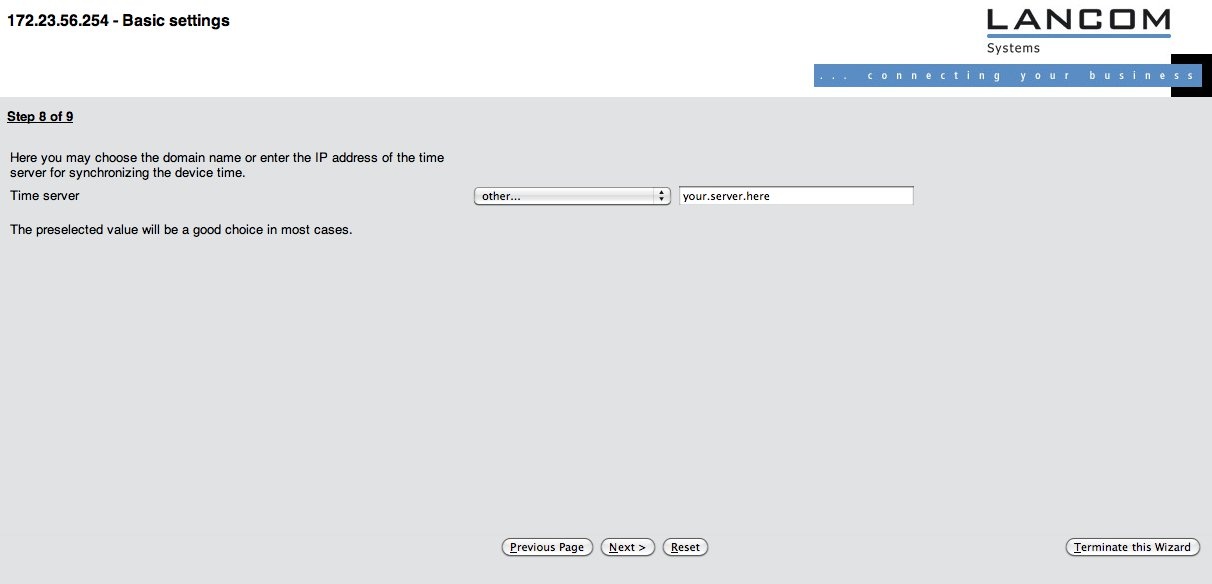
At step 8 of 9, you will encounter the first crucial setting for compliance with the eduroam policy: time synchronisation. The device suggests an NTP server (pool.ntp.org), which is a sane default setting. However, if you operate your own NTP server, you can select "Other..." and enter your own server name (see screenshot).
If you changed the IP address of the Access Point with the wizard, re-connect to the Access Point on its new address after finishing the wizard.
Timezone setup
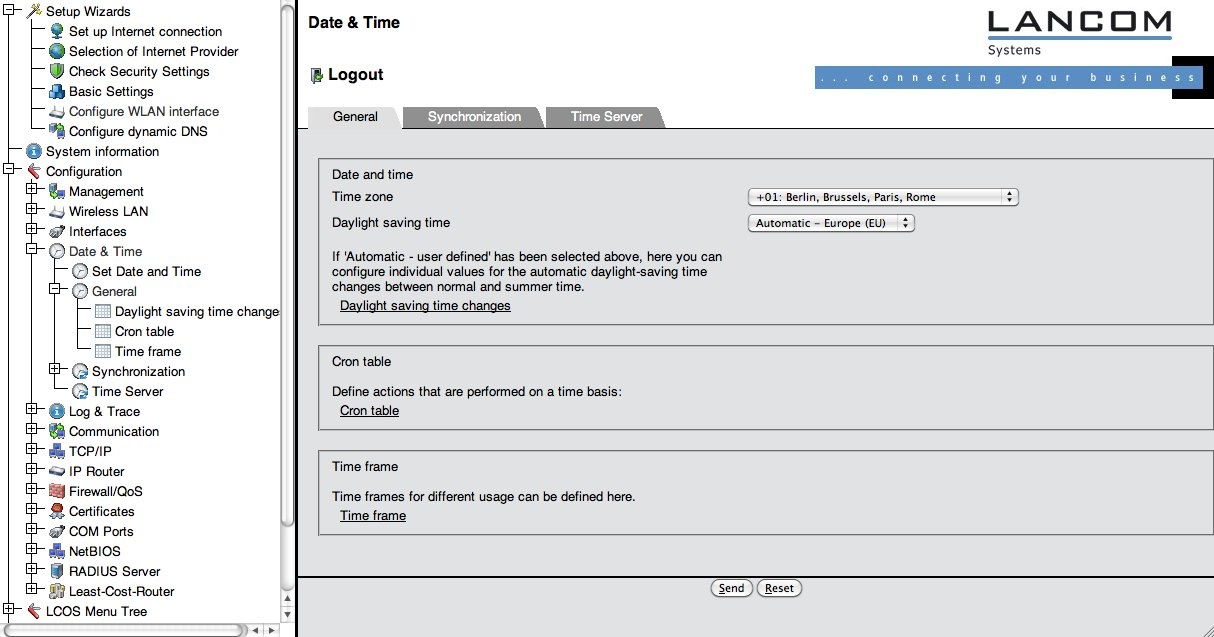
The Access point needs to be synchronised with a NTP or SNTP time server (which was set up using the wizard), which requires correct timezone settings. Click on "Configuration" -> "Date & Time" -> "General". and verify that the correct time zone and dayight saving time settings are set (see screenshot).
Logging
Another requirement in the eduroam policy is that the eduroam SP is required to maintain logs of the authentication and of MAC-address to IP address bindings. LANCOM devices can satisfy both by logging events via syslog. By default, the device keeps short-term logs by logging to "127.0.0.1". The logs can be viewed by navigating to the menu ""LCOS Menu Tree" > "Status" > "TCP-IP" > "syslog" > "Last Messages" and look like the following (prefixed with the exact timestamp, left out for readability reasons):
AUTH |
Notice |
[WLAN-1] Associated WLAN station 64:b9:e8:a0:2e:a4 [] |
AUTH |
Notice |
[WLAN-1] WLAN station 64:b9:e8:a0:2e:a4 [] authenticated via 802.1x [user name is certuser-2010-001@restena.lu] |
AUTH |
Notice |
[WLAN-1] Key handshake with peer 64:b9:e8:a0:2e:a4 successfully completed |
AUTH |
Notice |
[WLAN-1] Connected WLAN station 64:b9:e8:a0:2e:a4 [] |
AUTH |
Notice |
[WLAN-1] Determined IPv4 address for station 64:b9:e8:a0:2e:a4 []: 158.64.3.24 |
AUTH |
Notice |
[WLAN-1] Determined IPv6 address for station 64:b9:e8:a0:2e:a4 []: 2001:0a18:0000:0403:66b9:e8ff:fea0:2ea4 |
AUTH |
Notice |
[WLAN-1] Determined IPv6 address for station 64:b9:e8:a0:2e:a4 []: fe80:0000:0000:0000:66b9:e8ff:fea0:2ea4 |
AUTH |
Notice |
[WLAN-1] Disassociated WLAN station 64:b9:e8:a0:2e:a4 [] due to station request (Disassociated because sending station is leaving BSS |
As you can see, the authentication itself and all MAC -> IP binding actions are logged, both for IPv4 and IPv6.
It is required to log these notices to an external syslog server, since the syslog buffer in the device fills quickly and the information would be lost otherwise. Add your syslog server by selecting the menu item "Configuration" > "Log &Trace" > "Syslog" and make sure the box "Send information..." is checked (it is by default) (see screenshot).
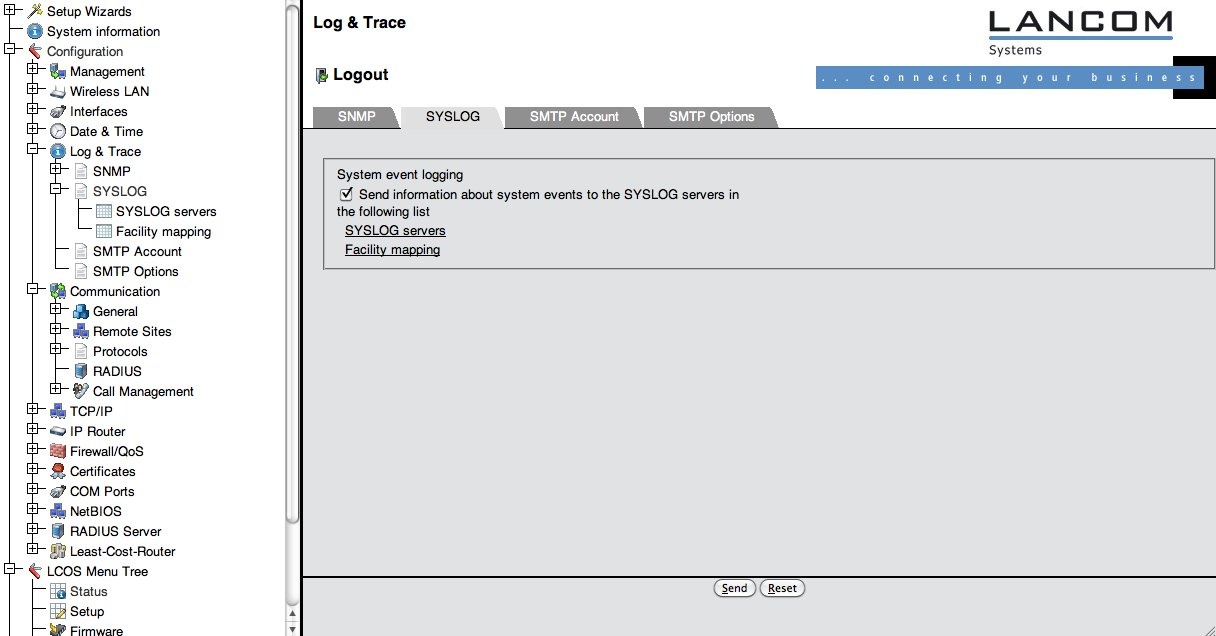
Then click on "Syslog servers" and on the following page "Add".
Then enter the IP address of your syslog server, and choose the events that shall be logged. We suggest to select at least the sources
- System
- Login
- System time
- Console Login
- Connections
- Administration
and the levels
- Alert
- Error
- Warning
- Information
for a comprehensive overview of events on the device.
Configuring the wireless LAN
The network name (SSID) for an eduroam SP is usually "eduroam", and the SSID needs to be broadcasted. Unfortunately, the network cannot be set up via the corresponding wizard, since the wizard only allows to configure WPA-Personal authentication, not eduroam's WPA-Enterprise. So, the necessary settings can only be found under "Configuration" > "Wireless LAN" > "General". (see screenshot)
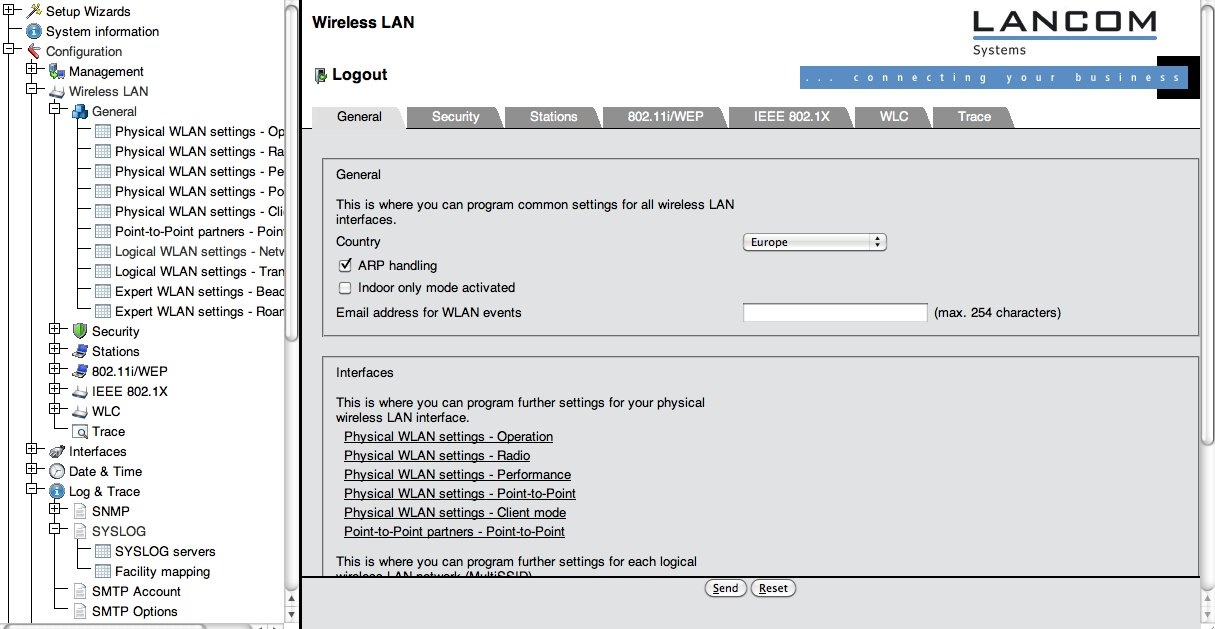
First, we need to enable the MAC to IP address logging. This is done by checking the box "ARP handling". You should also make sure that you enter the correct country on this page, since the country setting makes your device conformant to national regulations for radio usage.
We also suggest to check the box "Broken LAN link ..." as a safety feature: if the access point detects that the wired backhaul is disconnected, it will stop broadcasting the wireless network. This saves users from frustration if connecting to a defunct access point.
After these settings, go to the sub-menu "Logical WLAN setting – Network", see screenshot below.
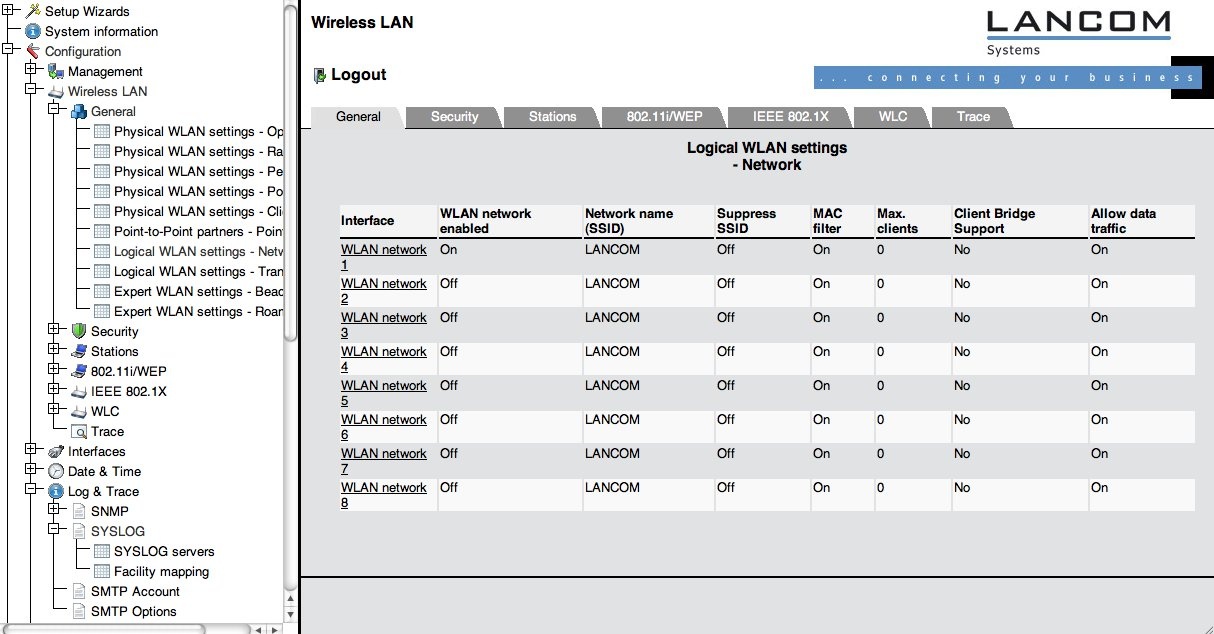
The device offers eight independent networks. Choose one you want to use for eduroam (for example: WLAN-1) and click on its entry. Now set the properties of this network as follows:
- WLAN network enabled to On.
- Network name (SSID) to eduroam.
- Deselect the box labelled "Suppress SSID broadcast"
- MAC filter enabled to Off.
- Maximum count of clients to 0.
- Client Bridge support to No.
When deploying your hotspot, you should also consider some non eduroam-specific guidelines for WLAN deployment. An incomplete list of things to consider is collected in chapter FOO.
Security settings
You need to make two security-relevant settings: configure the RADIUS server to use for authenticating users and configure the eduroam Wireless LAN to use RADIUS at all.
First, let's define a RADIUS server for authentication. As a pure eduroam SP, the RADIUS server in question is likely the one of your national federation. If you are both an eduroam IdP and an eduroam SP, the RADIUS is your own RADIUS server.
Select "Configuration" > "Wireless LAN" > "IEEE 802.1X" > "RADIUS server" and click on "Add". (see screenshot below).
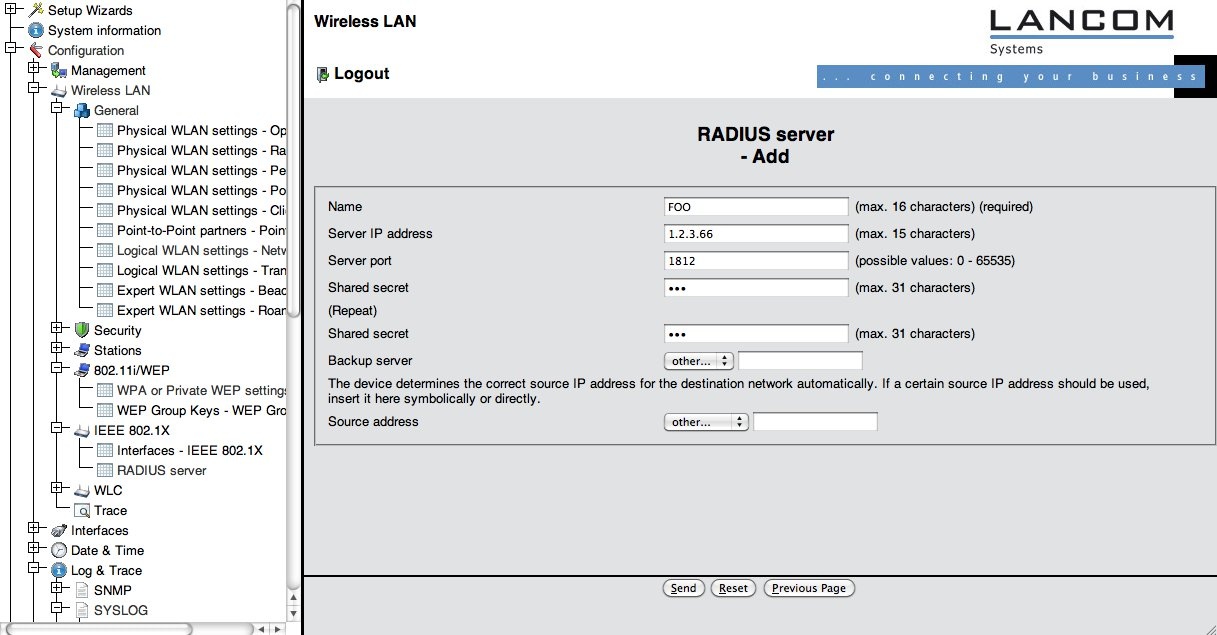
Then, fill in your RADIUS server details as negotiated with your eduroam IdP or federation operator.
In the second step, we'll apply the RADIUS server and encryption scheme to the SSID eduroam. To do that, go to the menu "Configuration" > "Wireless LAN" > "802.11i/WEP" > "WPA or Private WEP settings". Then, click on the WLAN network which you chose for the "eduroam" SSID before (see screenshot).

Set the following entries:
- Encryption Activated to Activated
- (Key 1/passphrase is irrelevant)
- Method/Key 1 Length to 802.11i(WPA)-802.1x.
- WPA Version to WPA2.
- (WPA1 Session Key Type is irrelevant)
- WPA2 Session Key Type to AES
- (WPA rekeying cycle is at your discretion; the default value 0 is a sane default)
- (Client EAP method is irrelevant)
- (Authentication is irrelevant)
- (Default key is irrelevant)
A recurring question is "Why is Client EAP method irrelevant?" The answer is: this setting refers to which authentication method the access point should use when it is in Client mode (i.e. it acts as a supplicant to connect to another access point). When in Access Point mode, its role is by design limited to transparently pass all authentication methods to a RADIUS server.
Using RADIUS/TLS instead of RADIUS (optional)
LANCOM devices have a RADIUS/TLS client built-in. It can be used instead of standard RADIUS for the uplink to an IdP. Please note that most of the value of RADIUS/TLS plays out in long-haul connections, like from an eduroam IdP server to his federation. If your Access Point is located closely to your RADIUS server, using RADIUS is sufficient and you need not follow the steps below.
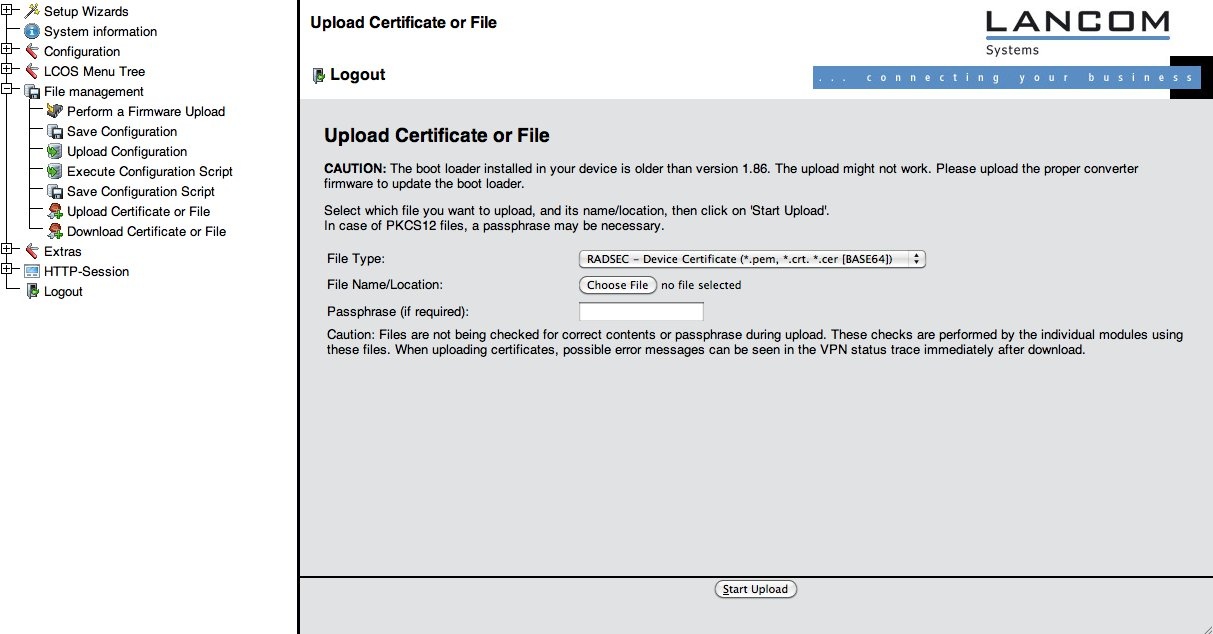
To use RADIUS/TLS in the eduroam context, you must have been issued an eduroam Service Provider X.509 certificate from your federation operator.
When you have your certificate, the private key, and the CA certificate that issued you your certificate, you need to upload these via the device menu "File Management" > "Upload Certificate or File".
Upload them using the File Type "RADSEC ..." as in the screenshot below.
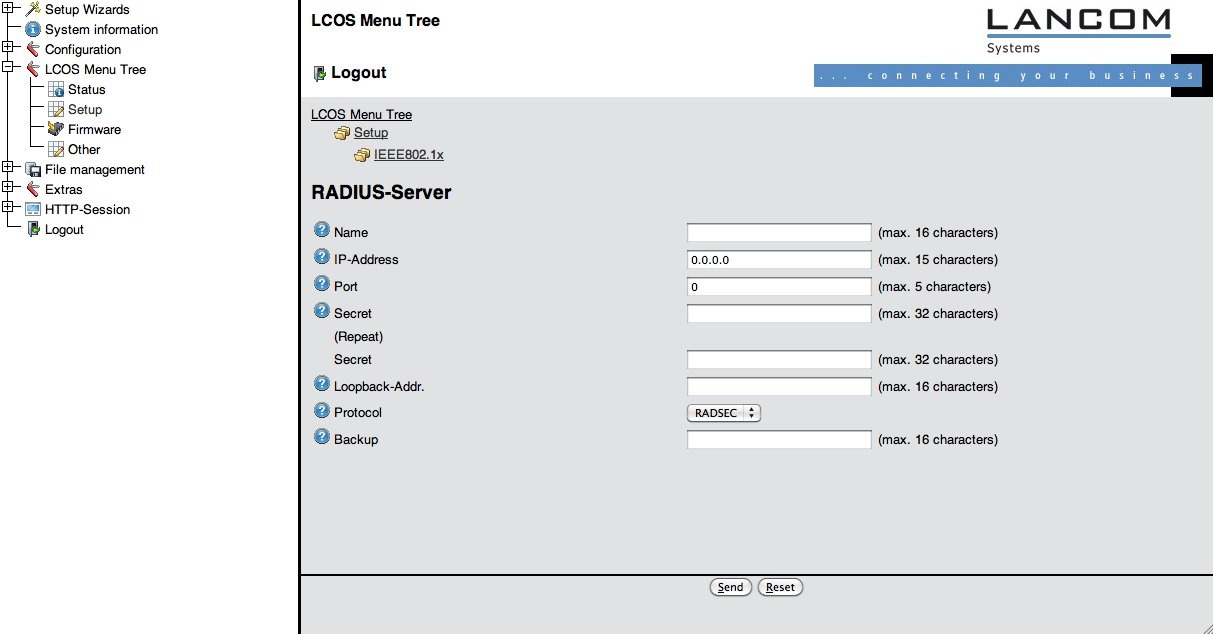
Then, go to "LCOS Menu Tree" > "Setup" > "IEEE802.1X" > "RADIUS Server" and set the Protocol option to "RADSEC", as in the screenshot below. The shared secret is not security-relevant when using RADIUS/TLS, but it must be set nevertheless. eduroam uses the fixed string "radsec" for all RADIUS/TLS shared secrets.
Apple AirPort Express
Feature | supported? |
|---|---|
multi-SSID | no |
VLANs | no |
dynamic VLAN assignment | no |
Set up of switches for wired eduroam
Set up of networking equipment in the network core
Since an eduroam hotspot always uses the RADIUS protocol to connect to a RADIUS authentication server, your network setup must allow this RADIUS communication. This includes opening firewalls for traffic from the WLAN equipment (AP/Controller) to UDP port 1812 (do not confuse this with TCP!). The RADIUS protocol can easily create UDP fragments, and will not function fully without UDP fragmentation support. Be sure to check your equipment whether forwarding of UDP fragments is supported and allowed.
If you deploy your own RADIUS server for eduroam SP purposes (see below), also make sure that its own uplinks to your National Roaming Operator are open in the same way.
Set up of eduroam SP RADIUS servers
Version information
This document is in migration from FreeRADIUS 2 to FreeRADIUS 3. We recommend using the last available version of the stable FreeRADIUS 3 branch. It's easy to compile version 3 (and create packages) if your distribution doesn't provide recent packages. (On Ubuntu/Debian with "make deb" for instance and "rpmbuild -ba redhat/freeradius.spec" should help you on Red Hat based systems.)
Some of the filesystem paths changed between version 2 and 3. The /etc/raddb/modules directory is now split between /etc/raddb/mods-available and /etc/raddb/mods-enabled, plus some of the configuration can be found in /etc/raddb/mods-config. Note that when a module isn't called from the rest of the configuration, placing it in mods-enabled doesn't mean it's active: only that it's available in the rest of your configuration.
Installation
FreeRADIUS is written in C and can be compiled with the usual UNIX compilation sequence. After unpacking the source into a directory of your choice, do
./configure --prefix=<your preferred install dir> --sysconfdir=<your preferred configuration base dir>
make
make install
In the examples below, we assume the installation is done for --prefix=/usr/local/freeradius/ and the configuration dir is --sysconfdir=/etc
Sample config directory
Base configuration / logging / F-Ticks
The main configuration file is /etc/raddb/radiusd.conf; it does not require many changes from the shipped default.
The following lines are important for eduroam operation: a server status probing mechanism called Status-Server is enabled in the security section. Make sure the config file contains the following security stanza
security {
           max_attributes = 200
           reject_delay = 0
           status_server = yes
}

proxy_requests      = yes
(From the default distribution, only reject_delay needs to be changed.)
FreeRADIUS is capable of both IPv4 and IPv6. By default, both are enabled in the listen {} section of sites-enabled/default so we'll duplicate them in our new sites-enabled/eduroam configuration. (The listen {} directives used to be in /etc/raddb/radiusd.conf for FreeRADIUS 2.) You can leave out the IPv6 part if your server shouldn't do IPv6.
The logic in the server is defined by activating modules in a certain order. These modules are separately defined in the /etc/raddb/mods-enabled/ subdirectory (and configured in /etc/raddb/mods-config/ where applicable). The order of activation of these modules is defined in so-called virtual servers, which are defined in the /etc/raddb/sites-enabled/ directory. For our eduroam SP purposes, we only need one virtual server "eduroam" and call very few of the modules. It needs to contain as a minimum:
server eduroam {

        listen {
                type = "auth"
                ipaddr = *
                port = 0
        }
        listen {
                type = "acct"
                ipaddr = *
                port = 0
        }
        listen {
                type = "auth"
                ipv6addr = ::
                port = 0
        }
        listen {
                type = "acct"
                ipv6addr = ::
                port = 0
        }

        authorize {
                # only use filter_username from version > 3.0.7 on
                filter_username
				update request {
                        Operator-Name := "1yourdomain.tld"
						# the literal number "1" above is an important prefix! Do not change it!
                }
                # if you want detailed logging
                auth_log
                suffix
        }

        authenticate {
        }

        preacct {
                suffix
        }

        accounting {
        }

        post-auth {
                # if you want detailed logging
                reply_log
                Post-Auth-Type REJECT {
                        reply_log
                }
        }

        pre-proxy {
                # if you want detailed logging
                pre_proxy_log
                if("%{Packet-Type}" != "Accounting-Request") {
                        attr_filter.pre-proxy
                }
        }

        post-proxy {
                # if you want detailed logging
                post_proxy_log
                attr_filter.post-proxy
        }
}
The multitude of sections in this above configuration is often confusing to new-comers. The order of execution when proxying a request are:
authorize → authenticate → pre-proxy
Then, the packet is proxied to an upstream server. When the reply comes back, the execution continues:
post-proxy → post-auth
Every stanza contains names of modules to be executed. Let's revisit them one after another:
- auth_log: logs the incoming packet to the file system. This is needed to fulfill the eduroam SP logging requirements.
- suffix: inspects the packet to look for an eduroam style realm (separated by the @ sign)
- pre_proxy_log: logs the packet to the file system again. Attributes that were added during the inspection process before are then visible to the administrator - great for debugging
- attr_filter.pre-proxy: strips unwanted attributes off of the request before sending the request to upstream
- post_proxy_log: logs the reply packet to the file system - as received by upstream
- attr_filter.post-proxy: strips unwanted attributes off of the reply, prior to sending it back to the Access Points (VLAN attributes in particular!)
- reply_log: logs the reply packet after attribute filtering to the file system
The paths where the logs are written to, and the files with the list of permitted attributes for filtering, are defined in the corresponding module definitions in /etc/raddb/modules/<name-of-module>.
If attr_filter.pre-proxy is enabled (as per the example above), then by default Operator-Name and Calling-Station-Id are stripped from the proxied request. In order for them not to be removed, add the attributes to /etc/raddb/attrs.pre-proxy (FreeRADIUS 2) or /etc/raddb/mods-config/attr_filter/pre-proxy (FreeRADIUS 3). This is a more sensible default for eduroam:
DEFAULT
        User-Name =* ANY,
        EAP-Message =* ANY,
        Message-Authenticator =* ANY,
        NAS-IP-Address =* ANY,
        NAS-Identifier =* ANY,
        State =* ANY,
        Proxy-State =* ANY,
        Calling-Station-Id =* ANY,
        Called-Station-Id =* ANY,
        Operator-Name =* ANY
Since the eduroam SP with this configuration will statically use RADIUS to its upstream federation-level server, activation of F-Ticks reporting is not strictly necessary. It is thus described only in the "Goodies" section below.
Client definition
FreeRADIUS defines the connected RADIUS clients in the file /etc/raddb/clients.conf. This file needs to hold all your connected Access Points (and/or wired eduroam-enabled switches, if you have these instead of Access Points). You set a shared secret for each client and define these in the config file as follows:
 client antarctica-access-point-1 {
    ipaddr                        = 172.25.1.55
    netmask                       = 32
    secret                        = yoursecret12345
    shortname                     = southpole-11g
    virtual_server                = eduroam
    require_message_authenticator = yes
 }
There are more (optional) settings for clients; please consult the comments in clients.conf for more detail. One option, the "virtual_server" one, enables your RADIUS server to serve more purposes than only eduroam: you can define several other virtual servers for other RADIUS purposes, and link clients to these. That is beyond the scope of this documentation, though.
If you want to connect your clients over IPv6, the syntax is only slightly different:
 client antarctica-access-point-2 {
    ipv6addr                      = 2001:db8:1:789::56
    netmask                       = 128
    secret                        = yoursecretABCDE
    shortname                     = southpole-11n
    virtual_server                = eduroam
    require_message_authenticator = yes
}
Request forwarding
FreeRADIUS contains a wealth of options to define how requests are forwarded. These options are defined in the file /etc/raddb/proxy.conf. For a single eduroam SP, these may seem overkill, but the required definitions for that purpose are rather static. Assuming you have two upstream servers to forward requests to, the following configuration will set these up - you only need to change the IP addresses and shared secrets in home_server stanzas. The realm NULL will reject authentication requests missing an @ sign, for example Windows always first tries its domain\hostname to authenticate when connecting the first time to eduroam. This authentication would otherwise be sent upstream to the realm "~.+$", which causes delays and is unneeded.
proxy server {
        default_fallback        = no
}

home_server antarctica-flr-1 {
        type                    = auth+acct
        ipaddr                  = 172.20.1.2
        port                    = 1812
        secret                  = secretstuff
        status_check            = status-server
}

home_server antarctica-flr-2 {
        type                    = auth+acct
        ipaddr                  = 172.25.9.3
        port                    = 1812
        secret                  = secretstuff
        status_check            = status-server
}

home_server_pool EDUROAM {
        type                    = fail-over
        home_server             = antarctica-flr-1
        home_server             = antarctica-flr-2
}

realm NULL {
    virtual_server  = auth-reject
    nostrip
}

realm "~.+$" {
        pool                    = EDUROAM
        nostrip
}
Goodies
Running FreeRADIUS as non-root user
The RADIUS protocol runs on ports >1023, which means it can be started entirely in unprivileged mode on UNIX-like systems. You can easily achieve that by
- creating a user "radiusd" and group "radiusd"
- giving all configuration files in /etc/raddb ownerships for that user radiusd + group radiusd
- changing these two parameters in /etc/raddb/radiusd.conf:
user  = radiusd
group = radiusd
F-Ticks
F-Ticks is using syslog to deliver user login statistics. You can enable syslog logging for login events by defining a linelog module. In the /etc/raddb/modules/ subdirectory, create a new file "f_ticks":
linelog f_ticks {
       filename = syslog
       #syslog_facility = local0
       #syslog_severity = info
       format = ""
       reference = "f_ticks.%{%{reply:Packet-Type}:-format}"
       f_ticks {
              Access-Accept = "F-TICKS/eduroam/1.0#REALM=%{Realm}#VISCOUNTRY=YOUR-TLD#VISINST=%{Operator-Name}#CSI=%{Calling-Station-Id}#RESULT=OK#"
              Access-Reject = "F-TICKS/eduroam/1.0#REALM=%{Realm}#VISCOUNTRY=YOUR-TLD#VISINST=%{Operator-Name}#CSI=%{Calling-Station-Id}#RESULT=FAIL#"
       }
}
Note that you have to adapt VISCOUNTRY to the country you are in (eg. set YOUR-TLD to "LU"), and VISINST to an identifier for your hotspot - which in this example is already set to the Operator-Name attribute. You can set the syslog facility and severity to help forward these ticks to the right place.
You need to enable this new module in the post-auth section of your virtual server eduroam:
post-auth {
                # if you want detailed logging
                reply_log
                f_ticks
                Post-Auth-Type REJECT {
                        # if you want detailed logging
                        reply_log
                        f_ticks
                }
        }
This way, appropriate loglines will be logged into your local syslog instance. If you want to forward your ticks to the statistics system, please get in touch with your NRO to get to know the syslog destination and configure your syslog daemon to forward the log line correspondingly.
Please note that the file proxy.conf may need your attention: FreeRADIUS' handling of the "DEFAULT" realm changed slightly between 2.1.9 and 2.1.10: previously, it would fill %{Realm} with the actual realm (e.g. "education.lu"), but after the change, it would use the literal "DEFAULT". It is not helpful to generate ticks with REALM=DEFAULT.
If you were using DEFAULT before, and now notice that ticks are sent incorrectly, the mitigation is to use a regular expression instead of DEFAULT - because for realm statements with regular expressions, also the most recent versions still substitute with the actual realm.
You would need to delete the DEFAULT realm and replace it with the following regular expression realm statement *at the end of your proxy.conf*:
realm "~.+$" {
...
}
CUI for eduroam SP
To use the Chargeable-User-Identity (CUI) you must already use the Operator-Name attribute.
This documentation is only for FreeRADIUS 3.0.X release.
Create a log module
By default the CUI is not logged, you have to use the FreeRADIUS linelog module to get a log. In the mods-available/ subdirectory, create a new file "eduroam_cui_log" :
linelog cui_log {
#    filename = syslog
    filename = ${logdir}/radius.log
    format = ""
    reference = "auth_log.%{%{reply:Packet-Type}:-format}"
    auth_log {
        Access-Accept = "%t : eduroam-auth#ORG=%{request:Realm}#USER=%{User-Name}#CSI=%{%{Calling-Station-Id}:-Unknown Caller Id}#NAS=%{%{Called-Station-Id}:-Unknown Access Point}#CUI=%{%{reply:Chargeable-User-Identity}:-Unknown}#MSG=%{%{EAP-Message}:-No EAP Message}#RESULT=OK#"
        Access-Reject = "%t : eduroam-auth#ORG=%{request:Realm}#USER=%{User-Name}#CSI=%{%{Calling-Station-Id}:-Unknown Caller Id}#NAS=%{%{Called-Station-Id}:-Unknown Access Point}#CUI=%{%{reply:Chargeable-User-Identity}:-Unknown}#MSG=%{%{reply:Reply-Message}:-No Failure Reason}#RESULT=FAIL#"
    }
}
Enable modules
cd mods-enabled; ln -s ../mods-available/eduroam_cui_log; ln -s ../mods-available/cui
Client definition
Force parameter 'add_cui' to 'yes' for all your connected clients :
client antarctica-access-point-1 {
...
    add_cui = yes
 }
Policy
Edit the default policy.d/cui file :
...
cui_hash_key = "changeme" 	# --> replace with a random string
							# if you use a secondary or backup FreeRADIUS server, use the same cui_hash_key
							# this allows you to keep the same CUI log even if the FreeRADIUS server change
cui_require_operator_name = "yes"
...
Others values don't need to be changed.
Attributes
Edit mods-config/attr_filter/pre-proxy file, check that attributes Calling-Station-Id, Operator-Name and Chargeable-User-Identity are defined :
DEFAULT
...
        Calling-Station-Id =* ANY,
        Operator-Name =* ANY,
        Chargeable-User-Identity =* ANY,
...
Edit mods-config/attr_filter/post-proxy file, check that the attributes User-Name and Chargeable-User-Identity are defined :
DEFAULT
...
        User-Name =* ANY,
        Chargeable-User-Identity =* ANY,
...
CUI filtering
Edit policy.d/filter, add a filter function 'cui_filter'. Simple example :
# Filter the Chargeable-User-Identity attribute
cui_filter {
  if (&reply:Chargeable-User-Identity =~ /REPLACE-WITH-CUI-TO-MATCH/) {
                        update request {
                                &Module-Failure-Message += "Rejected: CUI matching '%{reply:Chargeable-User-Identity}'"
                        }
                        reject
       }
}
Using policies and modules in your eduroam virtual server
Add 'cui' in authorize, post-auth and pre-proxy sections. Add 'cui_log' and 'cui_filter' in post-auth section :
server eduroam {
...
        authorize {
                # only use filter_username from version > 3.0.7 on
                filter_username
                update request {
                        Operator-Name := "1yourdomain.tld"
                        # the literal number "1" above is an important prefix! Do not change it!
                }
                cui
				# if you want detailed logging
                auth_log
                suffix
        }
...
        post-auth {
                # if you want detailed logging
                reply_log
				cui
				cui_filter
				cui_log
                Post-Auth-Type REJECT {
                        reply_log
						eduroam_log
                }
        }
...
        pre-proxy {
                pre_proxy_log
                cui
                if("%{Packet-Type}" != "Accounting-Request") {
                        attr_filter.pre-proxy
                }
        }
...
}
Caveats
Use the most recent version available (3.0.10 at the time of writing) because of known issues in older versions (ranging from filters that prevent people to get online with mixed usernames to TLS-related bugs).