eduroam Managed IdP: purpose and scope
Introduction
eduroam Managed IdP's purpose is to support you, an eduroam Identity Provider administrator, by allowing you to manage your eduroam end user base through a simple web interface, without a need for local technical infrastructure such as RADIUS servers or an identity management system.
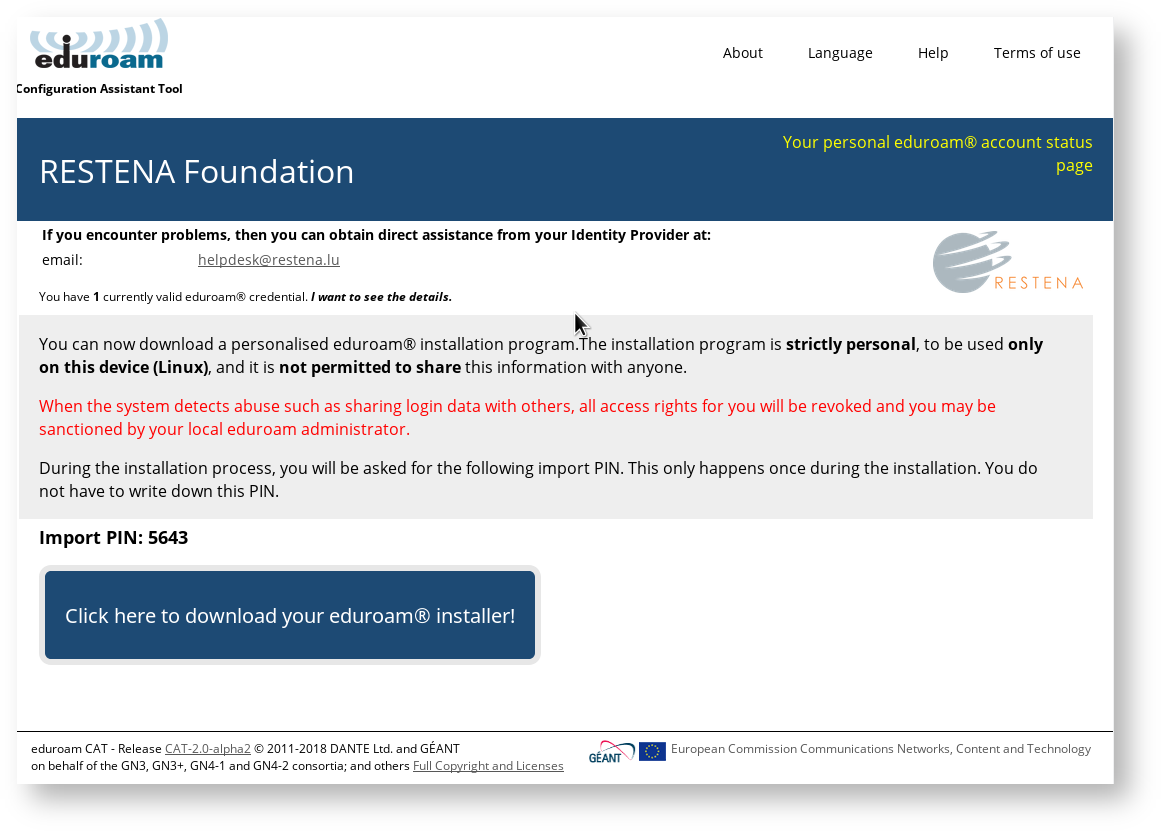
eduroam Managed IdP takes your input regarding who your users are, and produces vouchers ("invitation tokens") which you can hand out to those users. They can then redeem those invitation tokens for a customised, personal eduroam installer for their computer or device. The customisation includes your IdP's name, location and logo, contact details for your helpdesk, and a user access credential in the form of a "client certificate" - don't worry if you do not know what that is. The installers can be produced in many languages; that way, you can even offer your users an installer in their native language!
Surprisingly many users do not have a clue which operating system they are using. eduroam Managed IdP thus auto-detects the operating system and automatically produces the matching installer.
Below is what your users will see when redeeming an invitation token:
Device Support
eduroam Managed IdP supports a broad selection of common end-user client devices. Unfortunately, if your users use a non-supported operating system, we are unable to provide the service to them. Please do let the authors know if a particular unsupported operating system is popular and we will investigate if it is possible to support it. Please contact us via the mailing list cat-users@lists.geant.org.
Notably, Android versions below 4.3 are not supported and likely never will be, sorry.
Support Policy for operating systems versions
eduroam CAT generally tries to follow vendors' end of life dates:
- Microsoft products:http://windows.microsoft.com/en-us/windows/lifecycle
(next to go away: Windows Vista on April 11, 2017) - Apple products: https://support.apple.com/en-gb/HT201624
(next to go away, estimated: iPad - 1st gen (2016?), iPod touch - 3rd gen (2018?), iPhone - 4 (20XX?)
Scope
eduroam Managed IdP is not replacing your helpdesk! While we hope to do you a good service by taking the technical task of user account management and network admission checks into our hands, we can not take your users' phone calls or tell them how to fix problems on their computers. eduroam Managed IdP installers work on the supported platforms if these have not been modified beyond reason by the end-user, and we hope the installation process with them is intuitive enough; but we can not give you guarantees that you will not ever hear from failing users again.
Enrolling my institution for eduroam Managed IdP
Step 1: Requesting an entry for your IdP
eduroam Managed IdP follows the usual organisational model of eduroam: your eduroam National Roaming Operator (NRO) administrator has control over all the Identity Providers in his country or region. To manage your institution with eduroam Managed IdP, please let your NRO administrator know that you want to participate using your usual communications channels.
If the NRO administrator finds you eligible for the service, they will send you an invitation email with a token (the token is valid for 24 hours after sending it to you). You can then follow the supplied link with the token, log into the eduroam Managed IdP administration interface, and start managing your institution - see the next section for details of institution setup.
Step 2: Logging into eduroam Managed IdP
When clicking on the menu item "Manage → eduroam admin access", you will be automatically sent to the eduroam Support Services' federated login service. This login service does not work with site-specific usernames and passwords; instead you are presented with a list of sources of identity. Choose any organization that you have an account with:
* eduGAIN: many universities across Europe have already joined the educational Global Authorisation INfrastructure - if your organisation is among them, click on that institution and authenticate with your home organisation's usual web login credentials
* Experimental: some institutions are in the process of joining eduGAIN, but are not production-level members; if that is the case for your institution, you might find your institution's authentication service in this Experimental list
* Social Networks: if you cannot log in with your institution's credentials (for example, because your institution is not participating in eduGAIN), you can also log in using the federated login function of several popular social networks, including, but not limited to, Google and Facebook.
Some users have noted that none of the above options suits them: e.g. their institution is not participating in eduGAIN, and they have an aversion against using social networks. We understand that if a user finds all the numerous authentication options unacceptable, then he will have a hard time logging in. However, at this moment we do not have a good solution to that problem. It might be worth considering creating a social network account just for the purpose of logging in here; even if the service portfolio offered by e.g. Google is not interesting for the user, their authentication service in itself is useful on its own.
Configuring my IdP's properties
Overview
There are basically four groups of information which we need to ask of you before we can create good-looking installers for you:
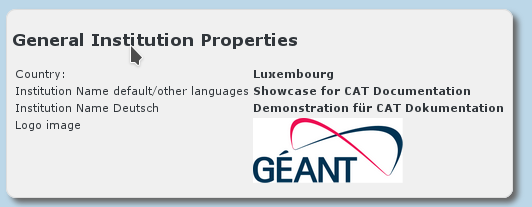
- general information about your institution (e.g. logo, approximate location, name)
- helpdesk contact details (mail, phone, web)

- RADIUS and EAP details

- Textual information can be provided in many languages; one language representation should be set as the default language though - to have a string to present to users who want to use a language which wasn't explicitly configured.
- An institution consists of one of more EAP profiles, each of which can have its own EAP-specific settings. One typical use-case is an institution which has "student" and "staff" accounts with different EAP-Types being supported. Many options in eduroam CAT can either be set for the entire institution or only for a specific profile; if a setting is set on both levels, the more specific profile-level setting will override the institution-level one.
Institution-wide Settings
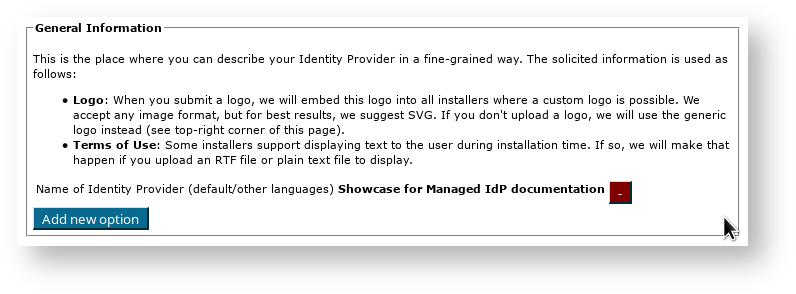
After you've followed the invitation token from your national administrator, you'll be dropped right in the "Edit IdP" page. On that first time, you'll see a "wizard mode" which provides lots of explanatory text about the meaning of all the settings you can make. You can add and delete any of those options; don't be shy and try them all out! Adding a new option is done by pushing the corresponding button, selecting which option you want to set, and then the content of that new option. Changes will only be saved when you hit the "Continue ..." button on the bottom of the page.
When you re-visit the "Edit IdP" page later from the Institution Overview page, the explanatory texts are condensed in order not to overload the user interface. You'll certainly find your way around without the wizard texts.
You can configure three of the four areas mentioned above in this first page. The RADIUS and EAP settings are configured in the more specific Profile configuration at a later stage.
General Information
Helpdesk Contact Details
Media Properties
Here, you can now configure all media properties of your eduroam setup.
The SSID "eduroam" for WPA2/AES is always configured as it is the core of the eduroam specification; you do not need to enter this one here (previous versions of eduroam CAT also installed a WPA/TKIP profile; since these are meanwhile obsolete, current CAT installers will silently remove this profile if seen during installation). The list of things you can additionally configure in "Media" are:
- additional SSID for WPA2/AES:
If you deploy other SSIDs for which eduroam credentials are valid, you can add these here and they will be configured alongside the eduroam SSID. - additional SSID for WPA2/AES and WPA/TKIP
If you deploy other SSIDs for which eduroam credentials are valid, you can add these here and they will be configured alongside the eduroam SSID. This SSID will be installed for both WPA2/AES and (legacy) WPA/TKIP. - additional own Hotspot 2.0 / Passpoint Consortium OI
If you want to enable Passpoint and have a Consortium Organization Identifier, you can enter it here. The consortium OI for eduroam is 001BC50460. We do not currently enable this consortium OI by default.
On end-user device side, settings made regarding Passpoint will currently only benefit the most recent Apple devices (iOS 7+ and recent-enough hardware; recent Mac OS X). - whether or not to configure wired ethernet for IEEE 802.1X
Some eduroam participants also use IEEE 802.1X for wired ethernet ports in their premises, e.g. in dormitories. Administrators can specify that the installers should include wired ethernet eduroam configuration on the client devices. This is currently supported for the Windows installers and Apple OS X. Windows installers will provoke a UAC prompt when wired support is turned on. - disable captive portal SSIDs after setting up eduroam
Many eduroam participants deploy several SSIDs; typically, a captive portal SSID for help and/or download of configuration profiles/configuration instructions (a "bootstrap" or "onboarding" network), and the real eduroam network. If your users have connected to the bootstrap network before, their devices usually remember it, and may unfortunately prefer that network over the then-configured eduroam network. To prevent this, you can configure the name of your bootstrap SSID, and then during the installation process, CAT will either remove it from the client device, or at least mark it as "do not join automatically".
Profiles
Profiles are the specific EAP configurations for your user group(s), and installers are always generated for specific profiles. If you only have one user group, the distinction between institution-wide and profile-wide settings does not make a difference. However, many IdPs have different user groups which share some properties, but not all. One example is where on the one hand students have username/password accounts, authenticating with PEAP and generic helpdesk contact points, and on the other hand permanent staff have TLS Client certificates with EAP-TLS and access to a better second-level helpdesk just for them.
eduroam CAT makes it easy to manage multiple user group profiles for one institution. Shared properties for e.g. server certificates and helpdesk contacts can be defined institution-wide (which makes them immediately available in all profiles) or per-profile (the property then is only defined for this specific profile). You can also define institution-wide settings and override them in specific profiles.
In the first-time wizard, the CAT automatically takes you to the profile creation page as soon as the institution-wide settings are submitted.
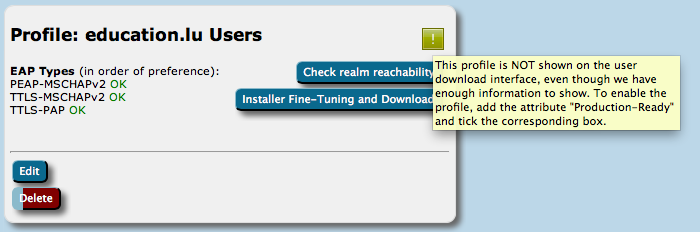
For a profile, you first have to set its name and description, which as usually can be done in many languages. There is also one important option: "Production-Ready". We will not publish your generated installers on the end-user download page unless you set this option and check the box. This is to prevent that people accidently download installers with incomplete information while you are still working on the final setup.
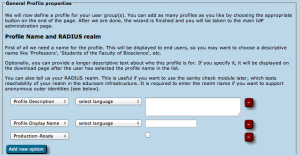
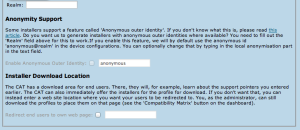
The CAT also asks for the RADIUS realm belonging to this profile; submitting the realm name is optional, but highly recommended because it enables us to do very thorough sanity checks on your RADIUS installation later. Please see the section "Verifying my RADIUS setup" for more details. You can also decide whether you want the generated installers to be configured with an anonymous outer identity, and what that identity should be. If you want users of that profile NOT to be given an installer, you can also specify that we should send your users to your own support page instead. A typical use case for that is if you, the admin, want to generate installers but only download them yourself and present them on your own eduroam support page.
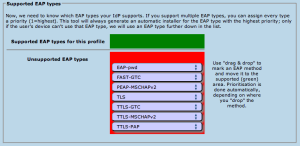
The third part of profile generation is about the EAP types which you've configured in your RADIUS server for this user group. By simple drag&drop, please drag all the EAP types you support into the upper green area. The list is ordered by preference, so drag the EAP types into your preferred order. The CAT will always compare the EAP types you've configured here with the capabilities of the various devices which are to be configured. If the device supports your most preferred EAP type, installers will always be generated for that EAP type. If your preferred EAP type does not work on a given device, the preference list is worked through until a match occurs, and then installers for that device will use that not-so-preferred EAP type (which is better than not supporting eduroam configuration at all). Finally, if there is a complete mismatch between the EAP types you support and the EAP types on a device, then we can't generate installers for that device. You might be luckier if you can change your RADIUS setup to support more EAP types then.
EAP Details
In the EAP Details section, you can upload common properties of your RADIUS installation's EAP configuration. If you specify something here, the settings will be used for all the user profiles you define (see below), unless you choose to override them in one of the profiles.
For most EAP methods, the required EAP details are
- The Certification Authority (CA) certificate(s) which signed your EAP server certificate
- always include the root CA (root CAs are indicated with a blue circled "R" besides the certificate details after upload)
- optionally include intermediate CAs (intermediate or server certificates are indicated with a blue circled ("I") besides the certficate after upload)
- The name of your server as specified in the Common Name (CN) of your EAP server certificate
Note 1 - server certificates
There is no point in uploading the server certificate itself. The server certificate is sent during the EAP exchange during login time to the client. Contrary to that, the CA certificates are needed because they are the trust anchor on the client device which it uses to verify that incoming server certificate.
Note 2 - CA requirements
Various client device operating systems have specific requirements about which CA certificates and server certificates they accept. For more information, please see EAP Server Certificate considerations.
Note 3 - CA rollover support
You can upload multiple root CA certificates simultaneously to CAT. On all supported client OSes, all of them will be installed and all will be marked trusted. This enables CA vertificate rollow without a flag day: User devices which were configured with an upcoming new root CA ahead of time will then not even notice the change of server cert from old to new trust root (so long as the Common Name of the server certificate remains unchanged during the rollover).
Almost all CAT-support client operating systems support mutliple trust roots. There is only one fraction of CAT-supported client OSes which does not support multiple root CAs: Android versions < 7.1. For those, due to an API limitation we are not able to do anything about, only one root CA will be installed; the API also cannot install any intermediate CAs at all. To isolate Android users while giving everyone else multiple trust roots early, you could create a different profile (see next section) just for Android and only load the desired root CA into that profile). Android 7.1 finally got its support for multiple trust roots; the eduroamCAT app already supports that
Given the update situation on the Android platform, it is naive to think that the unsupported root CA rollover problem will wither out in anything less than five years. There is unfortunately nothing we can do about it.
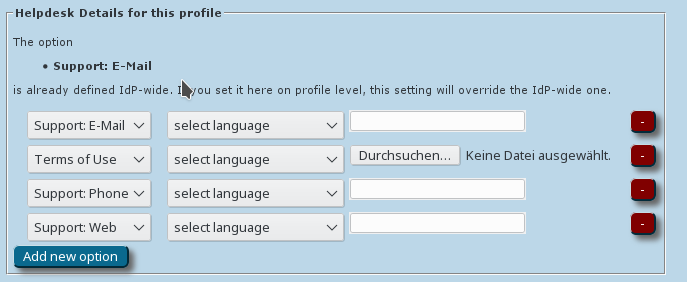
Overriding IdP-wide Settings
After these steps, you can enter/override helpdesk and media properties if you haven't done so on the institution-wide settings already (see above). If you have entered one specific option institution-wide already, and you enter something else here, then the settings on profile level supersede the institution-level ones.
That's all - the CAT then proceeds to a sanity check of the things you have configured and will tell you about any things which need fixing, it any. You are then transported to the Institution dashboard - from where you can continue to download your installers, change institution or profile details, perform sanity checks and more.
Generating installers for my users
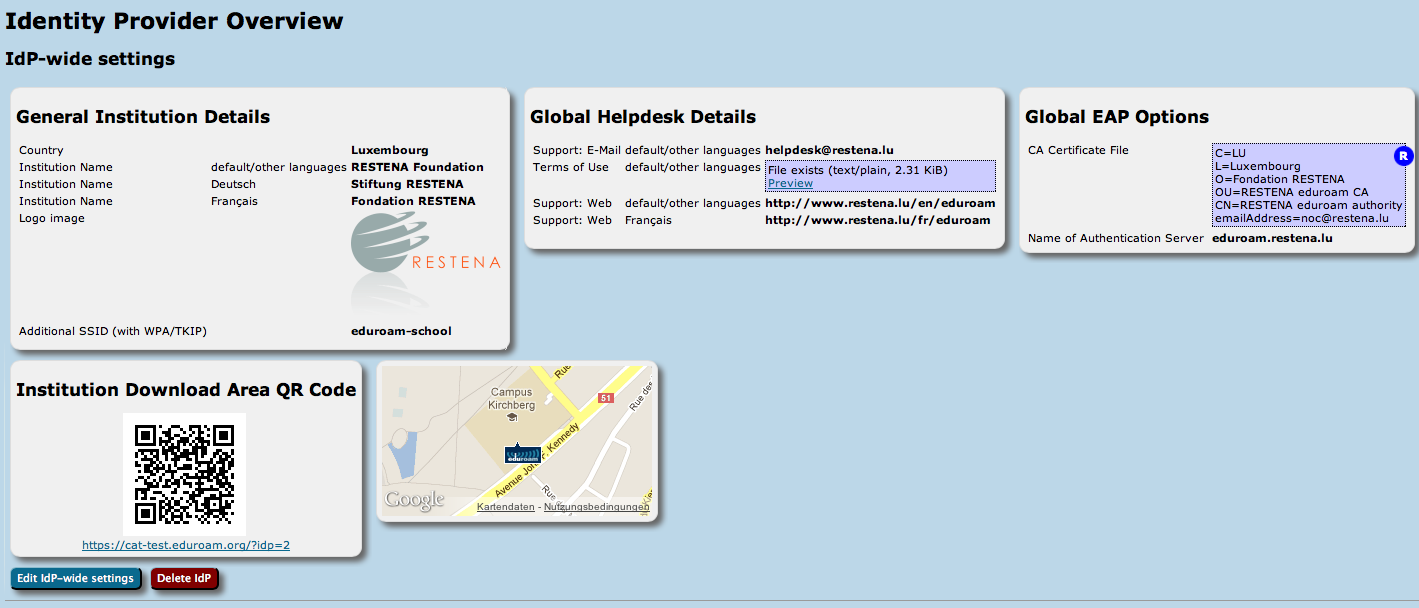
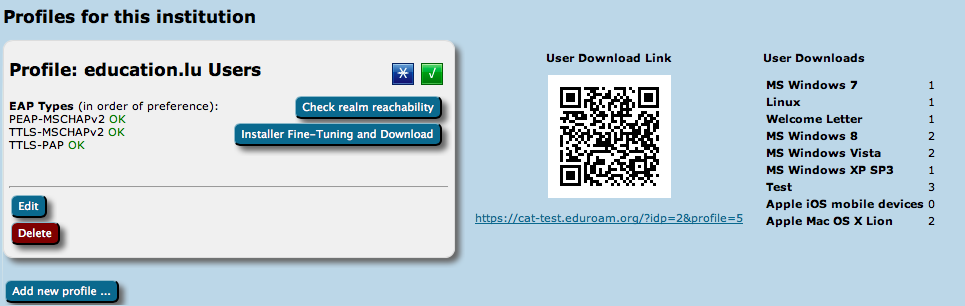
On the institution dashboard page, you see the most important pieces of data that you have entered.
This data (and all profile-specific data) is used to create installers from. To actually get access to the installers, click on the "Installer Fine-Tuning and Download" button in your defined profile.
This will take you to the overview of available installers. It takes the form of a matrix of your enabled EAP types, the devices CAT knows about, and whether or not an installer for all the combinations is available.
- Green matrix entries mean that the installer is ready for use, and there is a Download button in these fields.
- Blue entries mean that CAT could create an installer for that combination, but there is a more highly preferred EAP type which it can serve as well; so that one is generated instead.
- Red entries mean that CAT does not know how to configure the EAP type on that device.
- Grey entries mean that you did not supply all required information for CAT to produce an installer for you - you would need to go back to IdP and/or Profile settings and fill in the missing pieces.
- White entries mean that you have set up an "exception" and CAT will not offer this combination to end-users, even if an installer may in principle be available (see next paragraph for details).
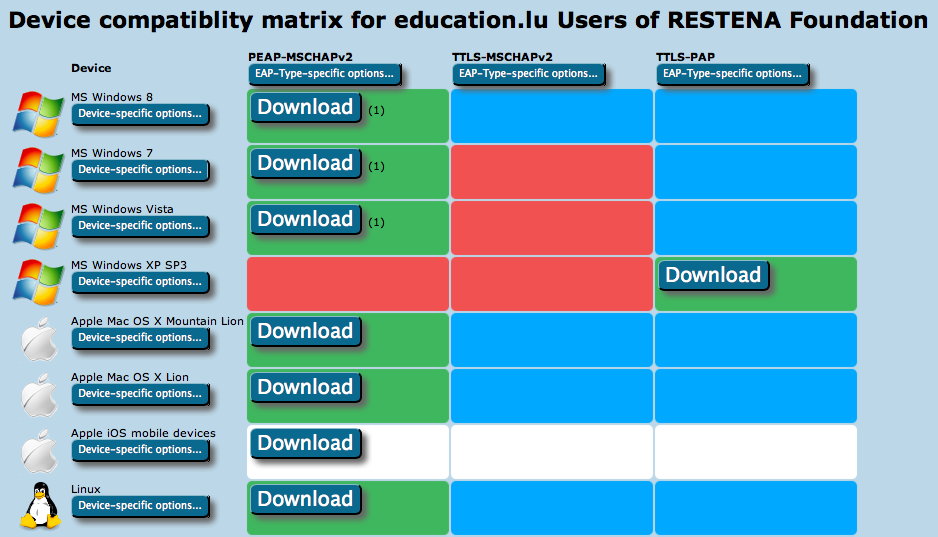
Maybe you have something special to communicate to your users? E.g. hints which password to use for EAP-TTLS, or which secretariat to turn to to get the client certificate for EAP-TLS? Maybe you ban Apple Smartphones from your campus and want to alert users to that end?
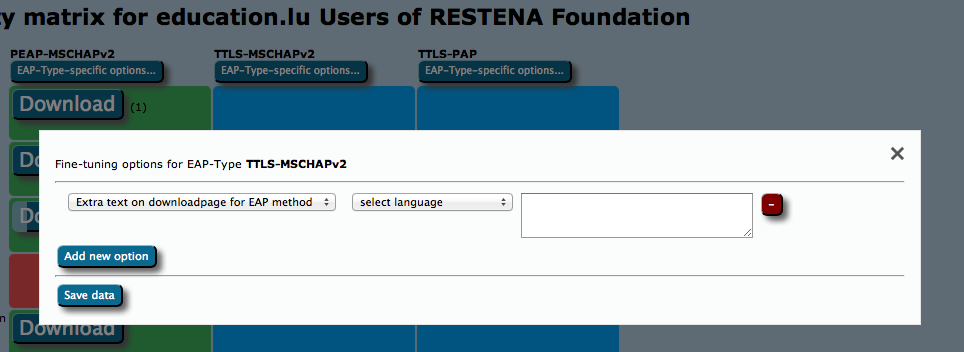
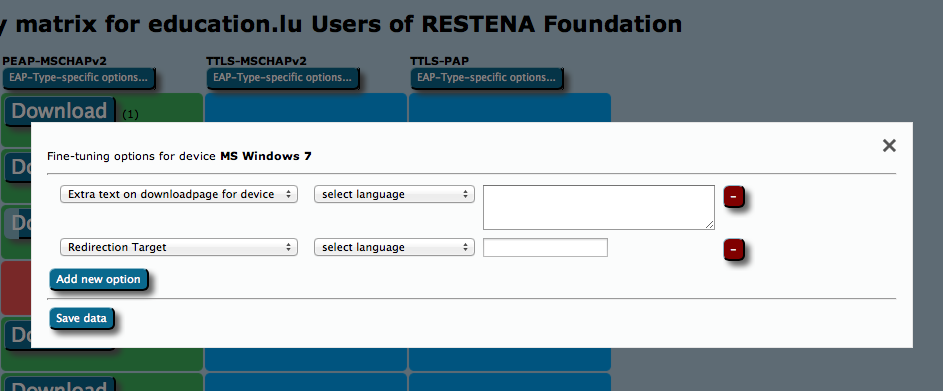
For all these options, the Fine-Tuning page has extra buttons: you can add free-text for either specific EAP Types or specific devices. This text will then be displayed on the user download page before the download begins. For devices, you can also specify a Redirect target; if this is set, CAT will not provide a download button, but instead will redirect users to the URL you specified. This could, for example, be useful if you have a custom-made or commercial installer for one of the devices, and don't want to use CATs services for that device. If this option is set, the background for this device will turn white in the matrix (see screenshot above).
You can now push the download buttons and use the generated installers as you see fit. This is also possible for redirected devices; even though your users don't get this installer from CAT, you as an admin might want to have it anyway, e.g. to include it in your own eduroam support pages.
Installer visibility on the user download page
You are in full control which of the installers, if any, and when you want to show on the CAT end-user download pages. Your control options are as follows:
- Make the EAP profile visible, but redirect users to your own support pages (entry is listed, but no download on the public page). This can be set in Profile options - see screenshot.

- Make the EAP profile visible with installers, but redirect certain devices to your own pages. Use the Fine-Tuning matrix to set the Redirect option for the device (see previous section).
- Make all installers visible.
All of three options will require confirmation by you that you have entered all details and have reviewed the profile to be "production-ready". No details of your EAP deployment will be made visible until you have declared your data set production-ready. You do this by adding the option with that same name in your Profile properties.
The visibility status of your EAP deployment is indicated with either a green (published) or yellow (unpublished) status icon on the Profile info (see screenshot). If the status is yellow, you can hover with your mouse over it to get a more detailed explanation why the profile is not published.
Verifying my RADIUS setup
If you have supplied the CAT with the realm which you are using in eduroam, an extra service is enabled for you: the CAT can send live data probes through the eduroam infrastructure to see if your realm's RADIUS server is reachable and whether it passes various sanity checks. All these tests are triggered by pushing the button "Check realm reachability". You will be presented with an overview page immediately while various tests are executed in the background:
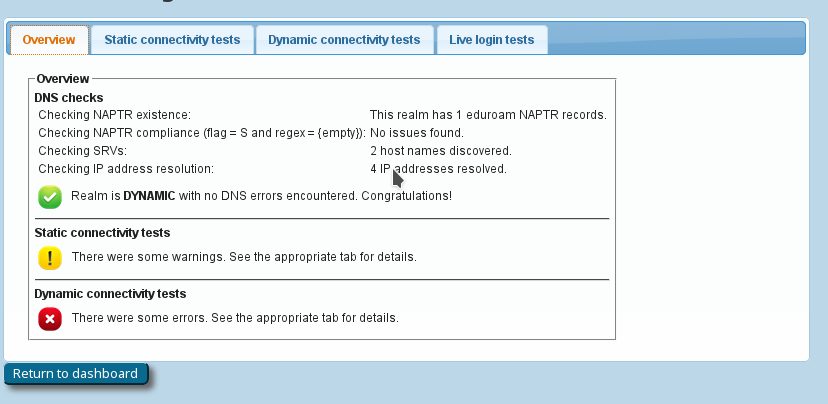
The tests will take a few to several tens of seconds, and will give you an in-depth overview of how your RADIUS server is doing in the world of eduroam. The tests include
- a DNS check whether your realm is publishing NAPTR records for eduroam Dynamic Discovery; and if so, whether all DNS records are correct (if you don't know what Dynamic Discovery is, please talk to your national federation operator. It's cool!). If the DNS checks were successful, the CAT will make actual use of the discovered RADIUS Dynamic Discovery server targets and try to connect. It will present a mix of valid and invalid certificates and will check whether the server acted correctly on receipt of these certificates.

- the results of actual authentication tests which were sent in the moment you pushed the button: these will not log anybody in (we don't have actual user credentials) but even with the planned failed authentication, we can run lots of diagnosis on your server. The web page will let you know if we found some oddities you might want to take care of:
- Authentication round-trip times to your realm which take more than 5 seconds are suspicious
- Your server must be able to send and receive UDP fragments (some firewalls choke on that)
- There are a number of RADIUS attributes that are commonly present in authentication requests; some servers behave strangely on receipt - we'll let you know if yours is problematic
- Checks regarding the structure and validity of your server, intermediate and root CA certificates. These checks are as thorough as checking everything that is described in prose on the EAP Server Considerations page. Here is a typical output if your server certificate is "from the 1990s" (i.e. didn't keep up with all the recommendations and requirements on server certificates in recent years):

- If you feel comfortable giving CAT access to short-lived real authentication credentials (for debugging purposes with test user accounts only!), then you can run an actual positive authentication test; in which case we can run even more diagnosis.

Other features
User API
A full access WEB API makes it possible to create different user interfaces to CAT. In particular you can list countries with configured institutions, list institutions globally or within a country, list profiles within institution, ask for the institution logo or even geolocate users's IP address and, of course download installers for given user profiles and devices.
Silent Windows installers
CAT 1.1 Windows installers can be run silently with the /S flag, which is useful for institutions which want to build the installers into their own, larger ones.
Getting Help with eduroam CAT
If you have any questions about the eduroam CAT website or the underlying software, don't hesitate to ask on the mailing list cat-users@lists.geant.org . If possible, please subscribe to the list before posting; this guarantees that you'll get replies even if someone forgets a "reply to all", and also ensures that your post doesn't accidently get classified as spam and discarded.