A guide to eduroam CAT for institution administrators
eduroam CAT: purpose and scope
eduroam CAT is the eduroam Configuration Assistant Tool. Its purpose is to support you, an eduroam Identity Provider administrator, by allowing you to generate customised eduroam installers for various platforms. The customisation includes your IdP's name, location and logo, contact details for your helpdesk, and of course the RADIUS settings which users need to uniquely identify your IdP when roaming. The installers can be produced in many languages; that way, you can even offer your users an installer in their native language! Further to that, eduroam CAT can also assist you in debugging your own RADIUS setup by comparing your inputs to the actual behaviour of your setup in the eduroam infrastructure.
eduroam CAT can make the end-user installers available on its own user download area, or you may choose to download them yourself and distribute them on your institution's own web page. You can also choose to make only a subset of the supported platforms available for direct download, while redirecting users of select platforms to your own support page (e.g. if you have custom installers with non-standard specialities for these platforms).
eduroam CAT supports a variety of of typical end-user client devices. In particular, it can generate eduroam installers for these platforms:
- Microsoft Windows 8
- Microsoft Windows 7
- Microsoft Windows Vista
- Microsoft Windows XP (Service Pack 3)
- Mac OS X Mountain Lion
- Mac OS X Lion
- iPhone, iPad, iPod touch
- many Linux distributions
As of right now, it notably does NOT support Android, sorry. Your helpdesk will have to take care of Android users by other means.
The support for all the above devices covers many common EAP types; however not all EAP types are supported on all platforms - we largely rely on the target Operating System's capabilities.
eduroam CAT is not replacing your helpdesk! While we hope to do you a good service by taking the technical task of generating secure installers for many platforms into our hands, we can not take your users' phone calls or tell them how to fix problems on their computers. The CAT's installers work on the target platforms if these have not been modified beyond reason by the end-user, and we hope the installation process with them is intuitive enough; but we can not give you guarantees that you will not ever hear from failing users again.
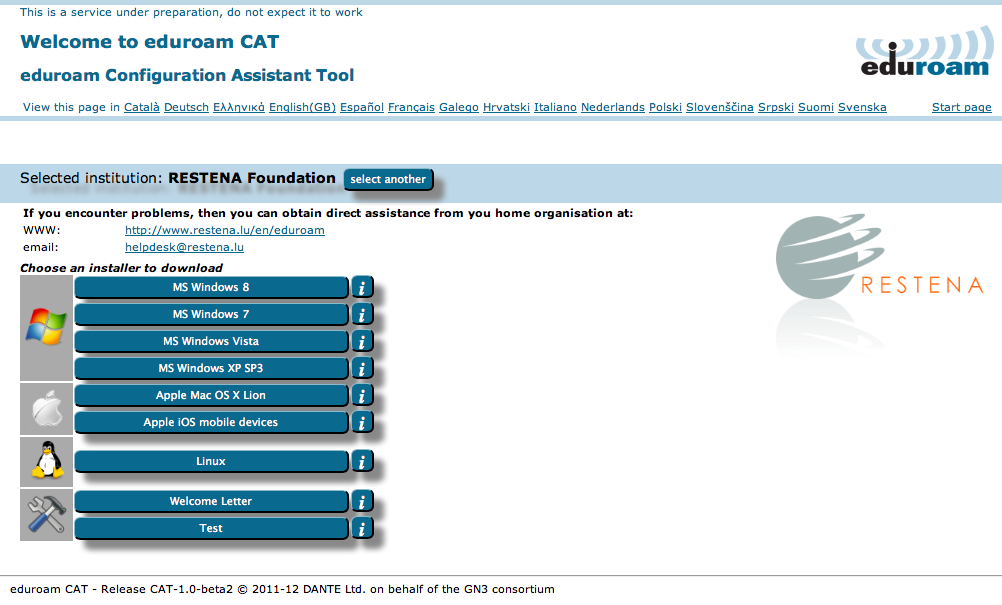
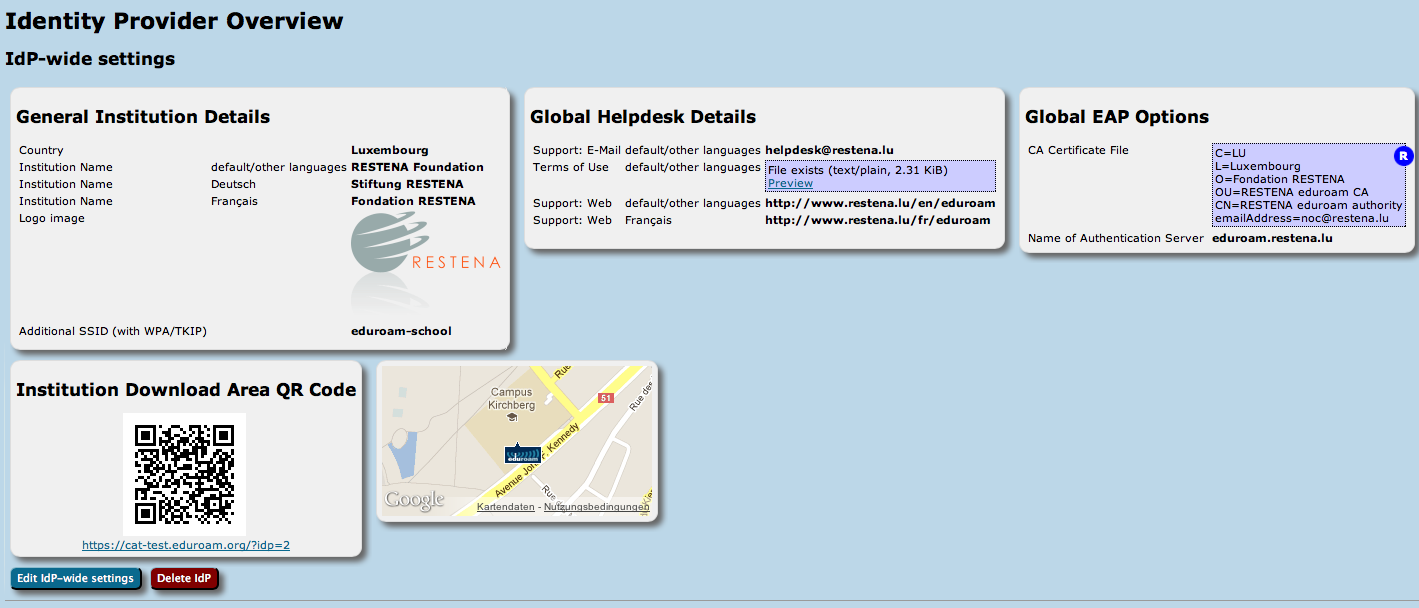
To see how the end-user area looks like, take a look at the following screenshot or try it out live: just hop over to https://cat-test.eduroam.org. You can select any institution, like "RESTENA Foundation" in Luxembourg, to get to the download page of the installers for that institution.
Enrolling my institution for eduroam CAT
Step 1: Requesting an entry for your institution
eduroam CAT follows the usual organizational model of eduroam: your national federation administrator has control over all the Identity Providers in his country. To manage your institution with eduroam CAT, please let your national administrator know that you want to participate using your usual communications channels.
If he finds you eligible for the service, he will send you an invitation email with a token (the token is valid for 24 hours after sending it to you). You can then follow the supplied link with the token, log into the eduroam Administration interface, and start managing your institution - see the next section for details of institution and profile setup.
Step 2: How to log into eduroam CAT?
When clicking on the Administration interface link, you will be automatically sent to the eduroam Support Services' federated login service. This login service does not work with site-specific usernames and passwords; instead you are presented with a list of sources of identity. Choose any organization that you have an account with:
* eduGAIN: many universities across Europe have already joined the educational Global Authorisation INfrastructure - if your organization is among them, click on that institution and authenticate with your home organization's usual web login credentials
* Experimental: some institutions are in the process of joining eduGAIN, but are not production-level members; if that is the case for your institution, you might find your institution's authentication service in this Experimental list
* Social Networks: if you cannot log in with your institution's credentials (for example, because your institution is not participating in eduGAIN), you can also log in using the federated login function of several popular social networks, including, but not limited to, Google and Facebook.
Some users have noted that none of the above options suits them: e.g. their institution is not participating in eduGAIN, and they have an aversion against using social networks. We understand that if a user finds all the numerous authentication options unacceptable, then he will have a hard time logging in. However, at this moment we do not have a good solution to that problem. It might be worth considering creating a social network account just for the purpose of logging in here; even if the service portfolio offered by e.g. Google is not interesting for the user, their authentication service in itself is useful on its own.
Configuring my institution's properties
Overview
There are basically three groups of information which we need to ask of you before we can create good-looking installers for you:
- general information about your institution (e.g. logo, approximate location, name)

- helpdesk contact details (mail, phone, web)
- RADIUS and EAP details

- Textual information can be provided in many languages; one language representation should be set as the default language though - to have a string to present to users who want to use a language which wasn't explicitly configured.
- An institution consists of one of more EAP profiles, each of which can have its own EAP-specific settings. One typical use-case is an institution which has "student" and "staff" accounts with different EAP-Types being supported. Many options in eduroam CAT can either be set for the entire institution or only for a specific profile; if a setting is set on both levels, the more specific profile-level setting will override the institution-level one.
Institution-wide Settings
After you've followed the invitation token from your national administrator, you'll be dropped right in the "Edit IdP" page. On that first time, you'll see a "wizard mode" which provides lots of explanatory text about the meaning of all the settings you can make. You can add and delete any of those options; don't be shy and try them all out! Adding a new option is done by pushing the corresponding button, selecting which option you want to set, and then the content of that new option. Changes will only be saved when you hit the "Continue ..." button on the bottom of the page.


When you re-visit the "Edit IdP" page later from the Institution Overview page, the explanatory texts are condensed in order not to overload the user interface. You'll certainly find your way around without the wizard texts.
Profiles
Profiles are the specific EAP configurations for your user group(s), and installers are always generated for specific profiles. If you only have one user group, the distinction between institution-wide and profile-wide settings does not make a difference. However, many IdPs have different user groups which share some properties, but not all. One example is where on the one hand students have username/password accounts, authenticating with PEAP and generic helpdesk contact points, and on the other hand permanent staff have TLS Client certificates with EAP-TLS and access to a better second-level helpdesk just for them.
eduroam CAT makes it easy to manage multiple user group profiles for one institution. Shared properties for e.g. server certificates and helpdesk contacts can be defined institution-wide (which makes them immediately available in all profiles) or per-profile (the property then is only defined for this specific profile). You can also define institution-wide settings and override them in specific profiles.
In the first-time wizard, the CAT automatically takes you to the profile creation page as soon as the institution-wide settings are submitted.
For a profile, you first have to set its name and description, which as usually can be done in many languages. There is also one important option: "Production-Ready". We will not publish your generated installers on the end-user download page unless you set this option and check the box. This is to prevent that people accidently download installers with incomplete information while you are still working on the final setup.
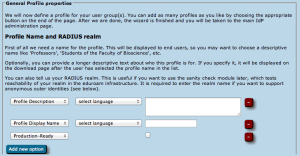
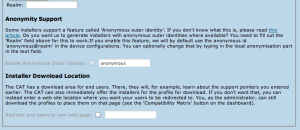
The CAT also asks for the RADIUS realm belonging to this profile; submitting the realm name is optional, but highly recommended because it enables us to do very thorough sanity checks on your RADIUS installation later. Please see the section "Verifying my RADIUS setup" for more details. You can also decide whether you want the generated installers to be configured with an anonymous outer identity, and what that identity should be. If you want users of that profile NOT to be given an installer, you can also specify that we should send your users to your own support page instead. A typical use case for that is if you, the admin, want to generate installers but only download them yourself and present them on your own eduroam support page.
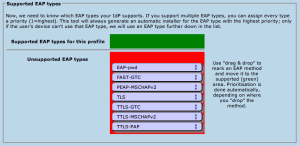
The third part of profile generation is about the EAP types which you've configured in your RADIUS server for this user group. By simple drag&drop, please drag all the EAP types you support into the upper green area. The list is ordered by preference, so drag the EAP types into your preferred order. The CAT will always compare the EAP types you've configured here with the capabilities of the various devices which are to be configured. If the device supports your most preferred EAP type, installers will always be generated for that EAP type. If your preferred EAP type does not work on a given device, the preference list is worked through until a match occurs, and then installers for that device will use that not-so-preferred EAP type (which is better than not supporting eduroam configuration at all). Finally, if there is a complete mismatch between the EAP types you support and the EAP types on a device, then we can't generate installers for that device. You might be luckier if you can change your RADIUS setup to support more EAP types then.
After these steps, you can enter helpdesk and certificate details if you haven't done so on the institution-wide settings already. If you have entered one specific option institution-wide already, and you enter something else here, then the settings on profile level supersede the institution-level ones.

That's all - the CAT then proceeds to a sanity check of the things you have configured and will tell you about any things which need fixing, it any. You are then transported to the Institution dashboard - from where you can continue to download your installers, change institution or profile details, perform sanity checks and more.
Generating installers for my users
On the institution dashboard page, you see the most important pieces of data that you have entered.
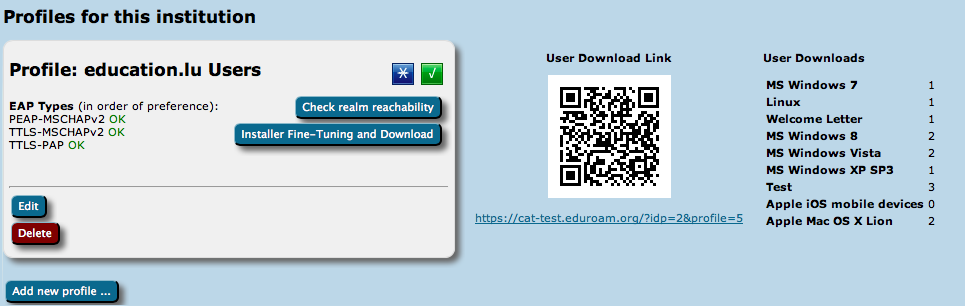
This data (and all profile-specific data) is used to create installers from. To actually get access to the installers, click on the "Installer Fine-Tuning and Download" button in your defined profile.
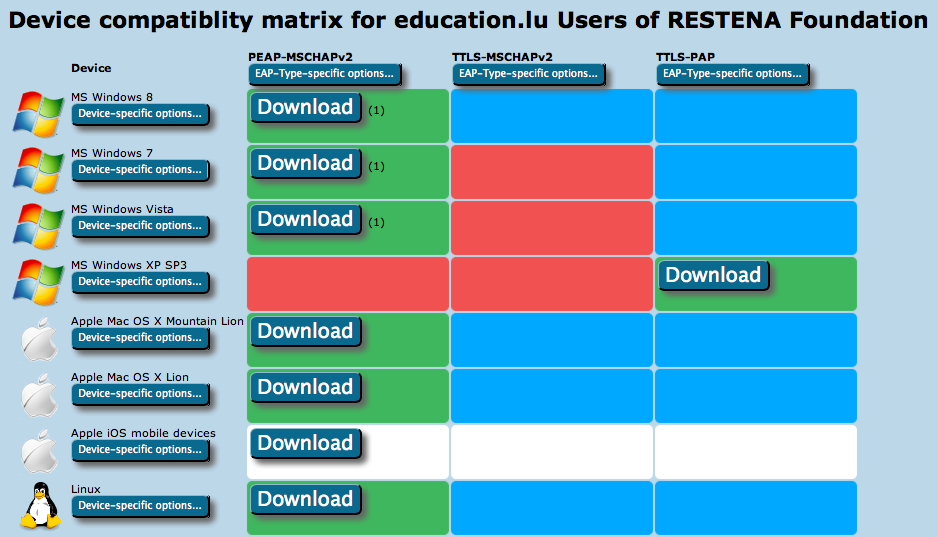
This will take you to the overview of available installers. It takes the form of a matrix of your enabled EAP types, the devices CAT knows about, and whether or not an installer for all the combinations is available.
- Green matrix entries mean that the installer is ready for use, and there is a Download button in these fields.
- Blue entries mean that CAT could create an installer for that combination, but there is a more highly preferred EAP type which it can serve as well; so that one is generated instead.
- Red entries mean that CAT does not know how to configure the EAP type on that device.
- Grey entries mean that you did not supply all required information for CAT to produce an installer for you - you would need to go back to IdP and/or Profile settings and fill in the missing pieces.
- White entries mean that you have set up an "exception" and CAT will not offer this combination to end-users, even if an installer may in principle be available (see next paragraph for details).
Maybe you have something special to communicate to your users? E.g. hints which password to use for EAP-TTLS, or which secretariat to turn to to get the client certificate for EAP-TLS? Maybe you ban Apple Smartphones from your campus and want to alert users to that end?
For all these options, the Fine-Tuning page has extra buttons: you can add free-text for either specific EAP Types or specific devices. This text will then be displayed on the user download page before the download begins. For devices, you can also specify a Redirect target; if this is set, CAT will not provide a download button, but instead will redirect users to the URL you specified. This could, for example, be useful if you have a custom-made or commercial installer for one of the devices, and don't want to use CATs services for that device. If this option is set, the background for this device will turn white in the matrix (see screenshot above).
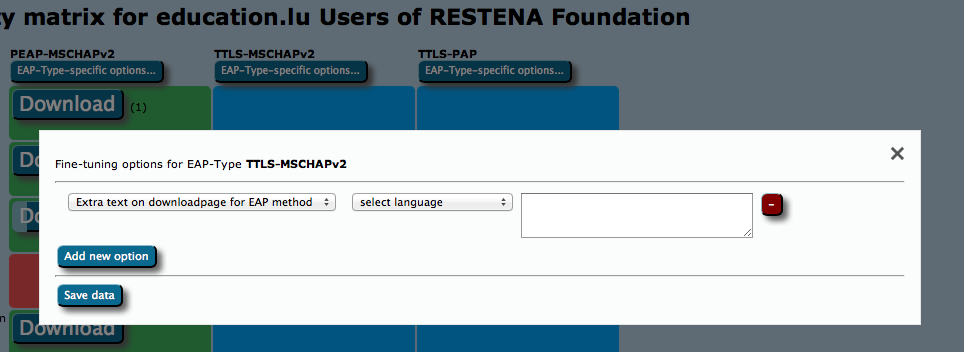

You can now push the download buttons and use the generated installers as you see fit. This is also possible for redirected devices; even though your users don't get this installer from CAT, you as an admin might want to have it anyway, e.g. to include it in your own eduroam support pages.
Installer visibility on the user download page
You are in full control which of the installers, if any, and when you want to show on the CAT end-user download pages. Your control options are as follows:
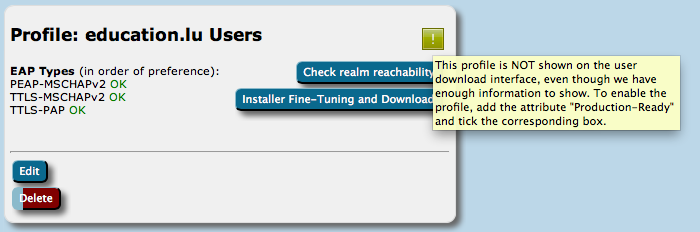
- Make the EAP profile visible, but redirect users to your own support pages (entry is listed, but no download on the public page). This can be set in Profile options - see screenshot.

- Make the EAP profile visible with installers, but redirect certain devices to your own pages. Use the Fine-Tuning matrix to set the Redirect option for the device (see previous section).
- Make all installers visible.
All of three options will require confirmation by you that you have entered all details and have reviewed the profile to be "production-ready". No details of your EAP deployment will be made visible until you have declared your data set production-ready. You do this by adding the option with that same name in your Profile properties.
The visibility status of your EAP deployment is indicated with either a green (published) or yellow (unpublished) status icon on the Profile info (see screenshot). If the status is yellow, you can hover with your mouse over it to get a more detailed explanation why the profile is not published.
Verifying my RADIUS setup
explain realm testing tool. Note UDP frag check, Op-Name; most admins will probably have neglected these things.