Create a copy of this page as a sibling and complete it as instructed below.
Describe the platform
To ensure a successful test of the authenticator, please follow these steps:
- For this test, you need a computer or mobile device and a hardware or software authenticator. It may be:
- Hardware authenticator, such as YubiKey.
- Operating system authenticator, such as Touch ID or Windows Hello.
- Software authenticator, such as tpm-fido.
- Password manager with passkey support, such as Dashlane.
- The actions performed during this test are parts of regular usage and should not affect the authenticator in any way. However, you may choose to use a brand-new authenticator, reset or clear it to avoid any conflicts during the test.
- If necessary, delete the passkey that you create during this testing if it prevents you from creating it again. This should not happen, but if it does, please provide a screenshot and an accompanying note. If you are willing to, reset the authenticator's settings (e.g., disable PIN, unregister fingerprint).
- xx
- Then don't test it, or fill "yes" into "I registered a PIN/password/finger/face in the authenticator before the session".
- Fill in the details in the table below:
Tester: | |
|---|---|
| }}Date: Use '//' to input date{15{ | |
| }}Authenticator (or device) vendor: Yubico, Apple, Dell, HP, Android phone brand...{3{ | |
| }}Authenticator (or device) model: YubiKey 5 NFC, iPhone 13, PC model name, MacBook year size, MacBook Air year size, MacBook Pro year size...{20{ | |
| }}OS and its version: iOS 13, macOS 10.5.8, Windows 10 22H2, Windows 11 22H2, Android 13...{25{ | |
| }}Browser and its version: Chrome 114, Firefox 114...{30{ | |
| }}I registered a PIN/password/finger/face in the authenticator before the session: Enter yes or no{35{ |
}}
- Be prepared to capture screenshots of each system/browser dialogue that appears. Later in this process, you will register a passkey multiple times.
Capture the platform or browser passkey options
- If there are any options or settings related to "passkeys", "security keys" or similar in your OS/device/spaceship settings (related to the authenticator you are going to use), capture screenshots and paste or attach them here.
- If you are using a password manager, capture its passkey-related options.
- If you are using a browser supporting passkeys, capture its options instead.
- If f you are using an operating system to manage passkeys, capture its options instead.
Possible locations:
- Windows 11: Settings > Accounts > Passkeys
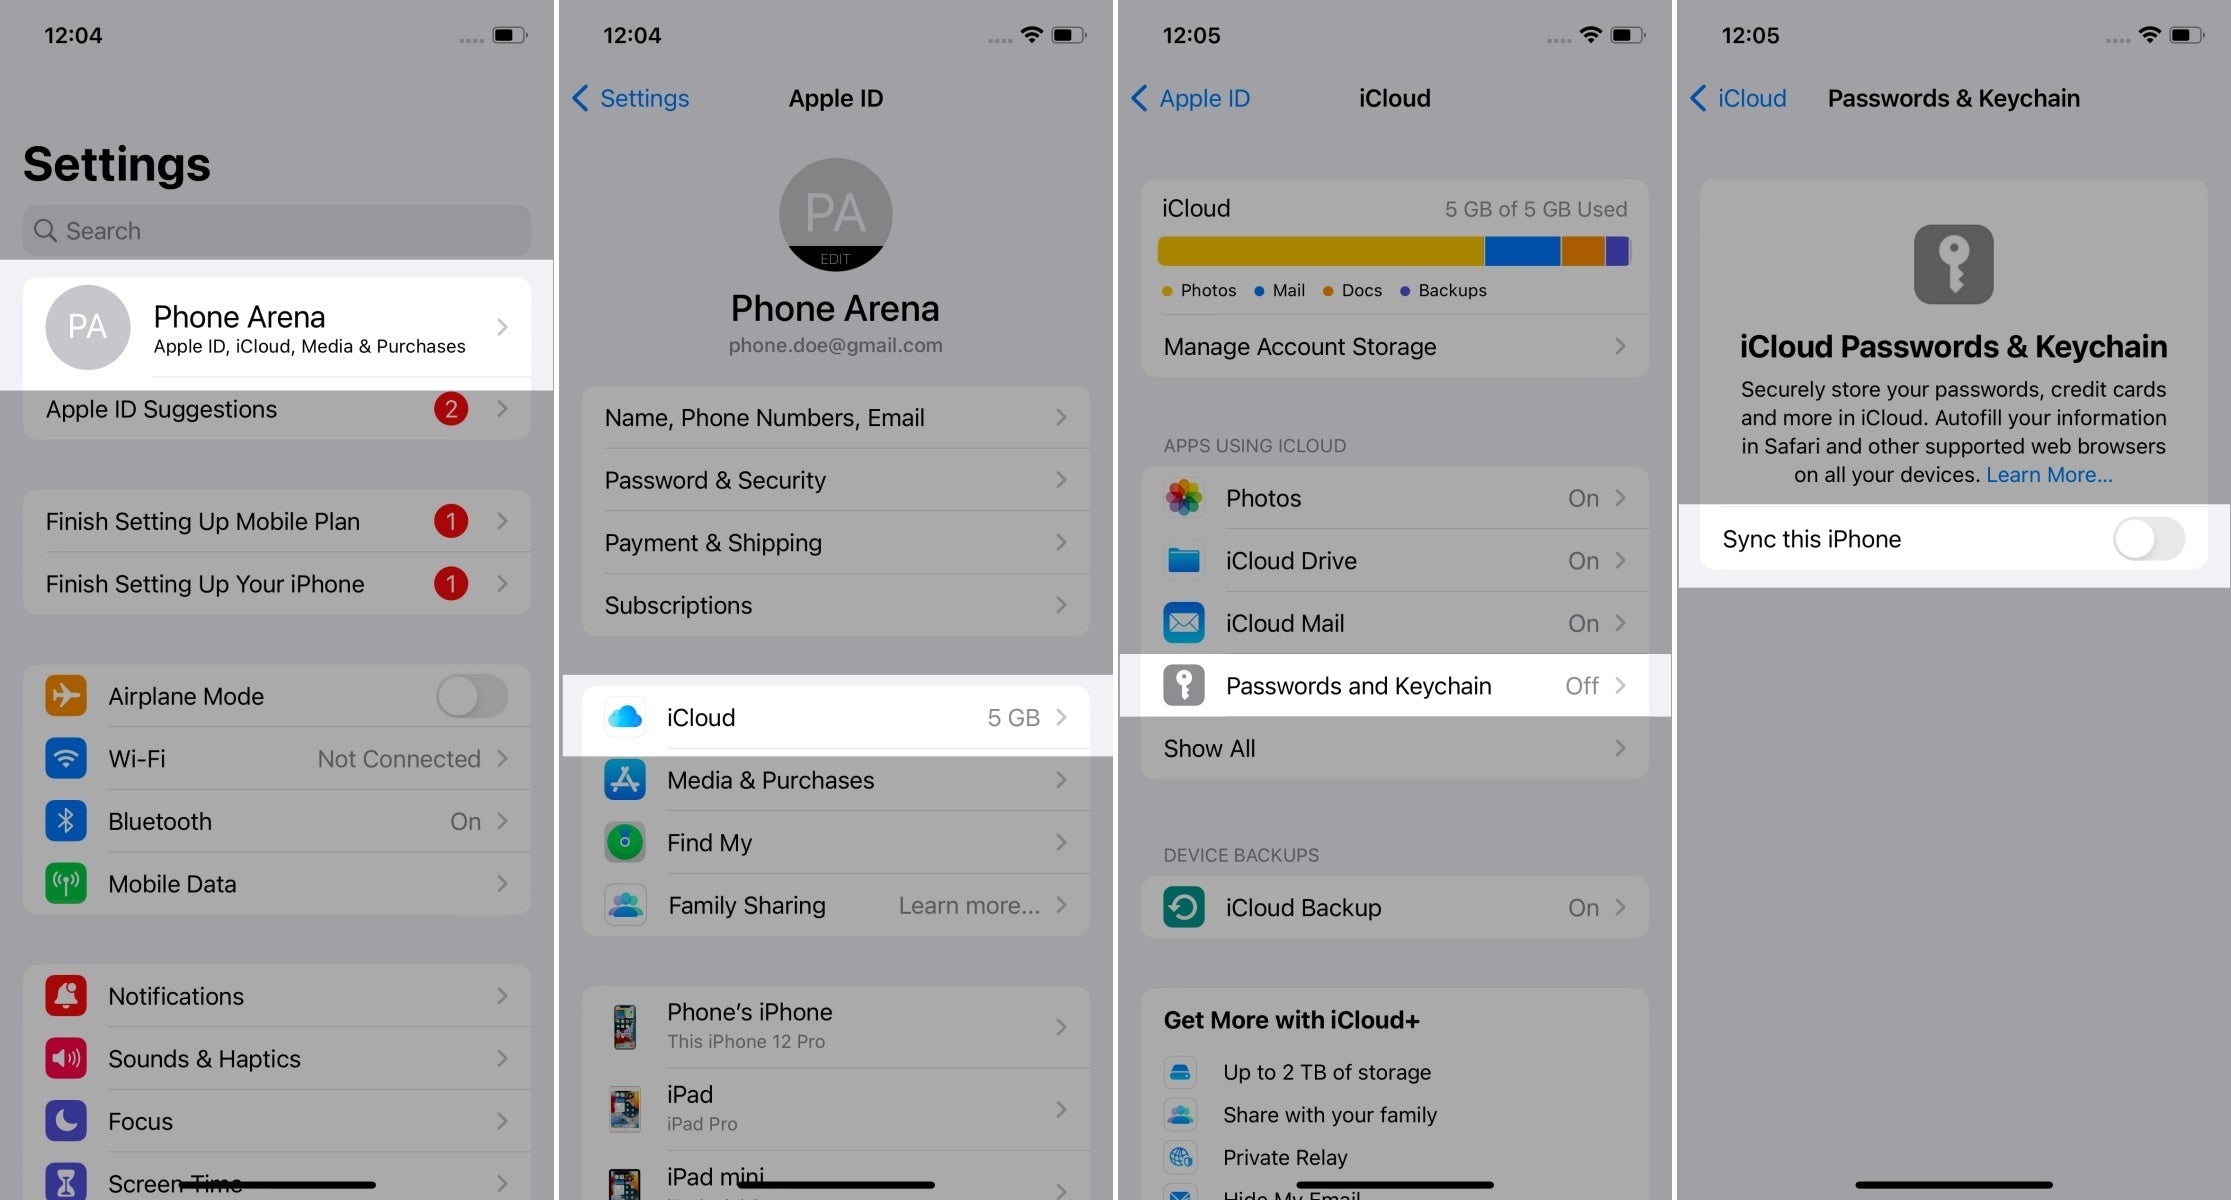
- iOS: Settings > Apple ID > iCloud > Passwords & Keychain
These are exemplary paths. You need to screenshot the only passkey-relates options (the rightmost screen here):
Please paste screenshots in or outside this table as suitable:
Get diagnostics
- Open https://webauthntest.identitystandards.io/.
- Click the "..." button.
}}Copy-paste the diagnostic results on the right as text (rows are labelled the same): Platform authenticator (isUVPAA): Conditional Mediation (Autofill UI): CTAP2 support (Firefox): {40{ |
|---|
}}
Set repeated settings
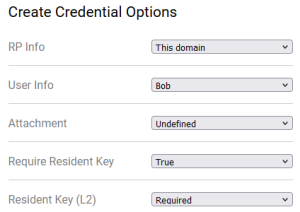
- Click the "+" button to create a passkey. Choose the following values:
- RP Info: This domain
- User Info: Bob
- Attachment: undefined
- Require Resident Key: true
- Resident Key (L2): required
It should look like this:
Create passkeys using various settings
- Capture and paste below the screenshot of various prompts, screens, dialogues, questions or messages that show up during passkey registration as you encounter them.
- If some options are offered, snapshot them as well, but do not change anything.
- Capture screenshots at each step of the first passkey creation.
- Also, capture screenshots when new screens appear during subsequent passkey creations and add them here.
- Try not to duplicate screenshots of the same steps, as interactions will likely look similar.
If you encounter an error message like "Authenticator data cannot be parsed", it indicates that the combination of arguments used is not supported by the authenticator being tested.
- You can add a note to a screenshot if you encounter an error or find something interesting.
Please insert or paste screenshots in this table as suitable, preferably putting the related screenshots in one row:
Place one row after each?
Test User Verification
- Select User Verification: Discouraged and click CREATE.
- Follow the requested steps to create a passkey, then copy-paste the result from the web app.
Copy-paste the result on the right: |
|---|
}}
- Select User Verification: Required and click CREATE.
- Follow the requested steps to create a passkey, then copy-paste the result from the web app.
- Note that the latest result is the rightmost in the bottom row. You may delete already pasted results.
Copy-paste the result on the right: |
|---|
}}
Test Attestation
- Select Attestation: Enterprise and click CREATE.
- Follow the requested steps to create a passkey, then copy-paste the result from the web app.
Copy-paste the result on the right: |
|---|
}}
- Select Attestation: Direct and click CREATE.
- Follow the requested steps to create a passkey, then copy-paste the result from the web app.
Copy-paste the result on the right: |
|---|
}}
- Select Attestation: Indirect and click CREATE.
- Follow the requested steps to create a passkey, then copy-paste the result from the web app.
Copy-paste the result on the right: |
|---|
}}
- Select Attestation: None and click CREATE.
- Follow the requested steps to create a passkey, then copy-paste the result from the web app.
Copy-paste the result on the right: |
|---|
}}
- If none of the previous four tries worked,
- Select Attestation: Undefined and click CREATE.
- Follow the requested steps to create a passkey, then copy-paste the result from the web app.
- Otherwise, skip this step???
Copy-paste the result on the right: |
|---|
}}
- If Attestation: Direct worked, select it. Otherwise, if Attestation: Indirect worked, select it. What about None? Otherwise, select Attestation: Undefined.
- Say which they used?
Test CredProtect Extension
- Select CredProtect Extension: UVOptional and click CREATE.
- Follow the requested steps to create a passkey, then copy-paste the result from the web app.
Copy-paste the result on the right: |
|---|
}}
- Select CredProtect Extension: UVOptionalWithCredIDList and click CREATE.
- Follow the requested steps to create a passkey, then copy-paste the result from the web app.
Copy-paste the result on the right: |
|---|
}}
- Select CredProtect Extension: UVRequired and click CREATE.
- Follow the requested steps to create a passkey, then copy-paste the result from the web app.
Copy-paste the result on the right: |
|---|
}}
- If none of the previous three tries worked,
- Select CredProtect Extension: Undefined and click CREATE.
- Follow the requested steps to create a passkey, then copy-paste the result from the web app.
- Otherwise, skip this step???
Copy-paste the result on the right: |
|---|
}}
- Select CredProtect Extension: Undefined (if not selected already).
Test cryptography
- Uncheck all the following checkboxes: Use ES256, Use ES384, Use ES512, Use RS256, Use EdDSA.
- Check Use ES256 and click CREATE.
- Follow the requested steps to create a passkey, then copy-paste the result from the web app.
Copy-paste the result on the right: |
|---|
}}
- Uncheck Use ES256, check Use ES384 and click CREATE.
- Follow the requested steps to create a passkey, then copy-paste the result from the web app.
Copy-paste the result on the right: |
|---|
}}
- Uncheck Use ES384, check Use ES512 and click CREATE.
- Follow the requested steps to create a passkey, then copy-paste the result from the web app.
Copy-paste the result on the right: |
|---|
}}
- Uncheck Use ES512, check Use RS256 and click CREATE.
- Follow the requested steps to create a passkey, then copy-paste the result from the web app.
Copy-paste the result on the right: |
|---|
}}
- Uncheck Use RS256, check Use EdDSA
- and click CREATE.
- Follow the requested steps to create a passkey, then copy-paste the result from the web app.
Copy-paste the result on the right: |
|---|
}}
Passkey usage testing?
Conclusion
- Do you have
- and click CREATE.
- Follow the requested steps to create a passkey, then copy-paste the result from the web app.
Do you have any additional observations or comments related to the entire procedure:{120{ |
|---|
}}
- Please, do not forget to Please or paste screenshots in the above tables.