Blog from October, 2020

So everyone inside home network can reach the Internet thanks to NAT translation described in SOHO #004

Requirement

  • Basic Linux/Unix knowledge
  • Service provider networking knowledge

Overview

In the previous article we enabled and checked IPv4 connectivity between all potential host within 192.168.128.0/17 and the outside Networks beyond ISP box. But, this is pretty useless as I can't imagine my kids typing IPv6 address (2001:8b0:0:30::666:102) in the browser in order to play a FUN puzzle. (Though for now we are suppose to have only IPv4 (smile)) So we definitely need to provide name service resolution at the SOHO router itself.

Article objective

In this article we will pursue the SOHO network appliance installation and enable name service to all host @ home.

Diagrams

[ SOHO #005 ] - "Got your Id number, but ... What's your name ?"

First step, it is need to configure the router as a client name for an existing DNS server.

SOHO router in VRF inet
!
conf t
client name-server 8.8.8.8 1.1.1.1 
!

So this declare our SOHO router as DNS client for 8.8.8.8 as primary DNS server and 1.1.1.1 as backup DNS server.

This step is mandatory as it will bind traffic originated from SOHO router to a specific VRF (here: inet). So this can be also qualified as "VRF proxy-awareness". In this way all DNS traffic originated from the router will be bound to VRF inet. This is done in 2 steps. The first step is to create the proxy-profile and bind it to the main VRF inet. The second step is to declare the SOHO router as client of this proxy-profile service.

SOHO router in VRF inet
!
! step 1
!
proxy-profile pp-inet
 vrf inet
 exit
!
! step 2
!
client proxy pp-inet
!

Step -3-, configure DNS cache / server 

  • enable recursion (recursive query toward other DNS defined 8.8.8.8, 1.1.1.1)
  • bind it to a specific interface (so SOHO router will answer only DNS from this interface)
  • bind it to VRF inet
SOHO router DNS cache
!
server dns ns-inet
 recursion enable
 interface loopback0
 vrf inet
 exit
!

So this declare our SOHO router as DNS client for 8.8.8.8 as primary DNS server and 1.1.1.1 as backup DNS server

Step -4-, configure DNS and DHCP to propagate default dummy zone local

  • Use local if you don't plan to propagate a domain name
  • create local as dummy zone


Propagate "local" zone
!
server dhcp4 dh4-inet
 dns-server 192.168.254.1
 domain-name local
 exit
!
server dns ns-inet
 zone local
 exit
!

Verification

When -1- and -2- are realised the router can resolve name

DNS resolution from CLI (DNS query originated by router)
ping www.free.fr /vrf inet                                             
pinging 212.27.48.10, src=null, vrf=inet, cnt=5, len=64, tim=1000, ttl=255, tos=0, sweep=false
!!!!!
result=100%, recv/sent/lost=5/5/0, rtt min/avg/max/total=3/3/4/16

This can be verified only using a host connected to SOHO router. Let's assume a laptop connected behind sdn6.

ping & ping6 hostname
...
╭─[10/31/20|3:01:19]loui@MacBook-Pro-de-Frederic.local ~  
╰─➤  ping www.free.fr
PING www.free.fr (212.27.48.10): 56 data bytes
64 bytes from 212.27.48.10: icmp_seq=0 ttl=57 time=3.670 ms
64 bytes from 212.27.48.10: icmp_seq=1 ttl=57 time=6.666 ms
64 bytes from 212.27.48.10: icmp_seq=2 ttl=57 time=6.163 ms
64 bytes from 212.27.48.10: icmp_seq=3 ttl=57 time=6.118 ms
^C
--- www.free.fr ping statistics ---
4 packets transmitted, 4 packets received, 0.0% packet loss
round-trip min/avg/max/stddev = 3.670/5.654/6.666/1.166 ms
╭─[10/31/20|3:40:12]loui@MacBook-Pro-de-Frederic.local ~  
╰─➤  ping6 www.free.fr
PING6(56=40+8+8 bytes) 2a01:e0a:159:2857:b9d9:e9e0:ae30:88e5 --> 2a01:e0c:1::1
16 bytes from 2a01:e0c:1::1, icmp_seq=0 hlim=56 time=3.805 ms
16 bytes from 2a01:e0c:1::1, icmp_seq=1 hlim=56 time=6.898 ms
16 bytes from 2a01:e0c:1::1, icmp_seq=2 hlim=56 time=5.868 ms
16 bytes from 2a01:e0c:1::1, icmp_seq=3 hlim=56 time=5.729 ms
^C
--- www.free.fr ping6 statistics ---
4 packets transmitted, 4 packets received, 0.0% packet loss
round-trip min/avg/max/std-dev = 3.805/5.575/6.898/1.117 ms

...

IPv4 / IPv6 name resolution
...
╭─[10/31/20|3:42:11]loui@MacBook-Pro-de-Frederic.local ~  
╰─➤  dig www.free.fr                                                                                                                                                127 ↵

; <<>> DiG 9.10.6 <<>> www.free.fr
;; global options: +cmd
;; Got answer:
;; ->>HEADER<<- opcode: QUERY, status: NOERROR, id: 25030
;; flags: qr rd ra; QUERY: 1, ANSWER: 1, AUTHORITY: 0, ADDITIONAL: 0

;; QUESTION SECTION:
;www.free.fr.                   IN      A

;; ANSWER SECTION:
www.free.fr.            20961   IN      A       212.27.48.10

;; Query time: 21 msec
;; SERVER: 192.168.254.1#53(192.168.254.1)
;; WHEN: Sat Oct 31 15:42:18 CET 2020
;; MSG SIZE  rcvd: 56

╭─[10/31/20|3:42:18]loui@MacBook-Pro-de-Frederic.local ~  
╰─➤  dig AAAA www.free.fr  

; <<>> DiG 9.10.6 <<>> AAAA www.free.fr
;; global options: +cmd
;; Got answer:
;; ->>HEADER<<- opcode: QUERY, status: NOERROR, id: 21770
;; flags: qr rd ra; QUERY: 1, ANSWER: 1, AUTHORITY: 0, ADDITIONAL: 0

;; QUESTION SECTION:
;www.free.fr.                   IN      AAAA

;; ANSWER SECTION:
www.free.fr.            21075   IN      AAAA    2a01:e0c:1::1

;; Query time: 5 msec
;; SERVER: 192.168.254.1#53(192.168.254.1)
;; WHEN: Sat Oct 31 15:42:29 CET 2020
;; MSG SIZE  rcvd: 68
...

As said IPv6 verification are just FYI, as we are supposed to have deployed only IPv4 till now. The point to show off IPv6 verification is to verify DNS AAAA request are working properly.

Conclusion

In this article DNS service has been enabled at:

  • SOHO router level 
  • All host getting an IPv4 via DHCP will get a DNS server set to SOHO@loopback0 (192.168.254.1)

RARE validated design: [ SOHO #005 ] - key take-away

In this example the key take-away are:

  • proxy-profile usage in order to proxy DNS query into VRF inet
  • proxy-profile can be used to proxy other types of traffic
  • data/routed traffic is not affected by proxy-profile


If you have followed sequentially previous SOHO articles, you should have now a strong vanilla base in order to develop you home office network or you home network. 

Requirement

  • Basic Linux/Unix knowledge
  • Service provider networking knowledge

Overview

In the previous article we enabled and checked IPv4 connectivity between RARE/freeRouter and ISP box using sdn1 interface within 192.168.0.0/24 network. But as stated in the previous post, I'd like:

  • all people connected within 192.168.128.0/17
  • to access the external world

Article objective

In this article we will pursue the SOHO network appliance installation and enable IPv4 connectivity for all host connected within your internal network to the external world.

Diagrams

[ #004 ] - Do you need translation ? 

First step, let's create an interface Loopback0 within 192.168.128.0/17, let's say 192.168.254.1/32

SOHO router in VRF inet
sh run loopback0                                                        
interface loopback0
 no description
 vrf forwarding inet
 ipv4 address 192.168.254.1 255.255.255.255
 no shutdown
 no log-link-change
 exit
!

First step, let's try to ping 8.8.8.8

ping 8.8.8.8
ping 8.8.8.8 /vrf inet /interface lo0                                  
pinging 8.8.8.8, src=192.168.254.1, vrf=inet, cnt=5, len=64, tim=1000, ttl=255, tos=0, sweep=false
.....
result=0%, recv/sent/lost=0/5/5, rtt min/avg/max/total=10000/0/0/5003

Hey ! It seems that it's not working as expected ! At the present time, it seems that no one is able to reach outside world. Let's try to figure out why.

Note

  • It is a common best practice to dedicate a loopback to a router in a VRF
  • Loopback are mostly used to identify a service proposed by the router
  • Each services are bound to this Loopback in a specific VRF 
traceroute 8.8.8.8 using looback0 as source address
traceroute 8.8.8.8 /vrf inet /interface lo0                            
tracing 8.8.8.8, src=192.168.254.1, vrf=inet, prt=0/33440, tim=1000, tos=0, len=64
1 192.168.254.1 time=0
2 null time=1000
3 null time=1000
4 null time=1000
5 null time=1000
6 null time=1000
7 null time=1000
8 null time=1000
9 null time=1000
10 null time=1000

This confirms the ping failures we observed previously. The output above indicate the packet does not even egress our SOHO router.

What is the inet VRF says ?

routes inside VRF inet
show ipv4 route inet                                                   
typ  prefix            metric  iface      hop            time
C    192.168.0.0/24    0/0     sdn1       null           14:30:07
LOC  192.168.0.90/32   0/1     sdn1       null           14:30:07
C    192.168.128.0/24  0/0     sdn999     null           14:30:13
LOC  192.168.128.1/32  0/1     sdn999     null           14:30:13
C    192.168.254.1/32  0/0     loopback0  null           14:30:15

So we have no default routes . Let's configure one then pointing towards ISP BOX gateway:

Default route configuration
conf t
ipv4 route inet 0.0.0.0 0.0.0.0 192.168.0.254
routes inside VRF inet
show ipv4 route inet                                                   
typ  prefix            metric  iface      hop            time
S    0.0.0.0/0         1/0     sdn1       192.168.0.254  14:30:07
C    192.168.0.0/24    0/0     sdn1       null           14:30:07
LOC  192.168.0.90/32   0/1     sdn1       null           14:30:07
C    192.168.128.0/24  0/0     sdn999     null           14:30:13
LOC  192.168.128.1/32  0/1     sdn999     null           14:30:13
C    192.168.254.1/32  0/0     loopback0  null           14:30:15

So at that point, packet send to 8.8.8.8 are sent to nexthop 192.168.0.254 via sdn1.

ping 8.8.8.8
ping 8.8.8.8 /vrf inet /interface lo0                                  
pinging 8.8.8.8, src=192.168.254.1, vrf=inet, cnt=5, len=64, tim=1000, ttl=255, tos=0, sweep=false
.....
result=0%, recv/sent/lost=0/5/5, rtt min/avg/max/total=10000/0/0/5003

But ping is still not not working. Let's figure out what's going on here.

As depicted in previous article:

  • ISP box has a demarcation point set to 192.168.0.254
  • So ISP box at some point is configured to perform Network Address Translation from 192.168.0.0/24 → ISP public IPv4 interface
  • When ISP box receives a ICMP ping from 192.168.254.1 which does not match any ISP box NAT rules → Packet is discarded

Therefore in order to have a working seamless networking environment from the ISP box point of view, traffic coming from 192.168.128.0/17 might need to be NAT(ed) into 192.168.0.0/24 network. Let's see If our guess is right.

Let's configure IPv4 Network Address Translation specifically for Loopback0

ping 8.8.8.8
!
conf t
access-list ACL-NAT4   
 sequence 10 deny all 192.168.128.0 255.255.128.0 all 192.168.128.0 255.255.128.0 all
 sequence 20 deny all any all 224.0.0.0 240.0.0.0 all                                          
 permit all 192.168.254.1 255.255.255.255 all any all     
exit
!
ipv4 nat inet sequence 10 srclist ACL-NAT4 interface sdn1
!

 In the config stanza above we configure an access-list called ACL-NAT4 in VRF inet that would translate all incoming packet matching 192.168.254.1 going to anywhere to interface sdn1 IPv4. But we also don't NAT for inter-vlan traffic within 192.168.128.0/17 and also does not touch multicast traffic.

ping 8.8.8.8
ping 8.8.8.8 /vrf inet /interface sdn1                                 
pinging 8.8.8.8, src=192.168.0.90, vrf=inet, cnt=5, len=64, tim=1000, ttl=255, tos=0, sweep=false
!!!!!
result=100%, recv/sent/lost=5/5/0, rtt min/avg/max/total=3/3/4/16

Yahhoooo ! It works ... Our guess was good after all... (smile)

For the future we assume that the home network is subnetted as follow and are all inside VRF inet:

  • appliance port#1 @ sdn1: 192.168.0.0/24 (ISP subnet)
  • appliance port#2 @ sdn2: 192.168.130.0/24
  • appliance port#3 @ sdn3: 192.168.133.0/24
  • appliance port#4 @ sdn4: 192.168.134.0/24 (unused)
  • appliance port#5 @ sdn5: 192.168.135.0/24
  • appliance port#6 @ sdn6: 192.168.136.0/24
  • appliance integrated wifi @ sdn998: 192.168.129.0/24
  • appliance loopback inet @ loopback0: 192.168.129.0/24


ping 8.8.8.8
!
conf t
access-list ACL-NAT4
 sequence 10 deny all 192.168.128.0 255.255.128.0 all 192.168.128.0 255.255.128.0 all
 sequence 20 deny all any all 224.0.0.0 240.0.0.0 all
 sequence 30 permit all 192.168.128.0 255.255.255.0 all any all
 sequence 40 permit all 192.168.129.0 255.255.255.0 all any all
 sequence 50 permit all 192.168.130.0 255.255.255.0 all any all
 sequence 60 permit all 192.168.133.0 255.255.255.0 all any all
 sequence 70 permit all 192.168.135.0 255.255.255.0 all any all
 sequence 80 permit all 192.168.136.0 255.255.255.0 all any all
 sequence 90 permit all 192.168.254.1 255.255.255.255 all any all
 exit
!
ipv4 nat inet sequence 10 srclist ACL-NAT4 interface sdn1
!

 In the config stanza above we configure an access-list called ACL-NAT4 in VRF inet that would translate all incoming packet matching 192.168.[128|129|130|133|135|136|254].0/24 going to anywhere.

Note

Each time you modify ACL-NAT4 you will need to re-apply the NAT calls:

ping 8.8.8.8
!
conf t
! modify access-list ACL-NAT4
!
no ipv4 nat inet sequence 10 srclist ACL-NAT4 interface sdn1
ipv4 nat inet sequence 10 srclist ACL-NAT4 interface sdn1
!

Also notice that we are NAT(ing), 192.168.128.0/24 which is the OOBM subnet of the Linux appliance itself. This is needed during Debian system update/upgrade operation and also needed during the auto-upgrade feature that I'll describe in a next article.

IPv6 does need NAT in my specific case as my ISP has allocated me public IPv6 prefixes. We will see IPv6 configuration in the next articles.

Verification

NAT show commands
!
show ipv4 nat ?                                                        
  <vrf> - name of routing table
!
show ipv4 nat inet ?                                                   
  statistics   - list of configuration entries
  translations - list of translation entries
!
ping 8.8.8.8 in order to trigger NAT translation
ping 8.8.8.8 /vrf inet /interface lo0                                 
pinging 8.8.8.8, src=192.168.254.1, vrf=inet, cnt=5, len=64, tim=1000, ttl=255, tos=0, sweep=false
!!!!!
result=100%, recv/sent/lost=5/5/0, rtt min/avg/max/total=2/3/4/16
NAT translation verification
mjolnir#show ipv4 nat inet translations | i 192.168.254.1                      
1      8.8.8.8 4392          192.168.0.90 4392      8.8.8.8 4392          192.168.254.1 4392     00:00:01  00:00:01  00:05:00  1        64
1      192.168.254.1 4392    8.8.8.8 4392           192.168.0.90 4392     8.8.8.8 4392           00:00:01  00:00:01  00:05:00  1        64
1      8.8.8.8 4393          192.168.0.90 4393      8.8.8.8 4393          192.168.254.1 4393     00:00:01  00:00:01  00:05:00  1        64
1      192.168.254.1 4393    8.8.8.8 4393           192.168.0.90 4393     8.8.8.8 4393           00:00:01  00:00:01  00:05:00  1        64
1      8.8.8.8 4394          192.168.0.90 4394      8.8.8.8 4394          192.168.254.1 4394     00:00:01  00:00:01  00:05:00  1        64
1      192.168.254.1 4394    8.8.8.8 4394           192.168.0.90 4394     8.8.8.8 4394           00:00:01  00:00:01  00:05:00  1        64
1      8.8.8.8 4395          192.168.0.90 4395      8.8.8.8 4395          192.168.254.1 4395     00:00:01  00:00:01  00:05:00  1        64
1      192.168.254.1 4395    8.8.8.8 4395           192.168.0.90 4395     8.8.8.8 4395           00:00:01  00:00:01  00:05:00  1        64
1      8.8.8.8 4396          192.168.0.90 4396      8.8.8.8 4396          192.168.254.1 4396     00:00:01  00:00:01  00:05:00  1        64
1      192.168.254.1 4396    8.8.8.8 4396           192.168.0.90 4396     8.8.8.8 4396           00:00:01  00:00:01  00:05:00  1        64

Conclusion

In this article

  • We finally have a router that enables connectivity for all hosts inside the home network to the outside world
  • due to the ISP specific setup, our router had to translate inner home IP subnets to subnet that can be in turn NAT'ed by the ISP box.
  • We have a consistent IPv4 addressing plan 
  • We now can add very exciting feature from now on. (In next articles !)


RARE validated design: [ SOHO #004 ] - key take-away

In this example we are proposing a basic connectivity scenario. However, keep in mind that depending on your location the configuration might be drastically different. But do not fear ! RARE/freeRouter has all the features need to enable connectivity !

  • NAT64 is available. So in case you want to run a pure IPv6 network, freeRouter can NAT64 traffic for you.
  • NAT46 is also available. In case you are desperate and don't want to implement a pure IPv6 home network and have an ISP running only IPv6, freeRouter can NAT46 your traffic for you !
  • In the example described, we are lucky to have IPv6 public global IPv6 address. We will see IPv6 configuration in subsequent articles.

Now that you have a hardware for your SOHO appliance, installed an Operating System and prepared  systemd init script in order to resume freeRouter operation in case of unexpected outage (power cut, reset button etc.), let's proceed to RARE/freeRouter installation itself.

Requirement

  • Basic Linux/Unix knowledge
  • Service provider networking knowledge

Overview

When installing RARE/freeRouter on x86, you have 2 choices:

  • installation with a software dataplane
  • installation with a DPDK dataplane


In this precise case, we will consider a DPDK dataplane installation as our hardware is compliant to the requirement listed below.

DPDK requirements

  • CPU with SSE4 support
  • DPDK compatible NIC 

Note that freeRouter is available where JVM is available

  • x86
  • ARM

Article objective

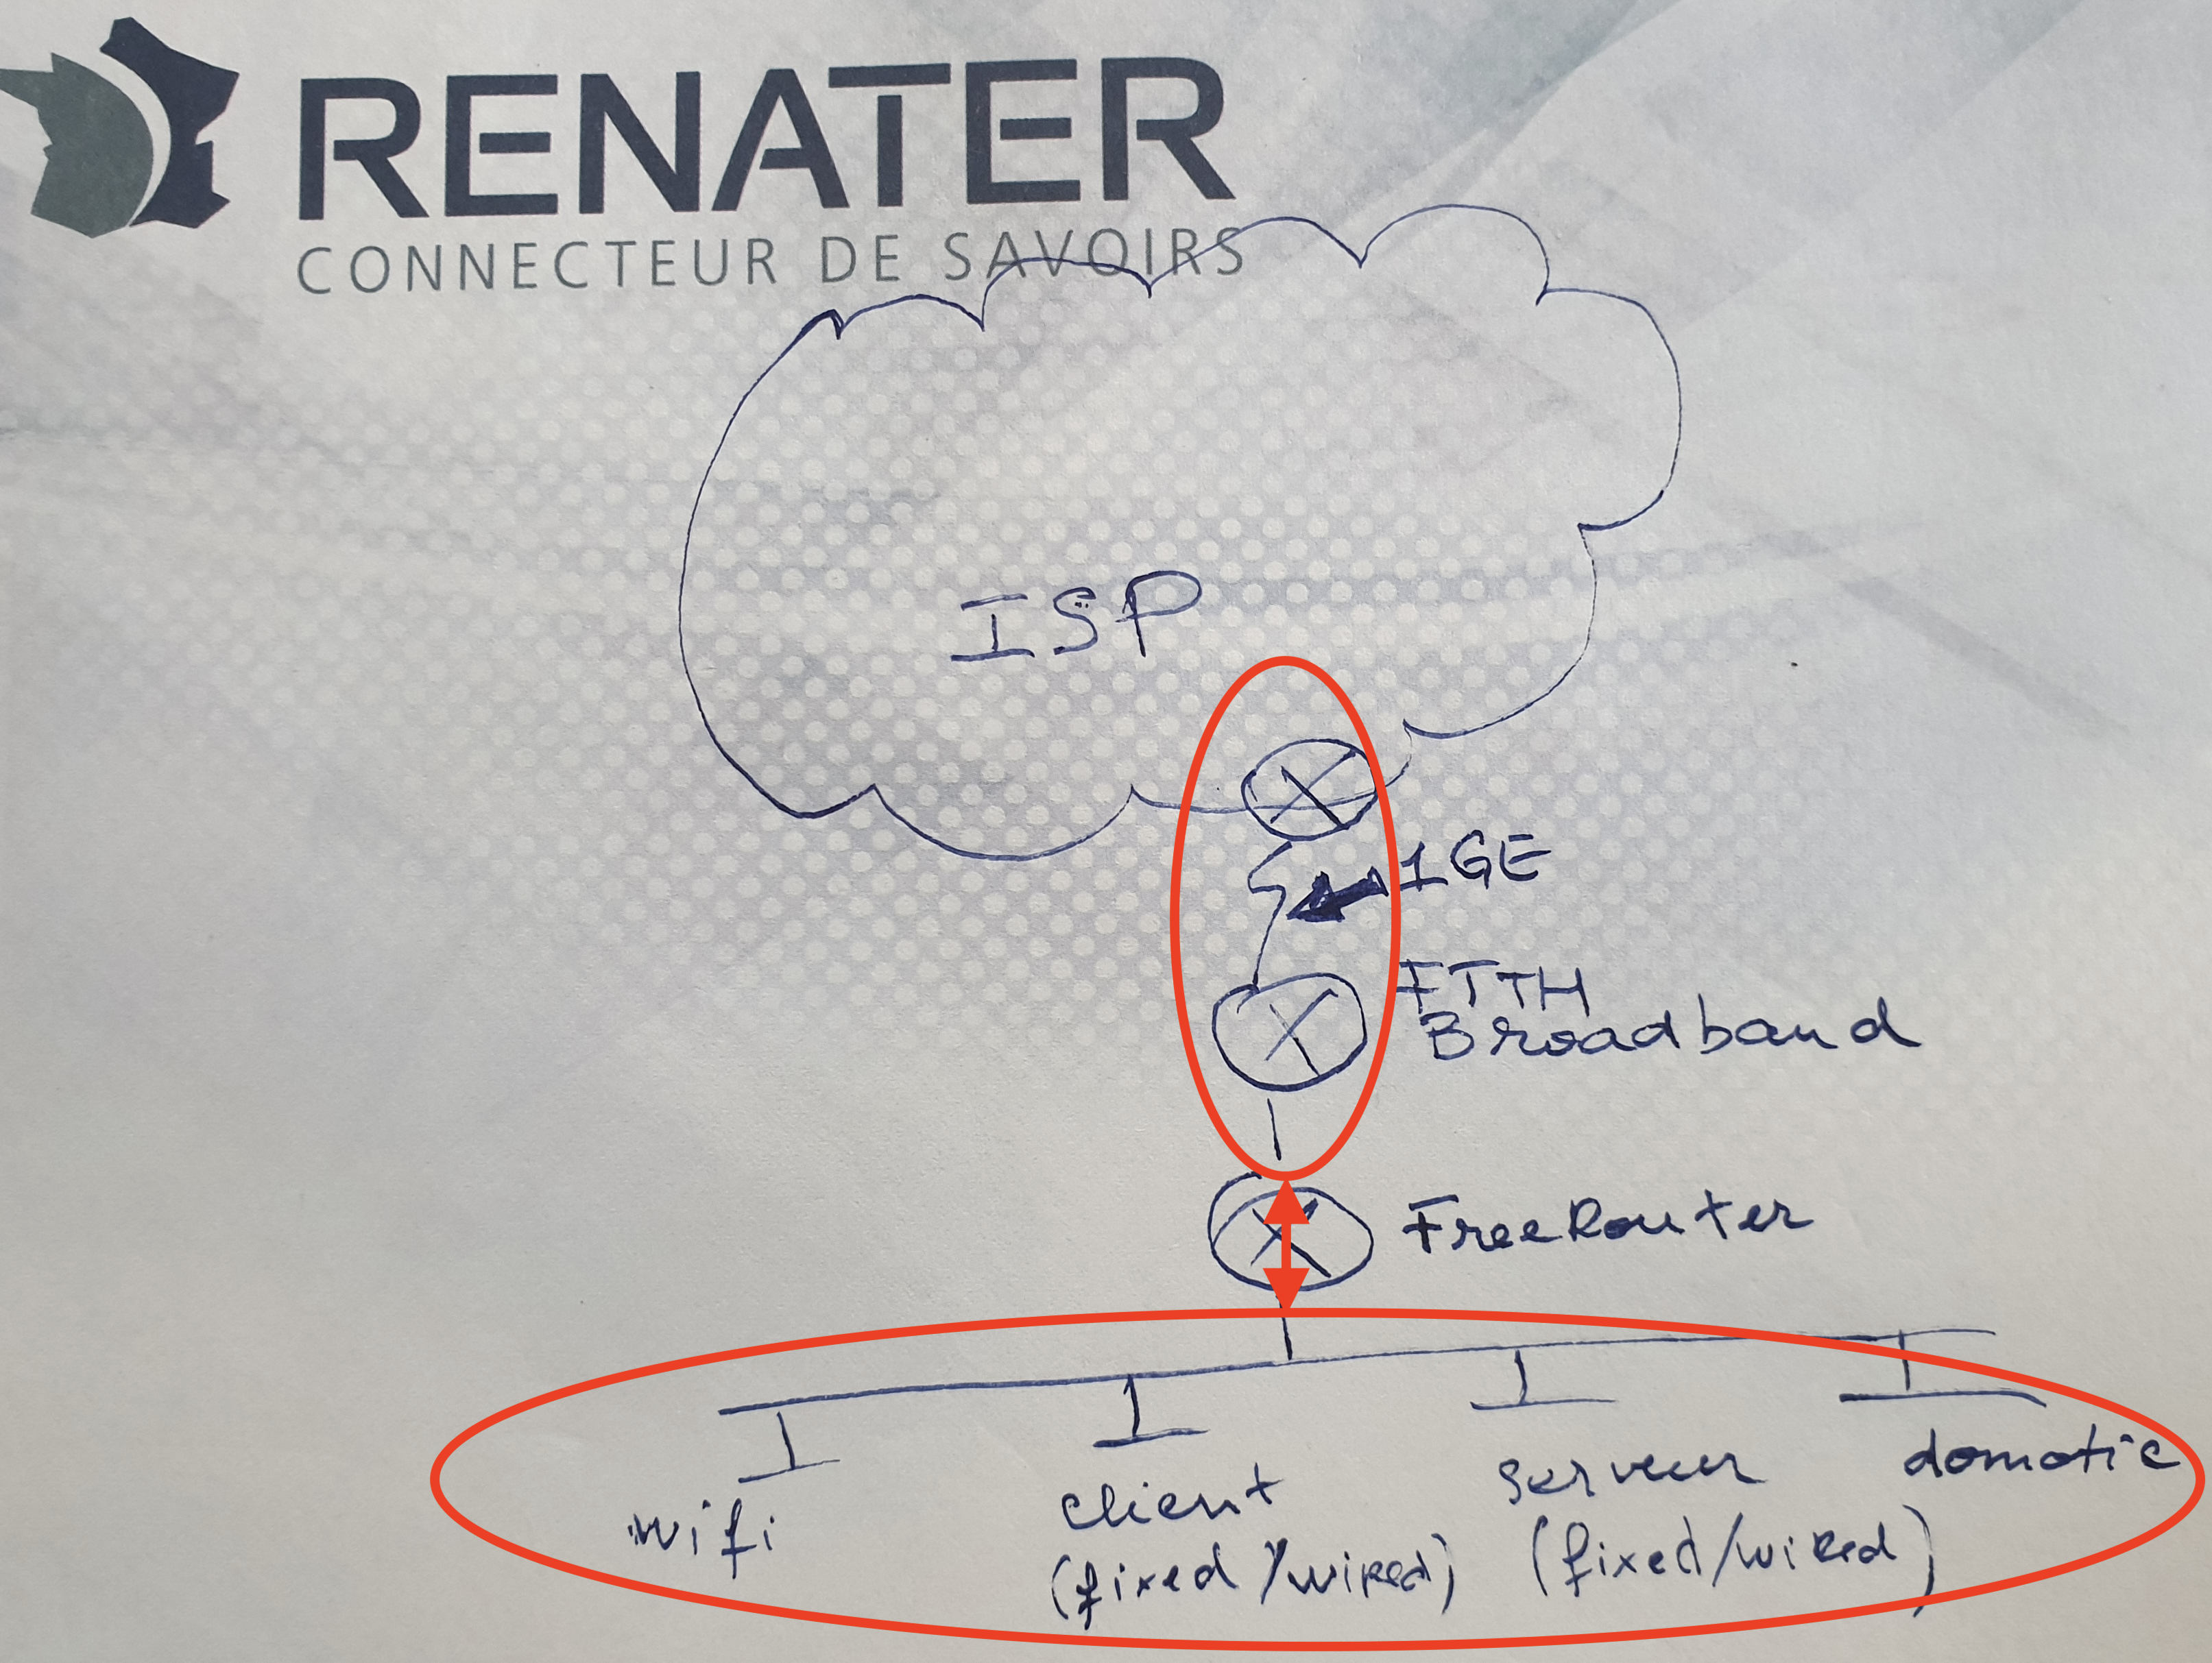
In this article we will pursue the SOHO network appliance installation based on the diagram below, and freeRouter installation using  DPDK dataplane. In this situation, the appliance is behind ISP FTTH box demarcation point. As it is typical to French FTTH domestic deployment. 

Deployment consideration

In this case, RARE/freeRouter is connected to a ISP box demarcation point that deliver copper connectivity. Nothing prevents you, following your context, to deploy a similar equipment with with SFP uplinks directly connected to your Provider Edge backbone routers if you own also the dark fiber paths local to the MAN. 

Diagrams

[ #003 ] - RARE/freeRouter DPDK SOHO installation 

  • Own a similar hardware described in SOHO #001
  • Having installed an Operating System with Java Runtime Environment
  • Configured systemd so that RARE/freeRouter can take over networking at each reboot as described in SOHO #002.

Let's consider the following assumptions:

  • ISP box comes with 192.168.0.0/24 subnet configured at RJ45 demarcation point
  • Home networkS will be within 192.168.128.0/17
  • 192.168.128.0/17 will be subnetted further into multiple /24 in order to accomodate home network requirement
  • RARE/freeRouter is connected to the FTTP ISP box via appliance DPDK port #0 (interface sdn1)
  • Home traffic going to outside world will be subject to port address translation (NAT/PAT) using an IPv4 within ISP subnet range
  • appliance port #1 will be connected to FTTH ISP box and will have an IP within 192.168.0.0/24

IPv6 addressing plan has not been forgotten. It is not mentioned here on purpose in order to not complicate explanations. IPv6 we be the object of further articles. It is not that IPv6 is a complex topic. It just that it deserves special attention. You might not realised it, but IPv6 is everywhere and is used by default between peers as soon as IPv6 is enable. So IMHO we need to get used to it as soon as possible especially if you are a network administrator.

FreeRouter uses 2 configuration files in order to run, let's write these configuration files in /rtr

freeRouter hardware configuration file: rtr-hw.txt
hwid j1900-i211
! cpu_port
int eth0 eth - 127.0.0.1 20001 127.0.0.1 20002
! freerouter control port for message packet-in/out in P4 VRF _ONLY_
tcp2vrf 9080 p4 9080
! freeroouter local access in p4 VRF _ONLY_
tcp2vrf 2323 p4 23
! launch a process called "veth0" that actually link to veth0b
! cmd for control plane/dataplane communication unified messaging: ip link add veth0a type veth peer name veth0b
! cmd for appliance Linux access: ip link add veth1a type veth peer name veth1b
! cmd for integrated wifi: ip link add veth2a type veth peer name veth2b
! external wifi AP
proc hostapd /usr/sbin/hostapd /etc/hostapd/hostapd.conf
! integrated wifi AP
proc wlan /rtr/pcap2pcap.bin wlan0 veth2a
! DP/CP communication process
proc veth0 /rtr/pcapInt.bin veth0a 20002 127.0.0.1 20001 127.0.0.1
! DP DPDK process
proc p4emu /rtr/p4dpdk.bin --vdev=net_af_packet0,iface=veth0b --vdev=net_af_packet1,iface=veth2b --vdev=net_af_packet2,iface=veth1b 127.0.0.1 9080 6

Note:

Let's spend some times on this hardware configuration file, as you might have notice there are additional interesting lines worth to mention:

  • Exclamation mark "!" are comments
  • hwid is a text field that would just designate the hardware on which freeRouter is running. (output of : show platform)
  • proc <process-name>

It is possible within freeRouter startup to launch processes. We use here this feature to start control plane / dataplane communication via veth pair: veth0a and veth0b and also P4Emu/dpdk, p4dpdk.bin packet processing backend.

  • proc p4emu /rtr/p4dpdk.bin --vdev=net_af_packet0,iface=veth0b --vdev=net_af_packet1,iface=veth2b --vdev=net_af_packet2,iface=veth1b 127.0.0.1 9080 6

In dpdk, by default dpdk interfaces have port_ids that are sequentially allocated and in the order of appearance in dpdk-devbind --status output usually sorted by pci_id. In the below output interface enp0s1 has port_id #0 and in dpdk it would be pci_id:00:01.0

enp0s1 would be: #0 with pci_id: 00:01.0

enp0s2 would be: #1 with pci_id: 00:02.0

enp0s5 would be: #2 with pci_id: 00:05.0

enp0s6 would be: #3 with pci_id: 00:06.0

enp0s7 would be: #4 with pci_id: 00:07.0

enp0s8 would be: #5 with pci_id: 00:08.0

DPDK diagnosis
dpdk-devbind.py --status

Network devices using DPDK-compatible driver
============================================
0000:01:00.0 'I211 Gigabit Network Connection 1539' drv=uio_pci_generic unused=igb
0000:02:00.0 'I211 Gigabit Network Connection 1539' drv=uio_pci_generic unused=igb
0000:05:00.0 'I211 Gigabit Network Connection 1539' drv=uio_pci_generic unused=igb
0000:06:00.0 'I211 Gigabit Network Connection 1539' drv=uio_pci_generic unused=igb
0000:07:00.0 'I211 Gigabit Network Connection 1539' drv=uio_pci_generic unused=igb
0000:08:00.0 'I211 Gigabit Network Connection 1539' drv=uio_pci_generic unused=igb

Network devices using kernel driver
===================================
0000:09:00.0 'AR928X Wireless Network Adapter (PCI-Express) 002a' if=wlan0 drv=ath9k unused=uio_pci_generic 

No 'Baseband' devices detected
==============================

Other Crypto devices
====================
0000:00:1a.0 'Atom Processor Z36xxx/Z37xxx Series Trusted Execution Engine 0f18' unused=uio_pci_generic

No 'Eventdev' devices detected
==============================

No 'Mempool' devices detected
=============================

No 'Compress' devices detected
==============================

No 'Misc (rawdev)' devices detected
===================================
  • DPDK --vdev addition. In this precise case we instruct DPDK to take into account additional veth endpoint we created respectively for
    • Control plane / data plane communication
    • Linux out of band management access via SSH we installed previously during Debian package installation
    • integrated hardware WIFI access point
  • in DPDK vdev interface will have in order of apparition in the command line:
    • DP/CP communication: 6 ↔ veth0b
    • integrated WIFI: 7 ↔ veth2b
    • Linux out of band management access: 8 ↔ veth1b

external WIFI access point will be bound directly to an interface of the appliance via DPDK. This will be describe in future articles.

freeRouter software configuration file: rtr-sw.txt
hostname mjolnir
buggy
!
!
vrf definition inet
 exit
!
vrf definition p4
 exit
!
interface ethernet0
 description freerouter@P4_CPU_PORT[veth0a]
 no shutdown
 no log-link-change
 exit
!
interface sdn1
 description freerouter@DPDK[port-1]
 mtu 1500
 vrf forwarding inet
 ipv4 address 192.168.0.90 255.255.255.0
 no shutdown
 no log-link-change
 exit
!
interface sdn2
 description freerouter@DPDK[port-2]
 mtu 1500
 shutdown
 no log-link-change
 exit
!
interface sdn3
 description freerouter@DPDK[port-3]
 mtu 1500
 shutdown
 no log-link-change
 exit
!
interface sdn4
 description freerouter@DPDK[port-4]
 mtu 1500
 shutdown
 no log-link-change
 exit
!
interface sdn5
 description freerouter@DPDK[port-5]
 mtu 1500
 shutdown
 no log-link-change
 exit
!
interface sdn6
 description freerouter@DPDK[port-6]
 mtu 1500
 shutdown
 no log-link-change
 exit
!
interface sdn998
 description freerouter@DPDK[port-7 --> veth2a] integrated wifi
 mtu 1500
 shutdown
 no log-link-change
 exit
!
interface sdn999
 description freerouter@OOBM[port-8 --> veth1a] Linux management
 mtu 1500
 vrf forwarding inet
 ipv4 address 192.168.128.1 255.255.255.0
 no shutdown
 no log-link-change
 exit

server telnet telnet
 security protocol telnet
 no exec authorization
 no login authentication
 vrf p4
 exit
!
server p4lang p4
 export-vrf inet 1
 export-port sdn1 0 1 0 0 0
 export-port sdn2 1 1 0 0 0
 export-port sdn3 2 1 0 0 0
 export-port sdn4 3 1 0 0 0
 export-port sdn5 4 1 0 0 0
 export-port sdn6 5 1 0 0 0
 export-port sdn998 7 1 0 0 0
 export-port sdn999 8 1 0 0 0
 interconnect ethernet0
 vrf p4
 exit
!
!
end
  • For now integrated wifi is shut. We will see in later article how to activate it
  • At Linux level, if you noticed in the previous article
    • management IP subnet is 192.168.128.0/24. OOBM appliance IP is then 192.168.128.254
appliance management IP@Linux level (check previous article)
ip addr flush dev veth1a
ip addr add 192.168.128.254/24 dev veth1a
  • management IP seen from freeRouter@sdn999 with IP 192.168.128.1 within 192.168.128.0/24
  • with configured a Linux static routes
Add default route to OOBM sdn999@Linux level (check previous article)
route add default gw 192.168.128.1

Security note

  • If you pay attention p4lang server in p4 VRF
    • This VRF has no bound interface
    • Is isolated then from the other VRF
  • This will allow only local Linux host control plane and dataplane communication 

Verification

ping ISP demarcation point IP
ping 192.168.0.254 /vrf inet /interface sdn1                           
pinging 192.168.0.254, src=192.168.0.90, vrf=inet, cnt=5, len=64, tim=1000, ttl=255, tos=0, sweep=false
!!!!!
result=100%, recv/sent/lost=5/5/0, rtt min/avg/max/total=0/0/1/4
ARP discovery
mjolnir#sh ipv4 arp sdn1                                                       
mac             address        time      static
0024.d4a0.0cd3  192.168.0.254  00:00:20  false
Add default route to OOBM sdn999@Linux level (check previous article)
sh int sdn1                                                          
sdn1 is up (since 13:14:14, 2 changes)
 description: mjolnir@LAN1[01:00.0]
 type is sdn, hwaddr=003b.7671.764f, mtu=1500, bw=8000kbps, vrf=inet
 ip4 address=192.168.0.90/24, netmask=255.255.255.0, ifcid=10014
 received 64038 packets (17841459 bytes) dropped 4 packets (326 bytes)
 transmitted 250217 packets (38032822 bytes) promisc=false macsec=false
interface summary
show interfaces summary                                                
interface    state  tx        rx        drop
ethernet0    up     74690935  51798769  0
sdn1         up     37954707  17828649  326
sdn2         admin  0         0         0
sdn3         admin  0         0         0
sdn4         admin  0         0         0
sdn5         admin  0         0         0
sdn6         admin  0         0         0
sdn998       admin  0         0         0
sdn999       up     23646     17904     0
interface summary
interface   state  tx          rx          drop
sdn1        up     674397352   3883928390  948
sdn2        admin  0           0           0
sdn3        admin  0           0           0
sdn4        admin  0           0           0
sdn5        admin  0           0           0
sdn6        admin  0           0           0
sdn998      admin  0           0           0
sdn999      up     110520      85072       0

Check Linux appliance local routes

From linux terminal
root@mjolnir:~# route -n
Kernel IP routing table
Destination     Gateway         Genmask         Flags Metric Ref    Use Iface
0.0.0.0         192.168.128.1   0.0.0.0         UG    0      0        0 veth1a

Test local telnet access from linux/localhost

Conclusion

In this article

  • we finally launched RARE/freeRouter with DPDK dataplane
  • configure RARE/freeRouter with a vanilla config that takes into account all the appliance physical interfaces
  • added veth pair in the config in order to take into account:
    • Control plane / Data plane communication 
    • linux OOBM
    • integrated WIFI
  • Enabled and checked IPv4 connectivity between freeRouter@sdn1 and ISP demarcation point
  • Check telnet access to freeRouter from localhost only

RARE validated design: [ SOHO #003 ] - key take-away

From this point you have a complete freeRouter connected to ISP box via SDN1 as uplink in 192.168.0.0/24 subnet. We will extend further this base configuration step by step in order to enrich user experience !

  • Now you would want to enable IPv4/IPv6  connectivity to all potential hosts@home whether they are connected via RJ45 or via built-in WIFI.
  • you would also want to distribute IPv4, IPv6 to all the of hosts@home
  • IPv4/IPv6 connectivity is not enough, you would like to provide Domain Name Service to them
  • Domain Name Service is not enough if they can't reach outside world. As we are using RFC1918 addressing plan we should figure out a way to ensure NAT/PAT address translation in order to enable egress traffic toward the Internet
  • Your home might have several floors and only one WIFI access point is not enough ? Let's see how we can add additional WIFI AP in the network
  • Maybe you have an outsourced network management service ? Let's see how connectivity can be enable via OpenVPN encrypted tunnel
  • Last but not least, let's see how we can connect DN42 parallel network using a Wireguard tunnel relying on an IPv6 underlay.

You've guessed it, all of these points will be elaborated in the futures articles. Therefore stay tuned !

This is a new article for the blog serie called "RARE Day One". Today we will explore one of freeRouter feature that is used a lot in Service Provider trusted environment" TFTP server

Requirement

  • Basic Linux/Unix knowledge
  • Service provider networking knowledge

Overview

I'm not sure if this is still the case now, but back in 1999, I had the opportunity to managed multiple VPNs at a very huge French Service Provider. I'm saying huge as in this type of MPLS muti-service core network, you could have hundreds of VRF in the same PE router connecting a myriads of CPE via X25 (XOT), frame-relay and ATM PVC at best. In that context, some companies could have several thousands of routers in their VPNs and it was not common to follow a high pace deployment which was at ~10 CPEs per day for a new customer VPN implementation. So one of my favorite CLI command was:

staging a CPE with its final configuration
copy tftp run
Address or name of remote host []? <x.y.z.t>
Source filename []? <router-cpe-config-file-name>
Destination filename [running-config]?
...

That being said, I'm not sure if this has evolved since then as TFTP occurred inside a very protected out of band management network, it was very good and did a perfect job. Keep in mind that we could be hundreds of "VPN owner" deploying CPEs at the same time. This has to be highly available.

That was for the anecdote, but recently I attempted to upgrade my OpenWRT wifi router from 18.06.02 to the latest code train: 19.07.4. As a I'm lazy, I just sticked with OpenWRT web upgrade via LuCI. Not sure if I was right ... I don't know why and how but the upgrade failed and my wifi router got "bricked". (smile)

After a lot of googling and reading, i concluded that I had only one solution: restore from factory and re-install OpenWRT 19.07.04 installation by hand. You have guess the rest of the article, the factory-reset procedure requires a TFTP server. (smile) 

Note

But before that, I had to solder an USB - UART module as described here.

Article objective

As again i was lazy on installing a TFTP server on my MAC and disconnect my current LAN access in order to have a direct connectivity with the OpenWRT box, I had an idea (this is not often (smile)) off the top of my head: "Hey, maybe freeRouter has a TFTP server that I can activate in few lines ?"... Well, after a terminal connection to my home router let me introduce you to freeRouter/TFTP server:


[ #004 ] - Saving private OpenWRT", thanks freeRouter's TFTP server !

If you are familiar with Cisco operating system you will feel at home with this TFTP server. 

Log into freeRouter in config mode:
   __               ____             _
  / _|_ __ ___  ___|  _ \ ___  _   _| |_ ___ _ __
 | |_| '__/ _ \/ _ \ |_) / _ \| | | | __/ _ \ '__|
 |  _| | |  __/  __/  _ < (_) | |_| | ||  __/ |
 |_| |_|  \___|\___|_| \_\___/ \__,_|\__\___|_|
  _ __ ___   ___| | _____  | |
 | '__/ _ \ / __| |/ / __| | |
 | | | (_) | (__|   <\__ \ |_|
 |_|  \___/ \___|_|\_\___/ (_)

welcome
line ready
mjolnir#conf t                                                                 
mjolnir(cfg)#server tftp openwrt                                               
mjolnir(cfg-server)#?                                                          
  access-blackhole4 - propagate and check violating prefixes
  access-blackhole6 - propagate and check violating prefixes
  access-class      - set access list
  access-log        - log dropped attemps
  access-map        - set route map
  access-peer       - per client session limit
  access-policy     - set route policy
  access-prefix     - set prefix list
  access-rate       - access rate for this server
  access-startup    - initial downtime for this server
  access-subnet     - per subnet session limit
  access-total      - session limit for this server
  do                - execute one exec command
  end               - close this config session
  exit              - go back to previous mode
  interface         - interface to bind to
  no                - negate a command
  path              - set root folder
  port              - set port to listen on
  protocol          - set lower protocols to use
  readonly          - set write protection
  security          - set security parameters
  show              - running system information
  vrf               - set vrf to use

sdn6 is the port #6 connected from my SOHO router to OpenWRT router.

TFTP server configuration
sh run tftp                                                            
server tftp openwrt
 path /rtr/owrt/
 interface sdn6
 vrf inet
 exit
!
sh run sdn6                                                           
interface sdn6
 description mjolnir@LAN6[08:00.0]
 mtu 1500
 macaddr 004c.7307.0a77
 vrf forwarding inet
 ipv4 address 192.168.136.1 255.255.255.0
 ipv4 broadcast-multicast
 no shutdown
 no log-link-change
 exit
!
...

So the LAN port of my OpenWRT router is like this:

OpenWRT config (this can be done via Web GUI)
...
config interface 'lan'
        option type 'bridge'
        option proto 'static'
        option ipaddr '192.168.136.2'
        option netmask '255.255.255.0'
        option broadcast '192.168.136.255'
        option gateway '192.168.136.1'
        option ip6assign '60'
        list dns '192.168.254.1'
        option ifname 'eth0 eth0.1 eth0.2 wlan0 wlan1' 
...

Basic connectivity check (well technically you could not ping as it is part if TFTP restore to factory process. Remember our box crashed ! (smile) )

ping OpenWRT
ping 192.168.136.2 /vrf inet                                           
pinging 192.168.136.2, src=null, vrf=inet, cnt=5, len=64, tim=1000, ttl=255, tos=0, sweep=false
!!!!!
result=100%, recv/sent/lost=5/5/0, rtt min/avg/max/total=0/1/2/5
...

So we are basically ready ...

Initiate OpenWRT factory restore process via TFTP
===================================================================
                MT7621   stage1 code 10:33:11 (ASIC)
                CPU=50000000 HZ BUS=12500000 HZ
==================================================================
Change MPLL source from XTAL to CR...
do MEMPLL setting..
MEMPLL Config : 0x11100000
3PLL mode + External loopback
=== XTAL-40Mhz === DDR-1200Mhz ===
PLL2 FB_DL: 0x9, 1/0 = 567/457 25000000
PLL3 FB_DL: 0xc, 1/0 = 596/428 31000000
PLL4 FB_DL: 0x11, 1/0 = 560/464 45000000
do DDR setting..[00320381]
Apply DDR3 Setting...(use customer AC)
          0    8   16   24   32   40   48   56   64   72   80   88   96  104  112  120
      --------------------------------------------------------------------------------
0000:|    0    0    0    0    0    0    0    0    0    0    0    0    0    0    0    0
0001:|    0    0    0    0    0    0    0    0    0    0    0    0    0    0    0    0
0002:|    0    0    0    0    0    0    0    0    0    0    0    0    0    0    0    0
0003:|    0    0    0    0    0    0    0    0    0    0    0    0    0    0    0    0
0004:|    0    0    0    0    0    0    0    0    0    0    0    0    0    0    0    0
0005:|    0    0    0    0    0    0    0    0    0    0    0    0    0    0    0    0
0006:|    0    0    0    0    0    0    0    0    0    0    0    0    0    0    0    0
0007:|    0    0    0    0    0    0    0    0    0    0    0    0    0    0    0    0
0008:|    0    0    0    0    0    0    0    0    0    0    0    0    0    0    0    0
0009:|    0    0    0    0    0    0    0    0    0    0    0    0    0    0    0    0
000A:|    0    0    0    0    0    0    0    0    0    0    0    0    0    0    0    0
000B:|    0    0    0    0    0    0    0    0    0    0    0    0    0    0    0    0
000C:|    0    0    0    0    0    0    0    0    0    0    0    0    0    0    0    0
000D:|    0    0    0    0    0    0    0    0    0    0    0    0    0    0    0    1
000E:|    0    0    0    0    0    0    0    0    0    1    1    1    1    1    1    1
000F:|    0    0    0    0    1    1    1    1    1    1    1    1    1    1    0    0
0010:|    1    1    1    1    1    1    1    1    1    0    0    0    0    0    0    0
0011:|    1    1    1    0    0    0    0    0    0    0    0    0    0    0    0    0
0012:|    0    0    0    0    0    0    0    0    0    0    0    0    0    0    0    0
0013:|    0    0    0    0    0    0    0    0    0    0    0    0    0    0    0    0
0014:|    0    0    0    0    0    0    0    0    0    0    0    0    0    0    0    0
0015:|    0    0    0    0    0    0    0    0    0    0    0    0    0    0    0    0
0016:|    0    0    0    0    0    0    0    0    0    0    0    0    0    0    0    0
0017:|    0    0    0    0    0    0    0    0    0    0    0    0    0    0    0    0
0018:|    0    0    0    0    0    0    0    0    0    0    0    0    0    0    0    0
0019:|    0    0    0    0    0    0    0    0    0    0    0    0    0    0    0    0
001A:|    0    0    0    0    0    0    0    0    0    0    0    0    0    0    0    0
001B:|    0    0    0    0    0    0    0    0    0    0    0    0    0    0    0    0
001C:|    0    0    0    0    0    0    0    0    0    0    0    0    0    0    0    0
001D:|    0    0    0    0    0    0    0    0    0    0    0    0    0    0    0    0
001E:|    0    0    0    0    0    0    0    0    0    0    0    0    0    0    0    0
001F:|    0    0    0    0    0    0    0    0    0    0    0    0    0    0    0    0
rank 0 coarse = 15
rank 0 fine = 72
B:|    0    0    0    0    0    0    0    0    0    0    1    1    1    0    0    0
opt_dle value:11
DRAMC_R0DELDLY[018]=00001F1F
==================================================================
                RX      DQS perbit delay software calibration 
==================================================================
1.0-15 bit dq delay value
==================================================================
bit|     0  1  2  3  4  5  6  7  8  9
--------------------------------------
0 |    10 7 9 9 7 7 8 7 3 6 
10 |    6 7 7 9 6 9 
--------------------------------------

==================================================================
2.dqs window
x=pass dqs delay value (min~max)center 
y=0-7bit DQ of every group
input delay:DQS0 =31 DQS1 = 31
==================================================================
bit     DQS0     bit      DQS1
0  (1~61)31  8  (1~56)28
1  (1~58)29  9  (1~61)31
2  (1~60)30  10  (1~59)30
3  (1~58)29  11  (1~57)29
4  (1~57)29  12  (1~60)30
5  (1~61)31  13  (1~60)30
6  (1~58)29  14  (1~61)31
7  (1~62)31  15  (1~61)31
==================================================================
3.dq delay value last
==================================================================
bit|    0  1  2  3  4  5  6  7  8   9
--------------------------------------
0 |    10 9 10 11 9 7 10 7 6 6 
10 |    7 9 8 10 6 9 
==================================================================
==================================================================
     TX  perbyte calibration 
==================================================================
DQS loop = 15, cmp_err_1 = ffff0000 
dqs_perbyte_dly.last_dqsdly_pass[0]=15,  finish count=1 
dqs_perbyte_dly.last_dqsdly_pass[1]=15,  finish count=2 
DQ loop=15, cmp_err_1 = ffff0080
dqs_perbyte_dly.last_dqdly_pass[1]=15,  finish count=1 
DQ loop=14, cmp_err_1 = ffff0000
dqs_perbyte_dly.last_dqdly_pass[0]=14,  finish count=2 
byte:0, (DQS,DQ)=(8,8)
byte:1, (DQS,DQ)=(8,8)
20,data:88
[EMI] DRAMC calibration passed

===================================================================
                MT7621   stage1 code done 
                CPU=50000000 HZ BUS=12500000 HZ
===================================================================


U-Boot 1.1.3 (Apr 17 2017 - 17:00:02)

Board: Ralink APSoC DRAM:  256 MB
Power on memory test. Memory size= 256 MB...OK!
relocate_code Pointer at: 8ffac000

Config XHCI 40M PLL 
******************************
Software System Reset Occurred
******************************
Allocate 16 byte aligned buffer: 8ffdffd0
Enable NFI Clock
# MTK NAND # : Use HW ECC
NAND ID [C8 D1 80 95 42]
Device not found, ID: c8d1
Not Support this Device! 
chip_mode=00000001
Support this Device in MTK table! c8d1 
select_chip
[NAND]select ecc bit:4, sparesize :64 spare_per_sector=16
Signature matched and data read!
load_fact_bbt success 1023
load fact bbt success
[mtk_nand] probe successfully!
mtd->writesize=2048 mtd->oobsize=64,    mtd->erasesize=131072  devinfo.iowidth=8
..============================================ 
Ralink UBoot Version: 5.0.0.0
-------------------------------------------- 
ASIC MT7621A DualCore (MAC to MT7530 Mode)
DRAM_CONF_FROM: Auto-Detection 
DRAM_TYPE: DDR3 
DRAM bus: 16 bit
Xtal Mode=5 OCP Ratio=1/4
Flash component: NAND Flash
Date:Apr 17 2017  Time:17:00:02
============================================ 
icache: sets:256, ways:4, linesz:32 ,total:32768
dcache: sets:256, ways:4, linesz:32 ,total:32768 

 ##### The CPU freq = 880 MHZ #### 
 estimate memory size =256 Mbytes
#Reset_MT7530
set LAN/WAN LWLLL

Please choose the operation: 
   1: Load system code to SDRAM via TFTP. 
   2: Load system code then write to Flash via TFTP. 
   3: Boot system code via Flash (default).
   4: Entr boot command line interface.
   7: Load Boot Loader code then write to Flash via Serial. 
   9: Load Boot Loader code then write to Flash via TFTP. 
 4 
You choosed 2

 0 

   
2: System Load Linux Kernel then write to Flash via TFTP. 
 Warning!! Erase Linux in Flash then burn new one. Are you sure?(Y/N)
 Please Input new ones /or Ctrl-C to discard
        Input device IP (192.168.31.1) ==:192.168.31.1
        Input server IP (192.168.31.100) ==:192.168.31.2  
        Input Linux Kernel filename () ==: <my_factory_router_image>


...

And ... Voilà !

Note

We won this factory reset battle but the war is over. After having restored the genuine official vendor image, we need to re-install OpenWRT with the latest 19.07.4 image and configure OpenWRT so that it can acts as a "dummy Wifi Access Point". DHCP, DNS will be served by the SOHO router.

Discussion

You can deploy freeRouter manually in a VM or container and bind it to a linux interface if you need a TFTP server in order to apply configuration to all your equipment. When final staging are done in a secure Out of Band management network context having a TFTP server is a blessing as it correspond to a gain of time in a production environment. Imaging hundreds of people working in a SP environment and working at the same time.

Conclusion

In this 4th article:

  • We presented freeRouter TFTP embedded server 
  • You can use it in order to undertake network equipment deployment requiring TFTP
  • This TFTP server is compatible with IPv4/IPv6

TFTP is a basic but a common tool in SP environment (or it was? If it is still used, yes please confirm !) In this example, I demonstrated the use of TFTP server in order to flash a wifi router to factory default. I have 802.11ac back up and running !

Final words

freeRouter can be perceived not only as a router but it is a networking Swiss army knife. in further articles we will shed some lights in various treasures hidden into freeRouter... And for free !

Last but not least, you can play with these different servers from this sandbox: (You'll be able to spot amazing server that will be the object of further article.)

type "telnet dl.nop.hu" in a terminal and choose "1"
Trying 193.224.23.5...
Connected to dl.nop.hu.
Escape character is '^]'.
XXXXXXXXXXXXXXXXXXXXXXXXXXXXXXXXXXXXXXXXXXXXXXXXXXXXXXXXXXXX
XXXX XXXXX XXX    XXX     XXX XX XX XXXX XXXXXXXXXXXXXXXXXXX
XXXX  XXXX XX XXXX XX XXXX XX XX XX XXXX XXXXX/~~~~~~\XXXXXX
XXXX X XXX XX XXXX XX XXXX XX XX XX XXXX XXXX| player |XXXXX
XXXX XX XX XX XXXX XX     XXX    XX XXXX XXXXX\______/XXXXXX
XXXX XXX X XX XXXX XX XXXXXXX XX XX XXXX XXXXXXXXXXXXXXXXXXX
XXXX XXXX  XX XXXX XX XXXXXXX XX XX XXXX XXXXXXXXXXXXXXXXXXX
XXXX XXXXX XXX    XXX XXX XXX XX XXX    XXXXXXXXXXXXXXXXXXXX
XXXXXXXXXXXXXXXXXXXXXXXXXXXXXXXXXXXXXXXXXXXXXXXXXXXXXXXXXXXX
welcome
line ready
menu lab:
# - reboot router1
$ - reboot router2
% - reboot router3
1 - connect to router1
2 - connect to router2
3 - connect to router3
^ - rebuild routers
l - connect to lg.nop.dn42
x - exit
choose:1 - attach vdc lab1 

welcome
line ready
yourname#conf t                                                                
warning user.userLineHandler.doExec:userLine.java:606 <nobody> configuring from tty1
yourname(cfg)#server ?                                                         
  bmp2mrt      - configure an bmp to mrt server
  bstun        - configure a bstun server
  chargen      - configure a chargen server
  daytime      - configure a daytime server
  dcp          - configure a dcp server
  dhcp4        - configure a dhcp4 server
  dhcp6        - configure a dhcp6 server
  discard      - configure a discard server
  dns          - configure a dns server
  echo         - configure an echo server
  etherip      - configure a etherip server
  forwarder    - configure a forwarder server
  ftp          - configure a ftp server
  geneve       - configure a geneve server
  gopher       - configure a gopher server
  gre          - configure a gre server
  gtp          - configure a gtp server
  honeypot     - configure a honeypot server
  http         - configure a http server
  irc          - configure an irc server
  iscsi        - configure an iscsi server
  l2f          - configure a l2f server
  l2tp2        - configure a l2tp v2 server
  l2tp3        - configure a l2tp v3 server
  loadbalancer - configure a loadbalancer server
  lpd          - configure a lpd server
  modem        - configure a modem server
  mplsip       - configure a mplsip server
  mplsudp      - configure a mplsudp server
  multiplexer  - configure a multiplexer server
  netflow      - configure an netflow server
  nrpe         - configure a nrpe server
  ntp          - configure a ntp server
  openflow     - configure an openflow server
  p4lang       - configure an p4lang server
  pcep         - configure a pcep server
  pckodtls     - configure a pckodtls server
  pckotcp      - configure a pckotcp server
  pckotxt      - configure a pckotxt server
  pckoudp      - configure a pckoudp server
  pop3         - configure a pop3 server
  pptp         - configure a pptp server
  prometheus   - configure a prometheus server
  quote        - configure a quote server
  radius       - configure a radius server
  rfb          - configure a rfb server
  rpki         - configure a rpki server
  sip          - configure a sip server
  smtp         - configure a smtp server
  snmp         - configure a snmp server
  socks        - configure a socks server
  streamingmdt - configure a streaming telemetry server
  stun         - configure a stun server
  syslog       - configure a syslog server
  tacacs       - configure a tacacs server
  telnet       - configure a telnet server
  tftp         - configure a tftp server
  time         - configure a time server
  udpfwd       - configure an udp forwarder server
  udptn        - configure an udptn server
  upnpfwd      - configure an upnp forwarder server
  upnphub      - configure an upnp hub server
  voice        - configure a voice server
  vxlan        - configure a vxlan server

yourname(cfg)#server                              
...

In order to exit the sandbox session use the following escape sequence: Ctrl-c + Ctrl-x


This is a new category of article that falls under "RARE software architecture" special blog series. As its name implies, it deals with topics related to RARE/freeRouter software / Monitoring.

Requirement

  • Basic Linux/Unix knowledge
  • Service provider networking knowledge

Overview

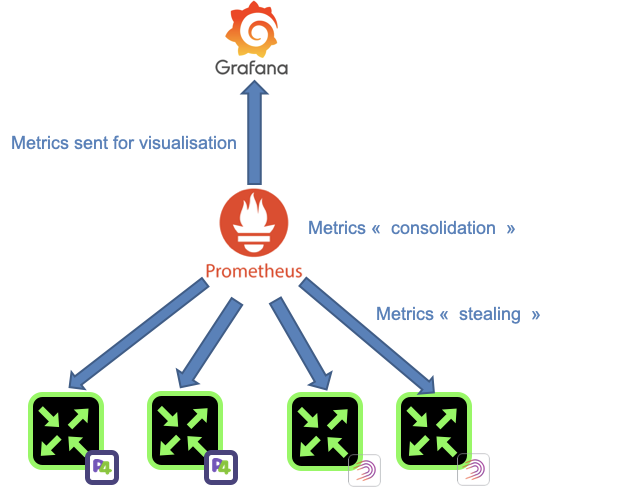
In Greek mythology, Prometheus is a Titan that is credited mankind creation by stealing Fire from Gods and by giving it to human. In the RARE context, Prometheus is a the software from prometheus.io project. It became very popular in the IT industry as it is very simple to implement/configure while providing a great number of metrics without impacting application performance. It is heavily used in microservices environment such as docker and Kubernetes. The mythological reference gives us an indication of how Prometheus is operating. At a constant rate, Prometheus metric collector or server is stealing metrics from Prometheus agent. All the stolen metrics are then consolidated in Time Series database ready to be poured to a queueing system for proper visualization. 

Before going further, allow me a brief digression by sharing with you a small anecdote that leds to this ongoing work related to network monitoring for RARE. As mentioned previously, our focus is to elaborate RARE/freeRouter solution the possibility to be monitored in an operational environment. In that context, we started with the implementation of a lightweight SNMP stack that provided relevant result via SNMP tools like LibreNMS. This is great for organisation that wouldn’t want invest time on anything but SNMP.

However, we felt a lack of flexibility due to SNMP inherent structure and we needed more versatile and instant monitoring capabilities.  More importantly the need to export infinite metric type from Control Plane in a more flexible way arise. How metrics such as: Number of IPv4/IPv6 routes, IPv4 BGP prefix, IPv6 BGP prefix platform JVM memory etc. could be shared without too much hassle ?

After some internal discussion, I just said: "I’m not a monitoring expert but we have tools like ELK and PROMETHEUS and GRAFANA in NMaaS catalog … Shouldn’t we consider use this ?"

The answer was: « Let’s give it a try and fire up a Prometheus and Grafana instance from NMaaS platform !»

Some hacking at the control plane code level were initiated, after few hours freeRouter lead developer came up with a solution and said: Let me introduce you "freeRouter prometheus agent »

And thanks to the great support of NMaaS team, in few minutes and some point and clicks (it took longer than expected as I’m not good with GUI) we were able to test this agent.

Why is it important you might say ? It is just that with prometheus simplicity and low resource overhead with have full control plane metrics visibility !

As a side note this is not a replacement for INT/Telemetry/Netflow/IPFIX that provide different type of data that are to at the same scale…
People with INT/TELEMETRY/NETFLOW/IPFIX are talking about a "data lake" or "data deluge". Which is correct, if you think about the complexity of resolving a  gigantic producer/consumer data problem. This needs the relevant IT infrastructure in order to process all of the data provided by these protocol at the NREN scale.

While in our case, we are just focusing on exposing CONTROL PLANE METRICS at the network element level. We simply monitor and ensure a router operation by using prometheus metrics

Note

While he above might be true, the number of metrics exported from a prometheus target can be very high. Fine tuning might be necessary in order to make sure that all metrics are really necessary for network monitoring purpose. This explosion of metrics exposure can add unnecessary workload at the control plane level. 

Again, kudos to NMaaS team that made this happen so that we could test this on the P4 LAB with — ZERO — effort.

Article objective

In this article, we will present freeRouter and Prometheus integration and as an example we will implement one of the 22 grafana dashboard that we developed and published here. In the rest of the article we will assume that you are a running one or more freeRouter nodes.

Diagram

[ #001 ] - Cookbook

The first step is to implement a prometheus server. Using NMaaS it is pretty instantaneous. However, if you plan to deploy prometheus in an other platform just follow the installation guide here.

Once deployed you can push the following prometheus.yaml config:

prometheus.yaml
global:
  scrape_interval: 15s
  evaluation_interval: 30s
alerting:
  alertmanagers:
    - static_configs:
      - targets:
rule_files:
scrape_configs:
  - job_name: 'router'
    metrics_path: /metrics
    scrape_interval: 15s
    static_configs:
    - targets: ['192.168.0.1:9001','192.168.0.2:9001']
      labels:

In this configuration we assume that we have 2 freeRouters that are configured as above (192.168.0.1:9001 and 192.168.0.2:9001) in prometheus worls these are called targets:

  • each target are interrogated or "scraped" very "scrap_interval" which is 15s here
  • the main job name is called; "router"
  • metrics_path is: "/metrics" so the scraped URL is: "http://192.168.0.1:9001/metrics

Note that this had to be deployed only once for all of your routers. However, each time you'd like to add a new router, you have to add a new target in the "targets" YAML list.

In this example let's focus our interest interface metrics. Please note that this configuration should be deployed on each freeRouter and connectivity should be available between all targets and the prometheus server.

  • The objective is to tell freeRouter control plane to expose hardware and software counter interface metric using the sensor object.
  • You have 2 types of sensor:
    • Universal sensor: Sensor definition that you can cut/paste anywhere
    • User specific sensor: Sensor definition that you need to adjust depending freeRTr configuration implemented by user
prometheus interface metric configuration
!-------------------------------------------------------------------------------
! Example of universal sensor:
! That can be copy paste as is.
!-------------------------------------------------------------------------------
!
sensor ifaces-hw
path interfaces-hw/interface/counter
prefix freertr-ifaces
key name interfaces-hw/interface
command sho inter hwsumm
prepend iface_hw_byte_
name 0 ifc=
replace \. _
column 1 name st
column 1 replace admin -1
column 1 replace down 0
column 1 replace up 1
column 2 name tx
column 3 name rx
column 4 name dr
.
exit
!
!-------------------------------------------------------------------------------
! Example of sensor you need to adjust: 
! You need to adapt your BGP process number: 
! Here replace 65535 by your BGP process number)
!-------------------------------------------------------------------------------
!
sensor bgp4peer
path bgp4/peer/peer
prefix freertr-bgp4peer
key name bgp4/peer
command sho ipv4 bgp 65535 summ
prepend bgp4_peer_
name 0 peer=
replace \. _
column 2 name state
column 2 replace false 0
column 2 replace true 1
column 3 name learn
column 4 name advert
.
exit
!

So this basically means:

  • From freeRouter CLI, issue the following command:
prometheus interface metric configuration
sho inter hwsumm
interface   state  tx          rx          drop
hairpin41   up     67404       0           0
hairpin42   up     153134      0           0
sdn1        up     412319805   1057514903  1152305
sdn2        up     1038840147  407307558   202
sdn3        admin  0           0           0
sdn4        admin  0           0           0
sdn5        admin  0           0           0
sdn6        admin  0           0           0
sdn998      up     9154        0           0
sdn999      up     199178      262939      0
tunnel1965  up     0           9122896     0 
  • prepend to the metric name: "iface_hw_byte_"
  • column 0 will have prometheus label ifc=
  • replace all dots "." by "_" . (so interface bundle1.123 will become bundle1_123)
  • column defines a metric name  "iface_hw_byte_" concatenated to "st" => "iface_hw_byte_st" which is essentially interface status
  • if column 1 "state" value is admin/down/up we associate value -1/0/1 
  • column defines a metric name  "iface_hw_byte_" concatenated to "tx" => "iface_hw_byte_tx" which is essentially interface bytes transmitted counter 
  • column defines a metric name  "iface_hw_byte_" concatenated to "rx" => "iface_hw_byte_rx" which is essentially interface bytes received counter 
  • column defines a metric name  "iface_hw_byte_" concatenated to "dr" => "iface_hw_byte_dr" which is essentially interface bytes dropped counter 


  • Then you need to bind the configured sensor to prometheus server:
prometheus interface metric configuration
!-------------------------------------------------------------------------------
! Example of Prometheus agent configuration
! And sensor bindings
!-------------------------------------------------------------------------------
!
server prometheus pr
 sensor ifaces-hw
 sensor bgp4peer
 interface <prometheus_agent_interface_binding>
 vrf <prometheus_agent_vrf_bingind>
 exit
!


And if you followed this correctly, we are repeating these lines for software interface counter metric.

Tip

You can view Prometheus configuration for various Grafana dashboard here. Feel free to study these Prometheus configuration and activate them as you see fit depending on your requirements. The set of dashboard is not exhaustive and is by no means absolute. Feel free to submit additional dashboard ! We would gladly add them in the current list of freeRouter Dashboard.

Note

After this definition a freeRouter level you should have:

4 metrics related to hardware counters 

  • iface_hw_byte_st
  • iface_hw_byte_tx
  • iface_hw_byte_rx
  • iface_hw_byte_dr

4 metrics related to software counters

  • iface_sw_byte_st
  • iface_sw_byte_tx
  • iface_sw_byte_rx
  • iface_sw_byte_dr

Which is a total of 8 metrics

Tip

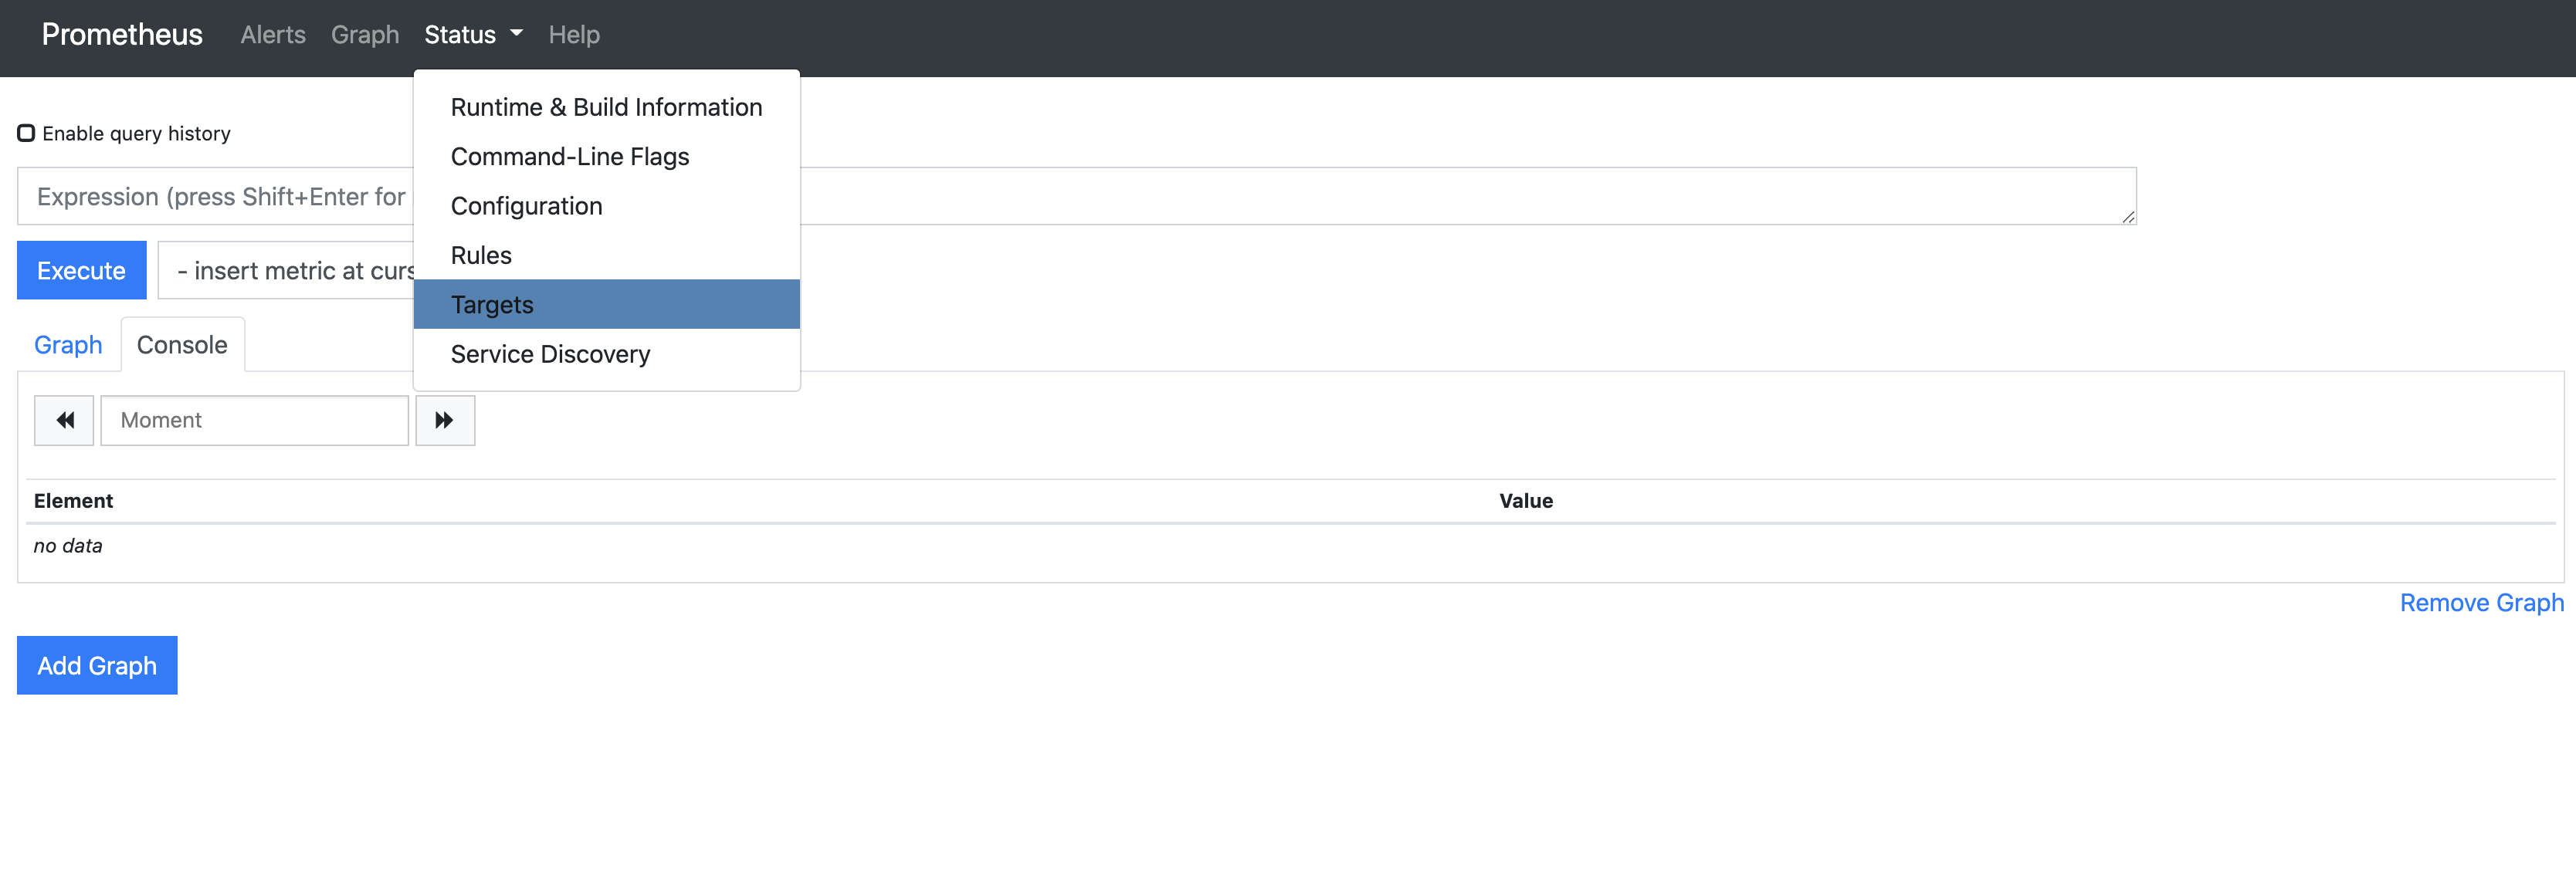
From that point you can check via prometheus console:

check the "Targets" menu drop down selection

From that point you should be able to use PromQL query filed in order to check that you can retrieve the metrics we defined above.

For metric visualisation, we will use Grafana. Therefore:

  • install Grafana from official web site.
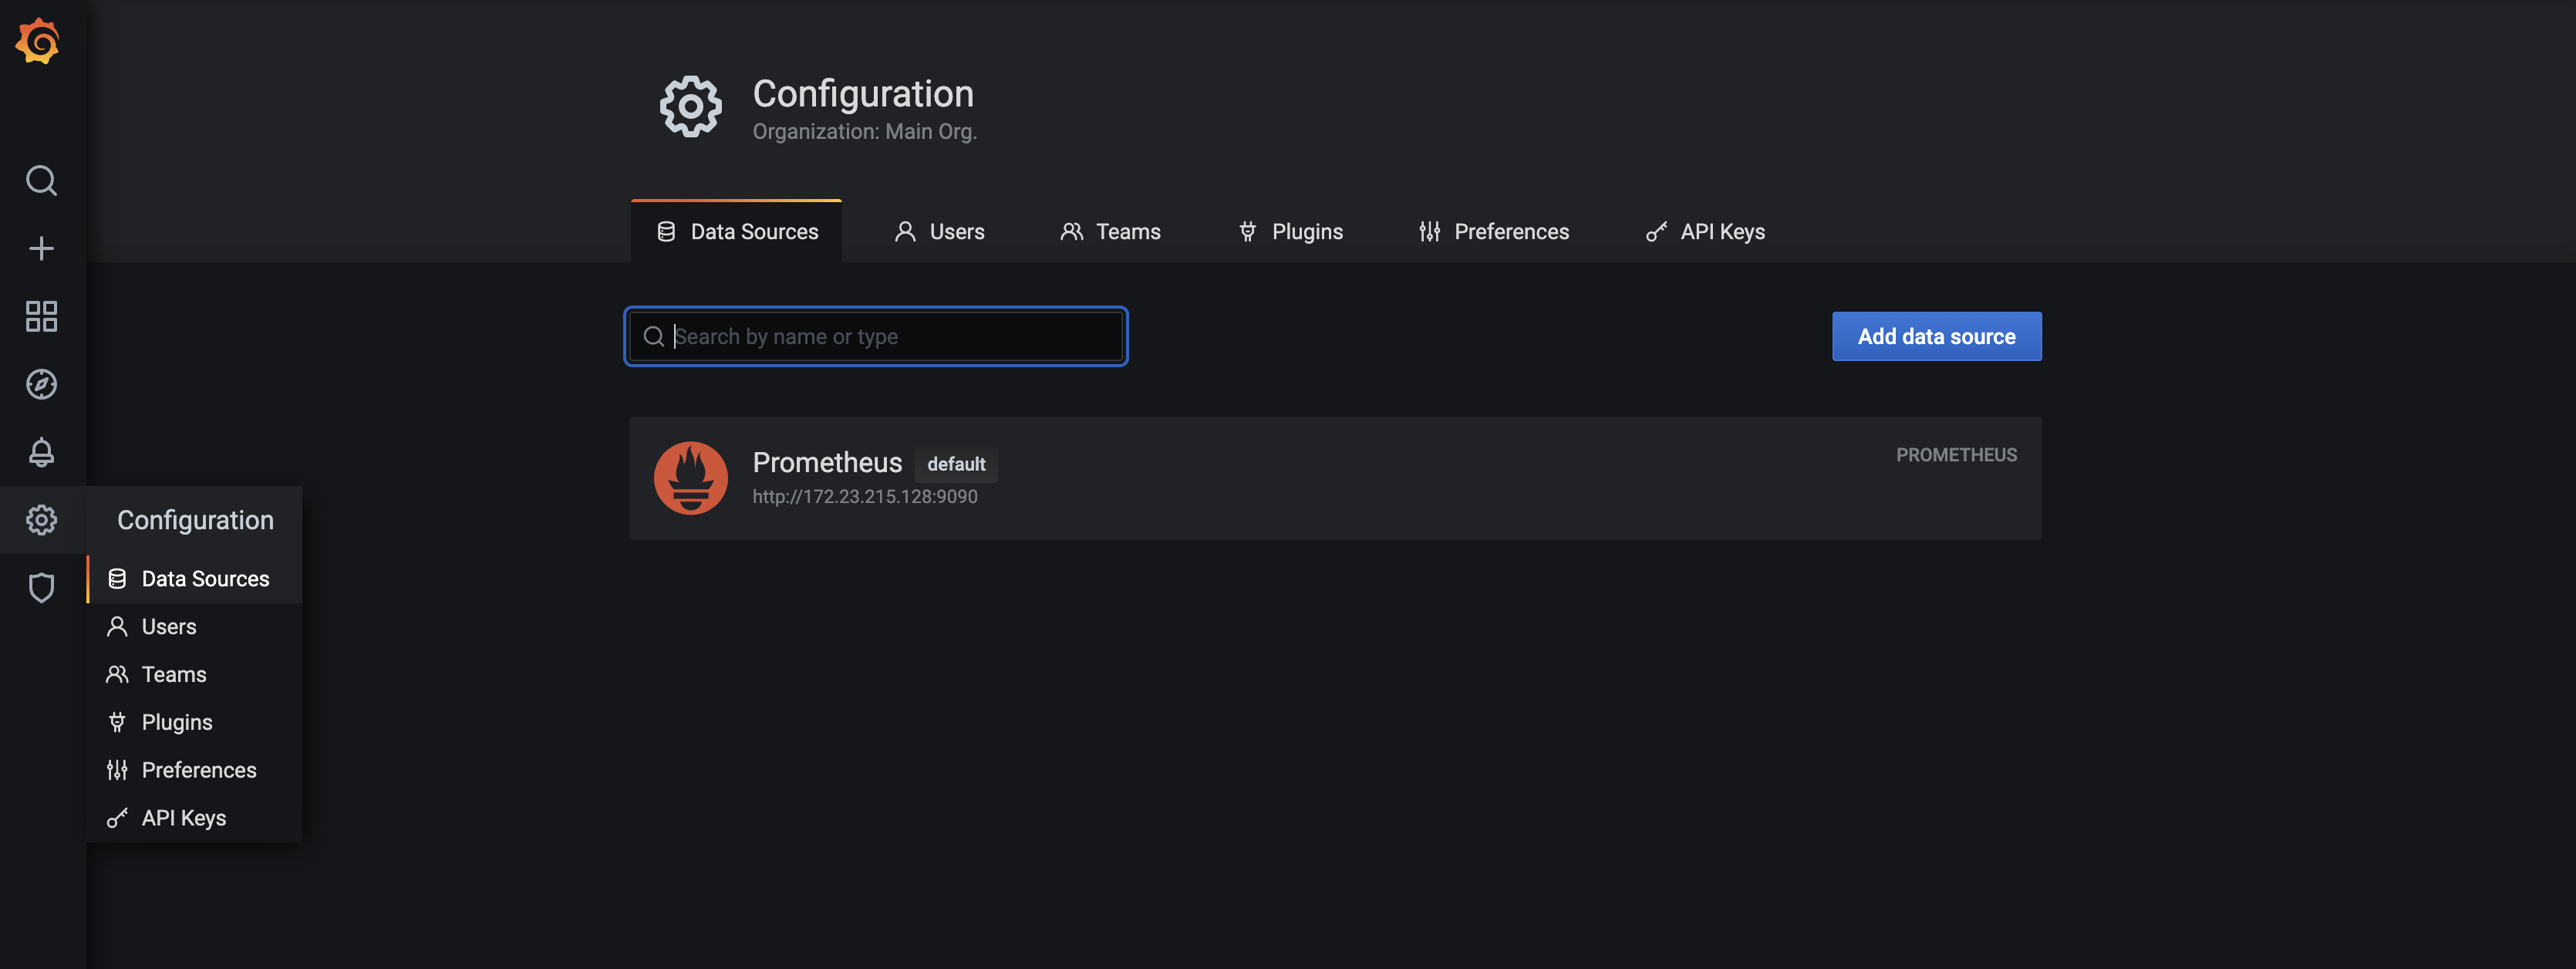
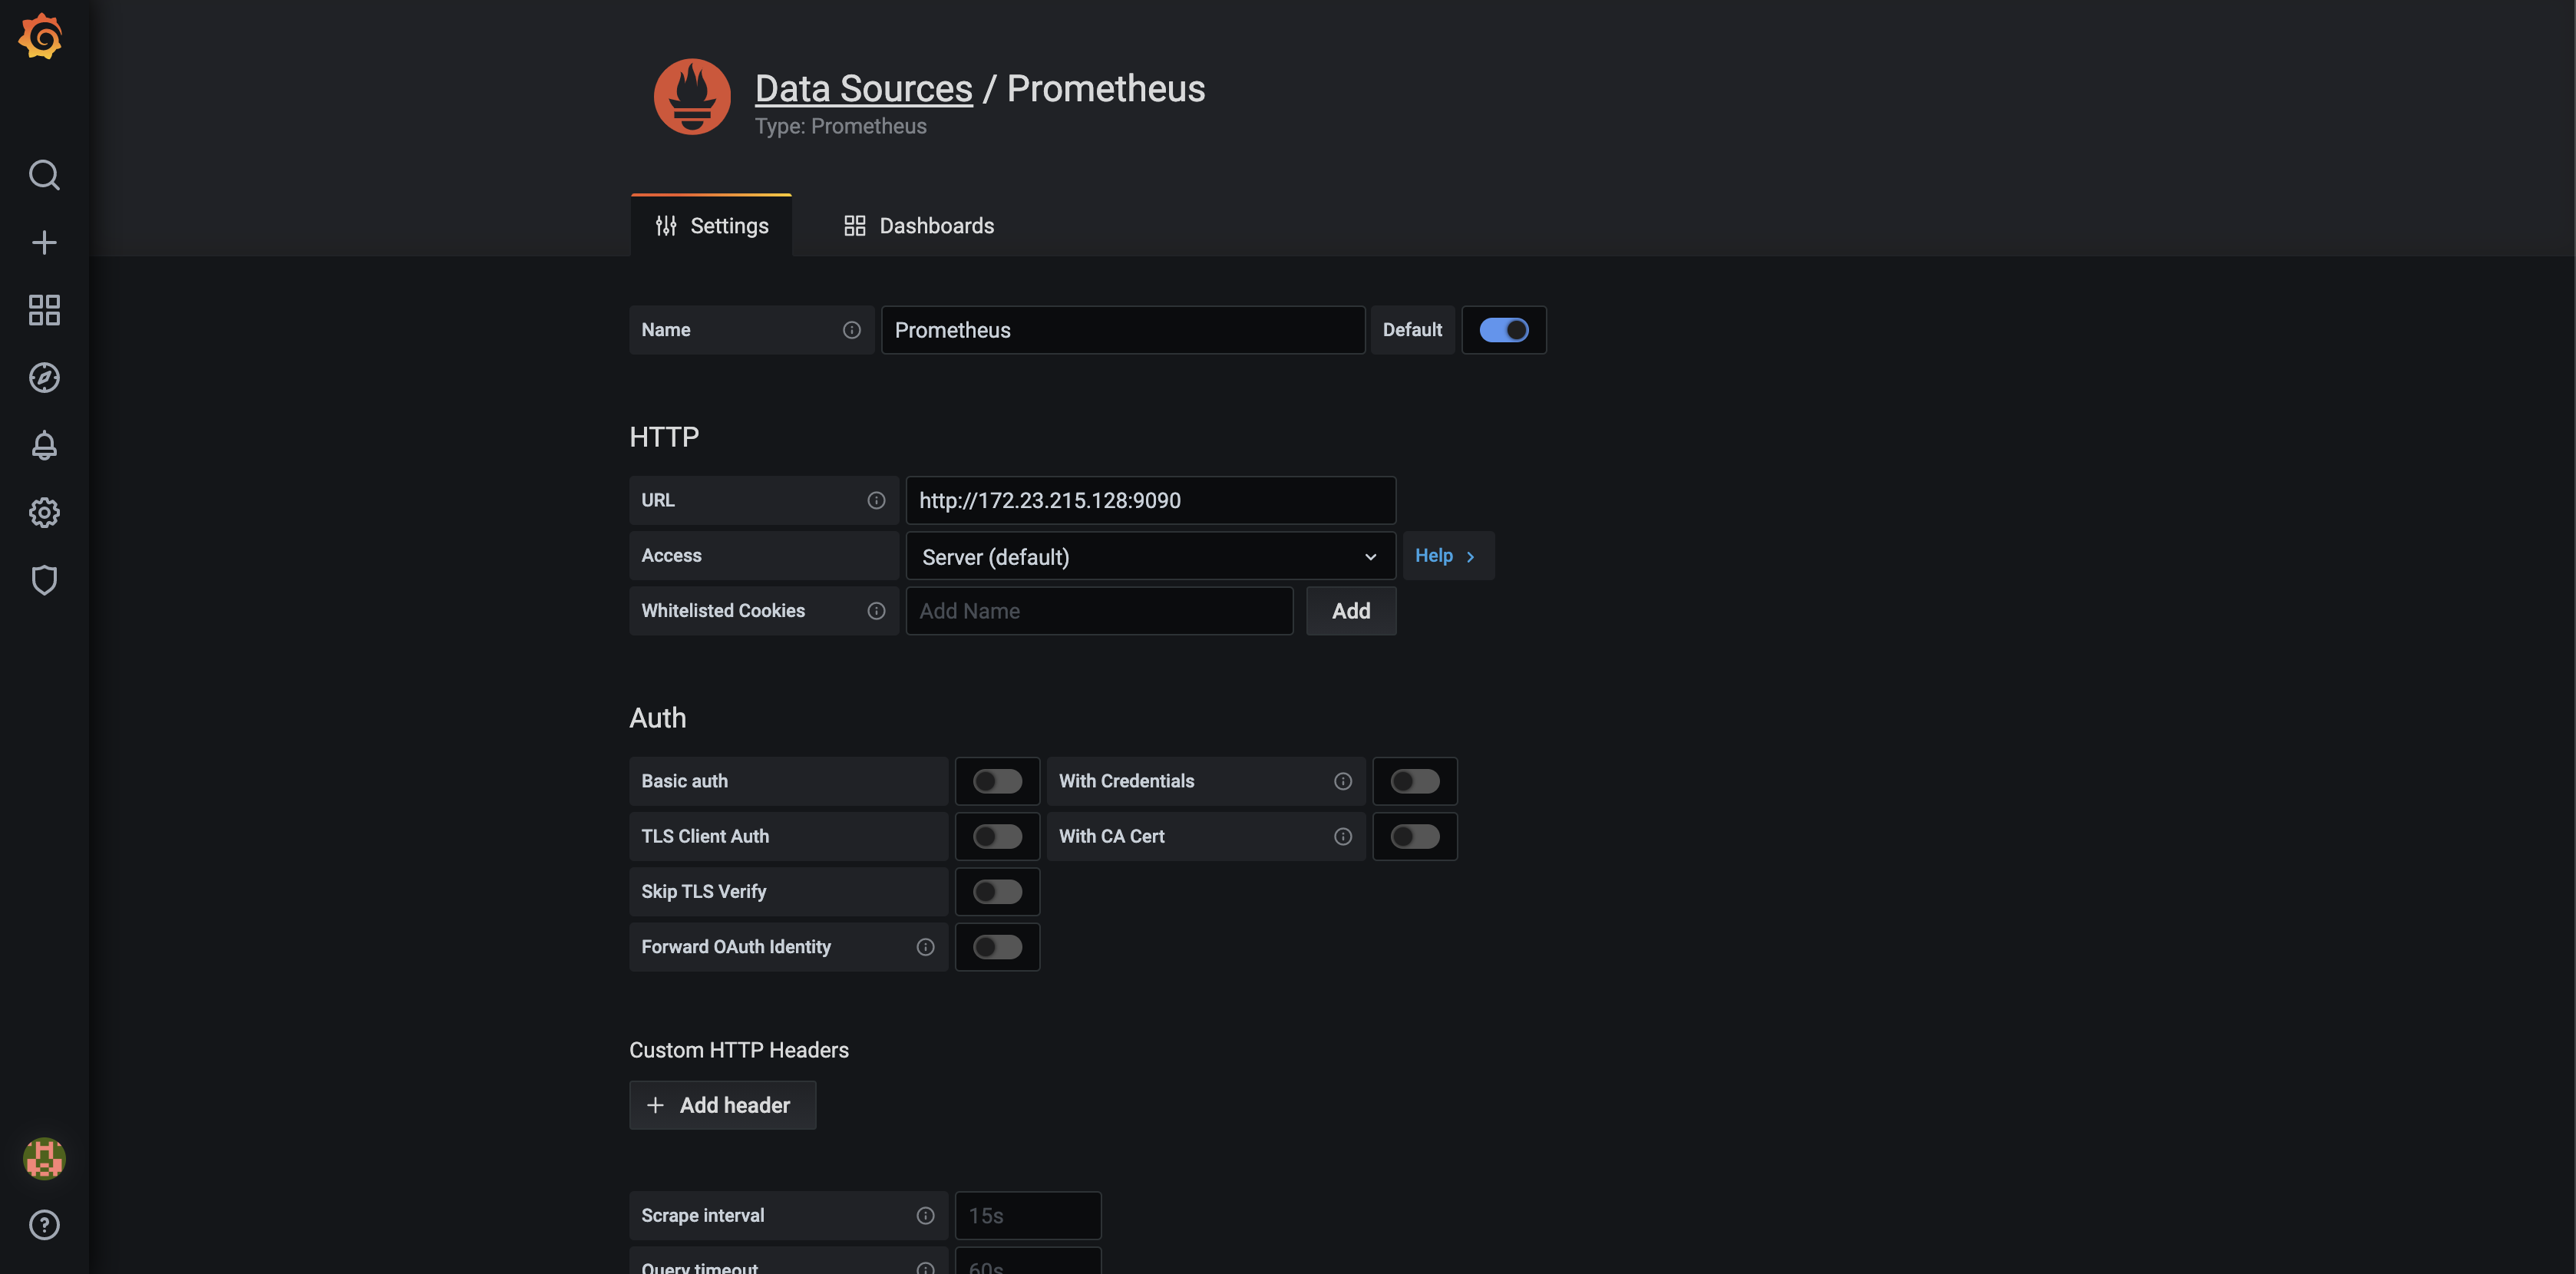
  • Once installed configure Prometheus as Grafana data source:


  • fill in all the prometheus server information

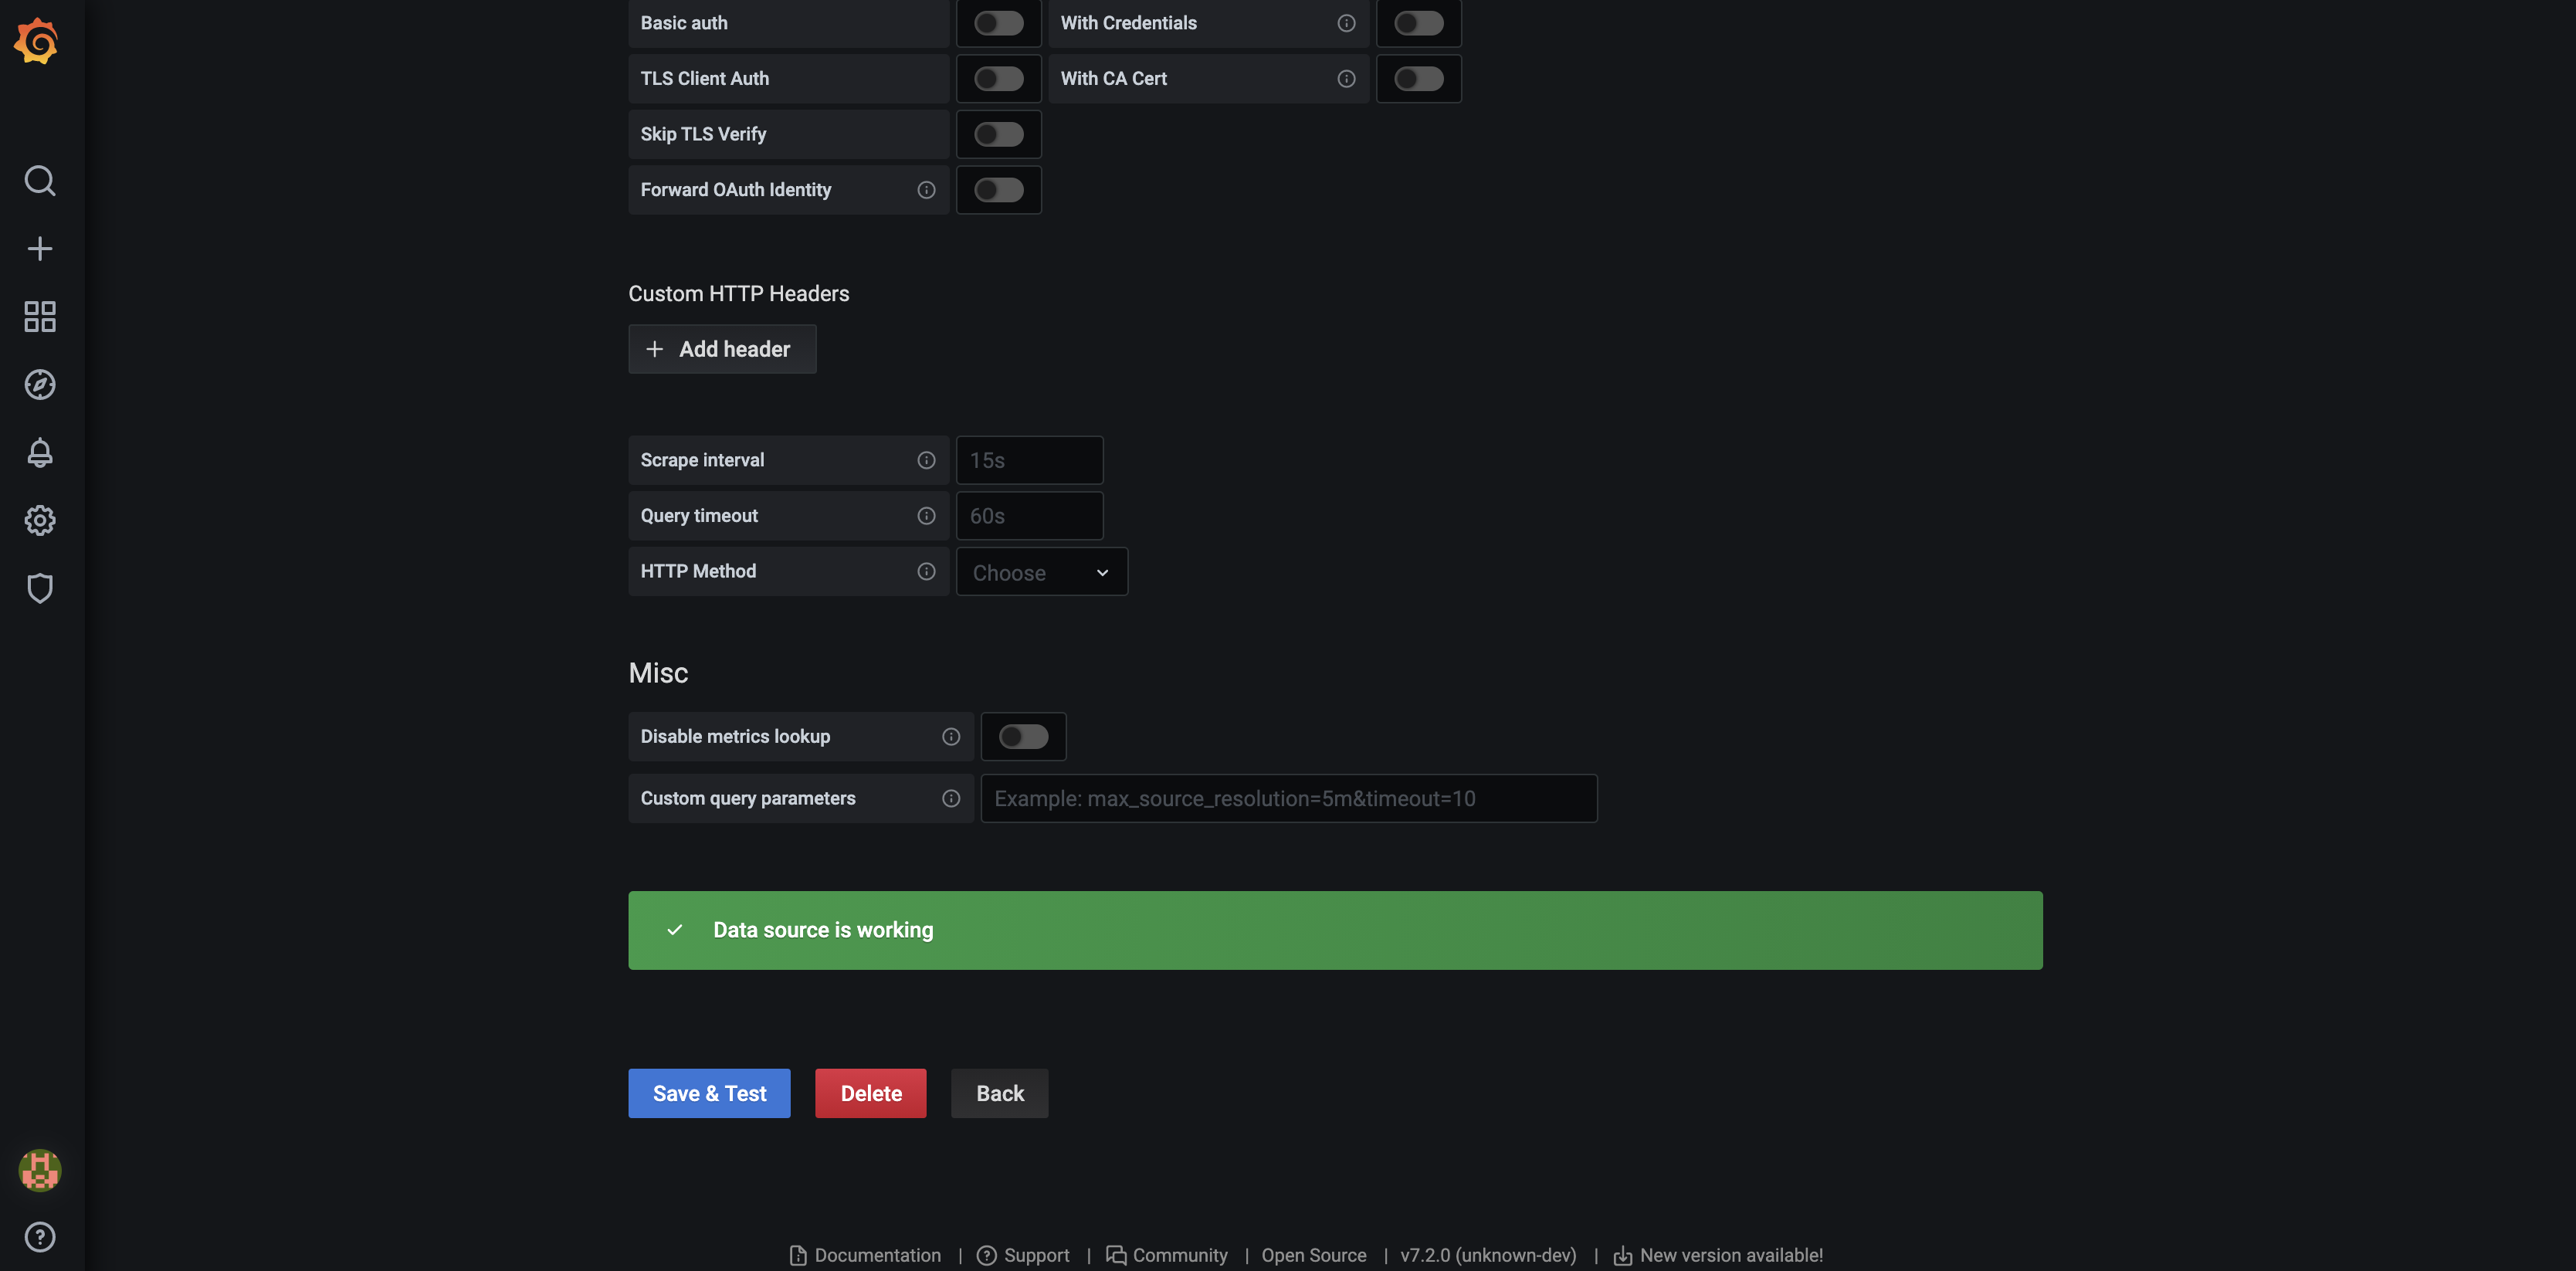
  • check the the data source is defined correctly by clicking the "Save & test" button

At that point your Grafana and Prometheus are correctly binded.

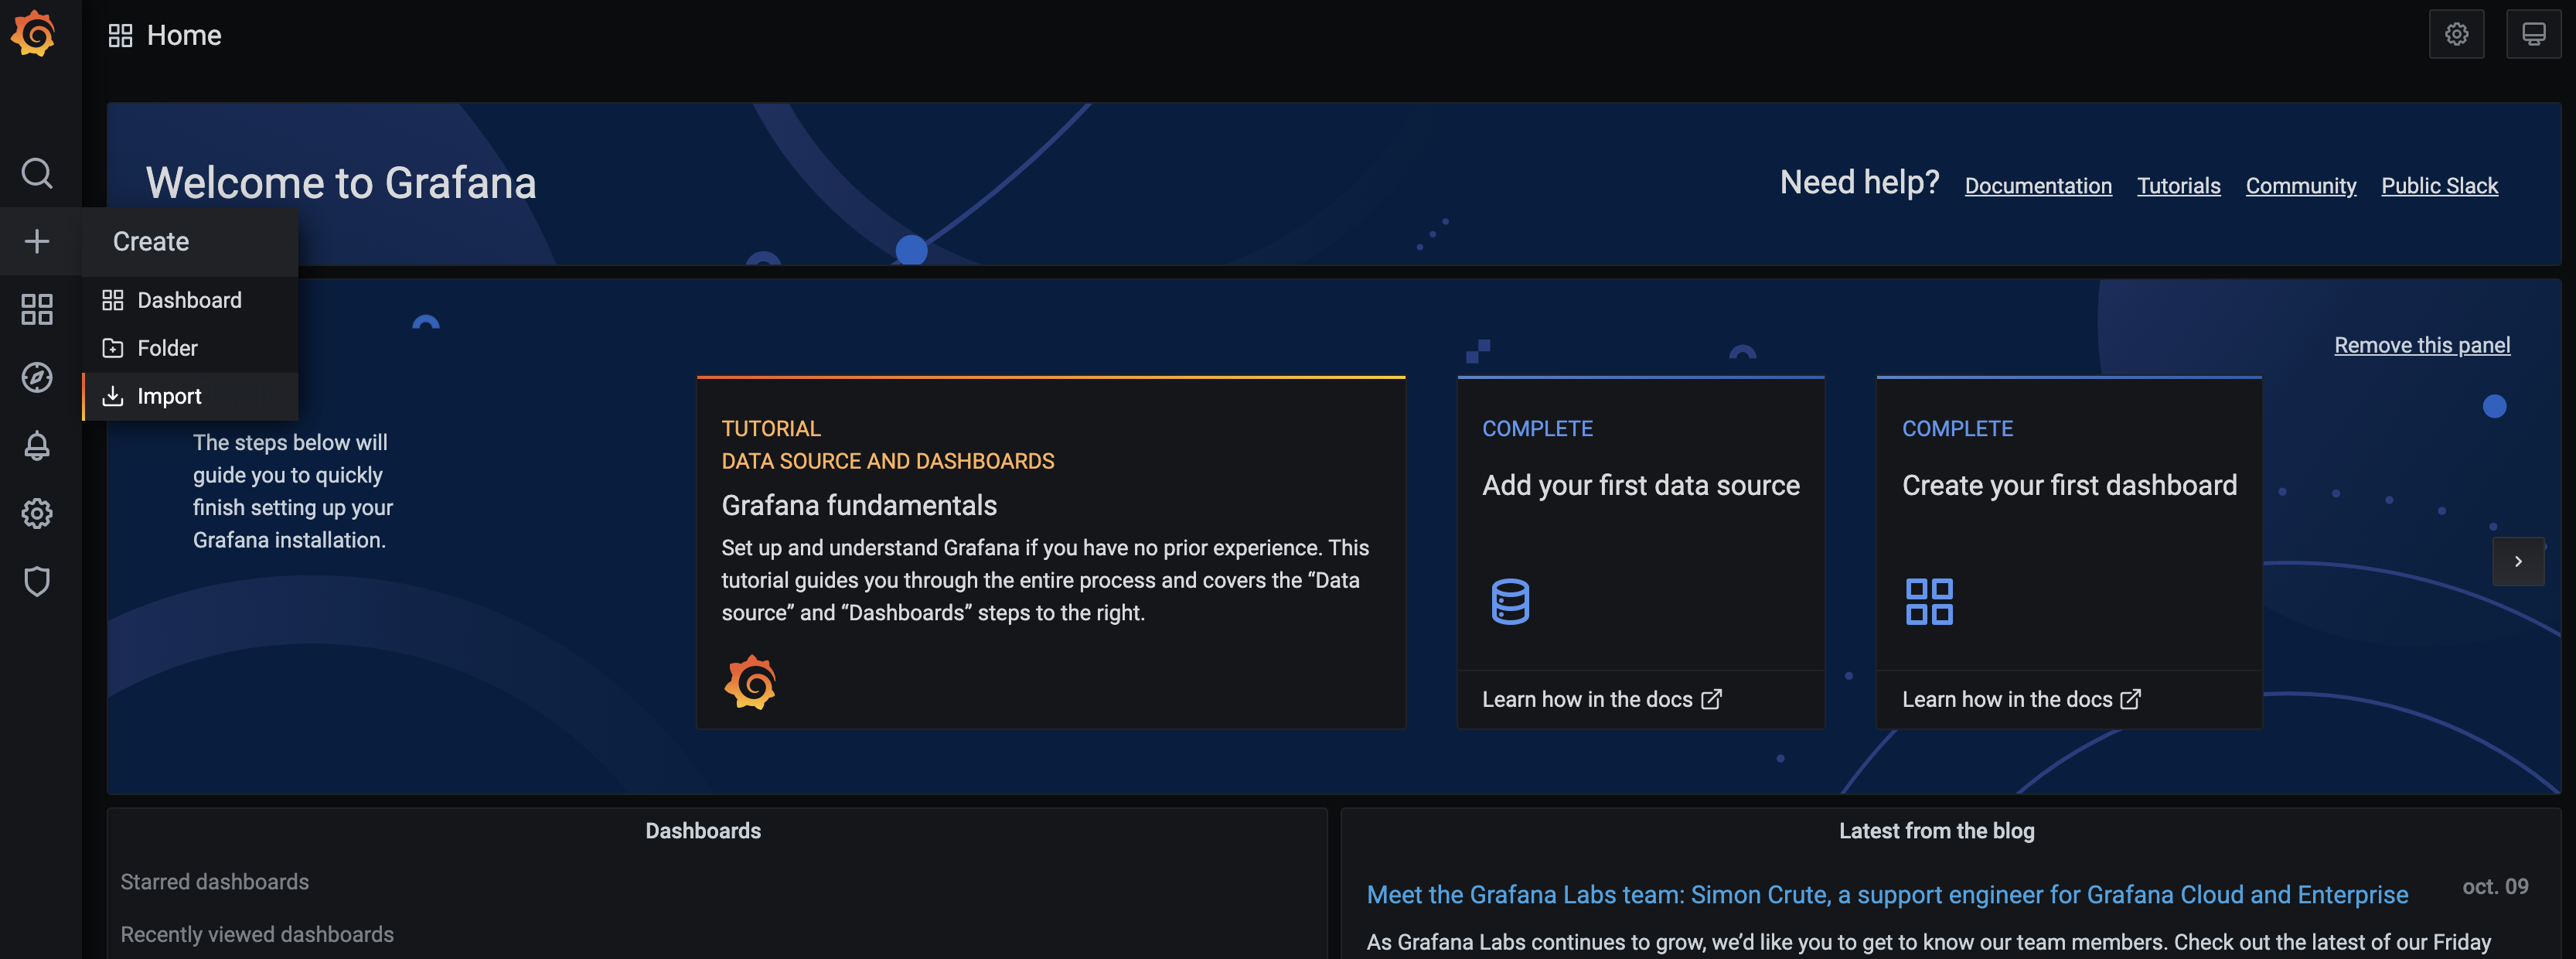
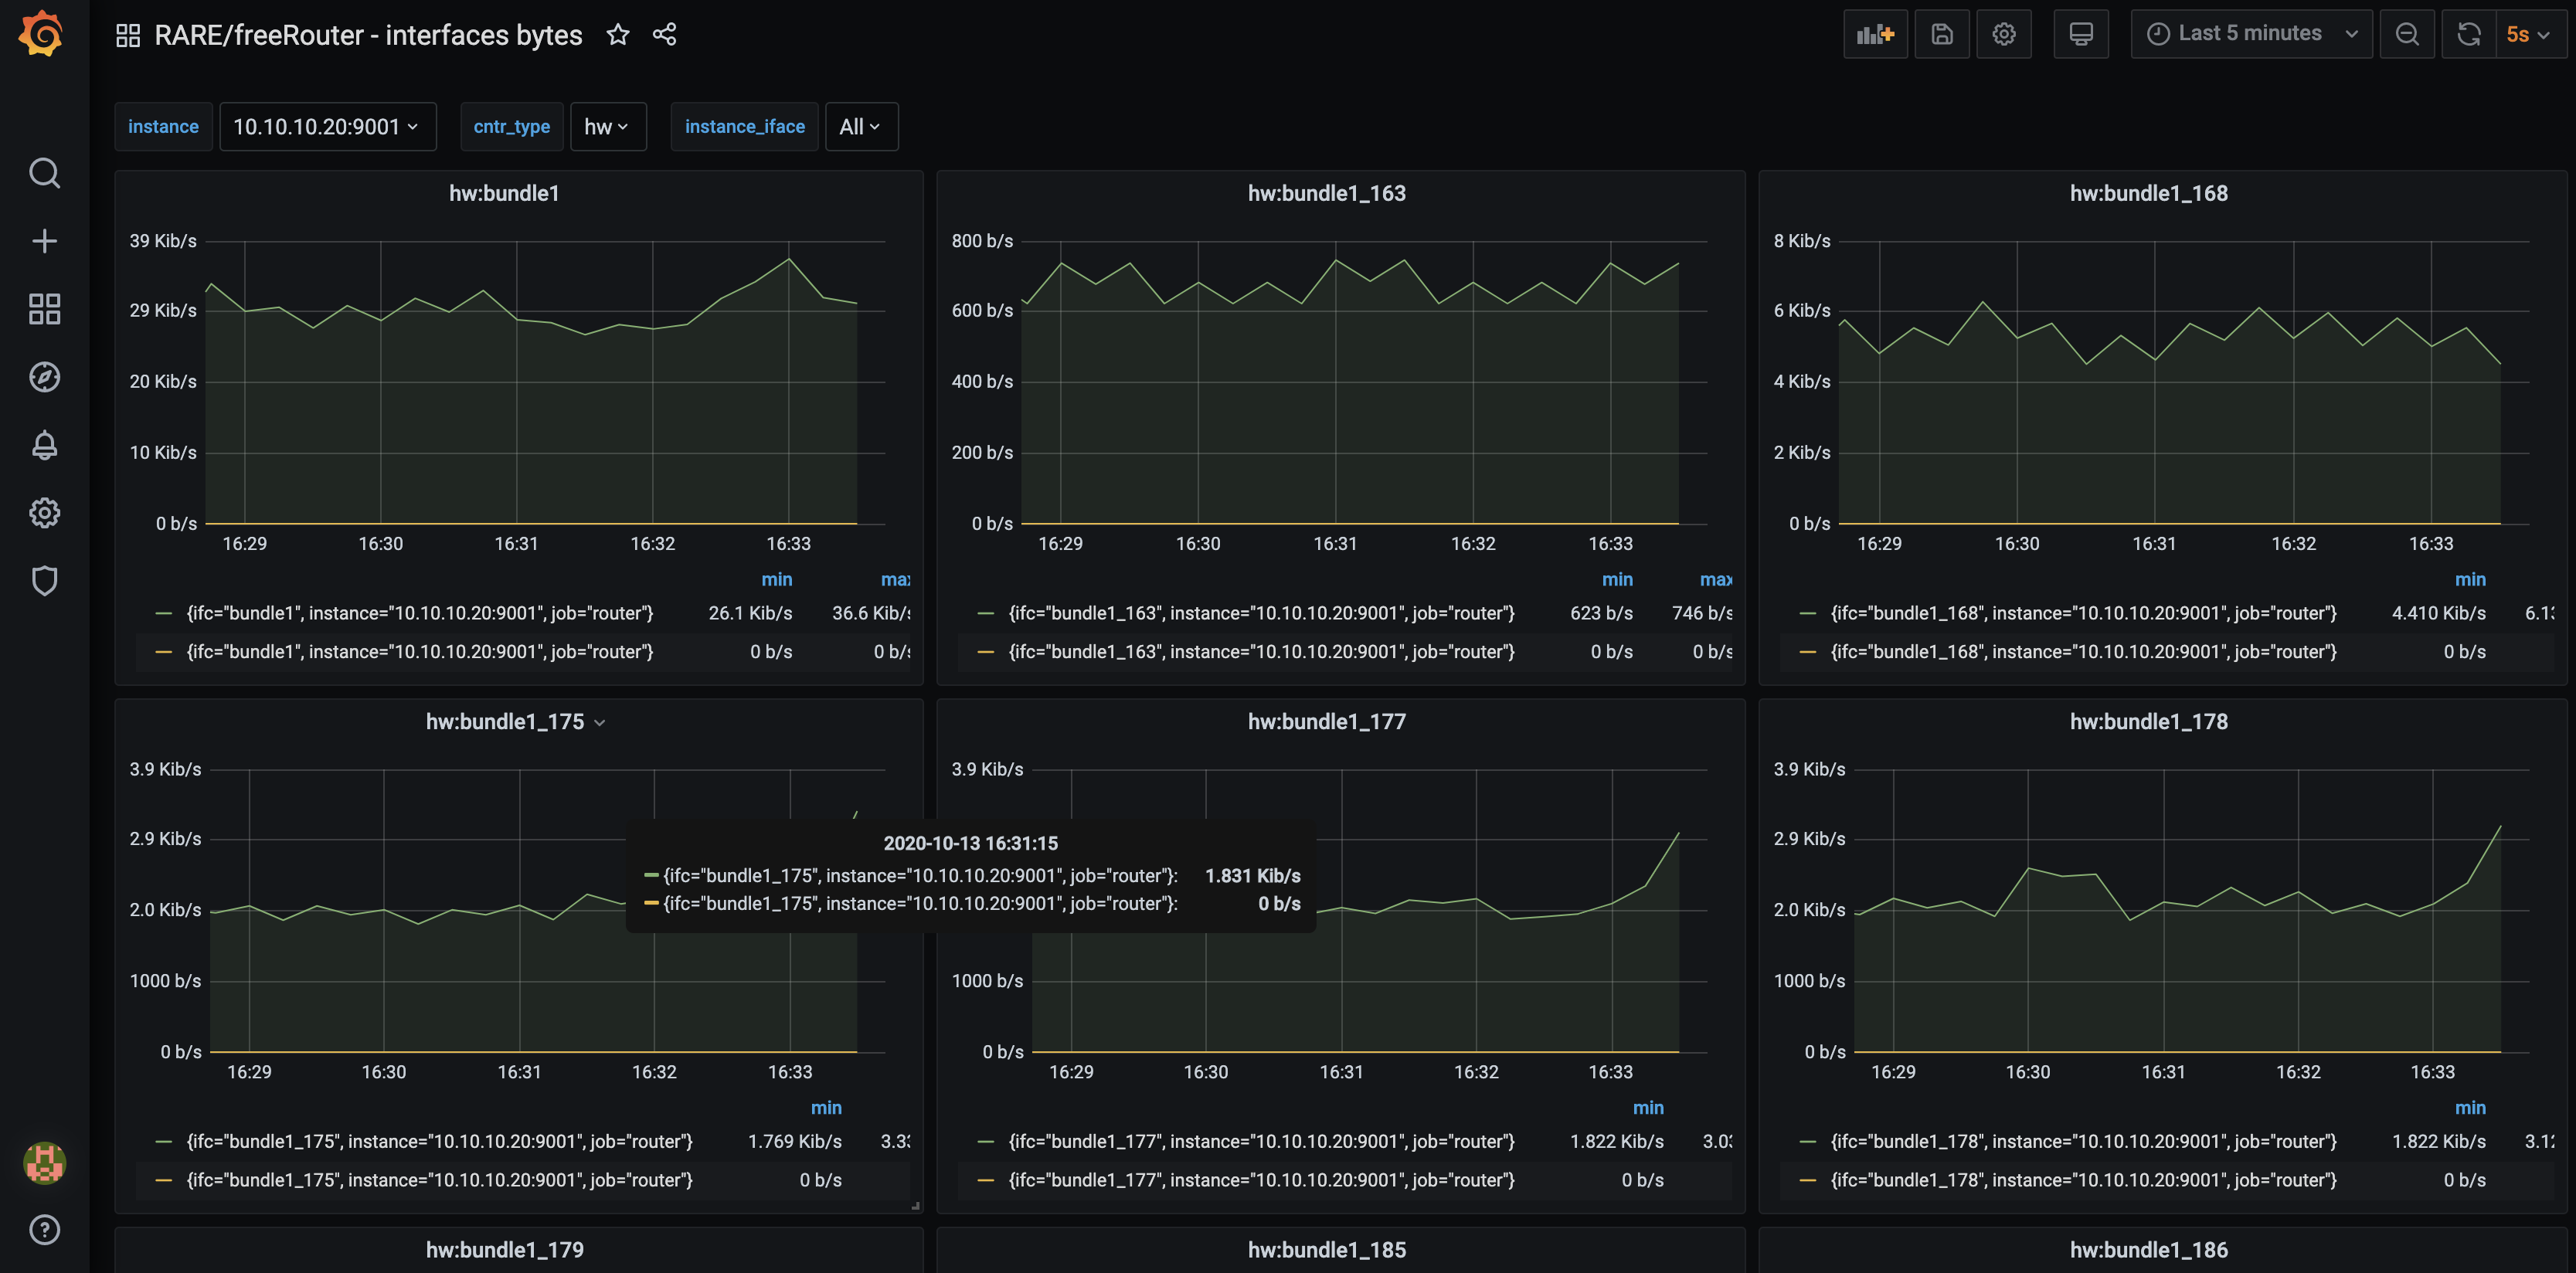
  • now you need to import "RARE/freeRouter interface bytes" dashboard

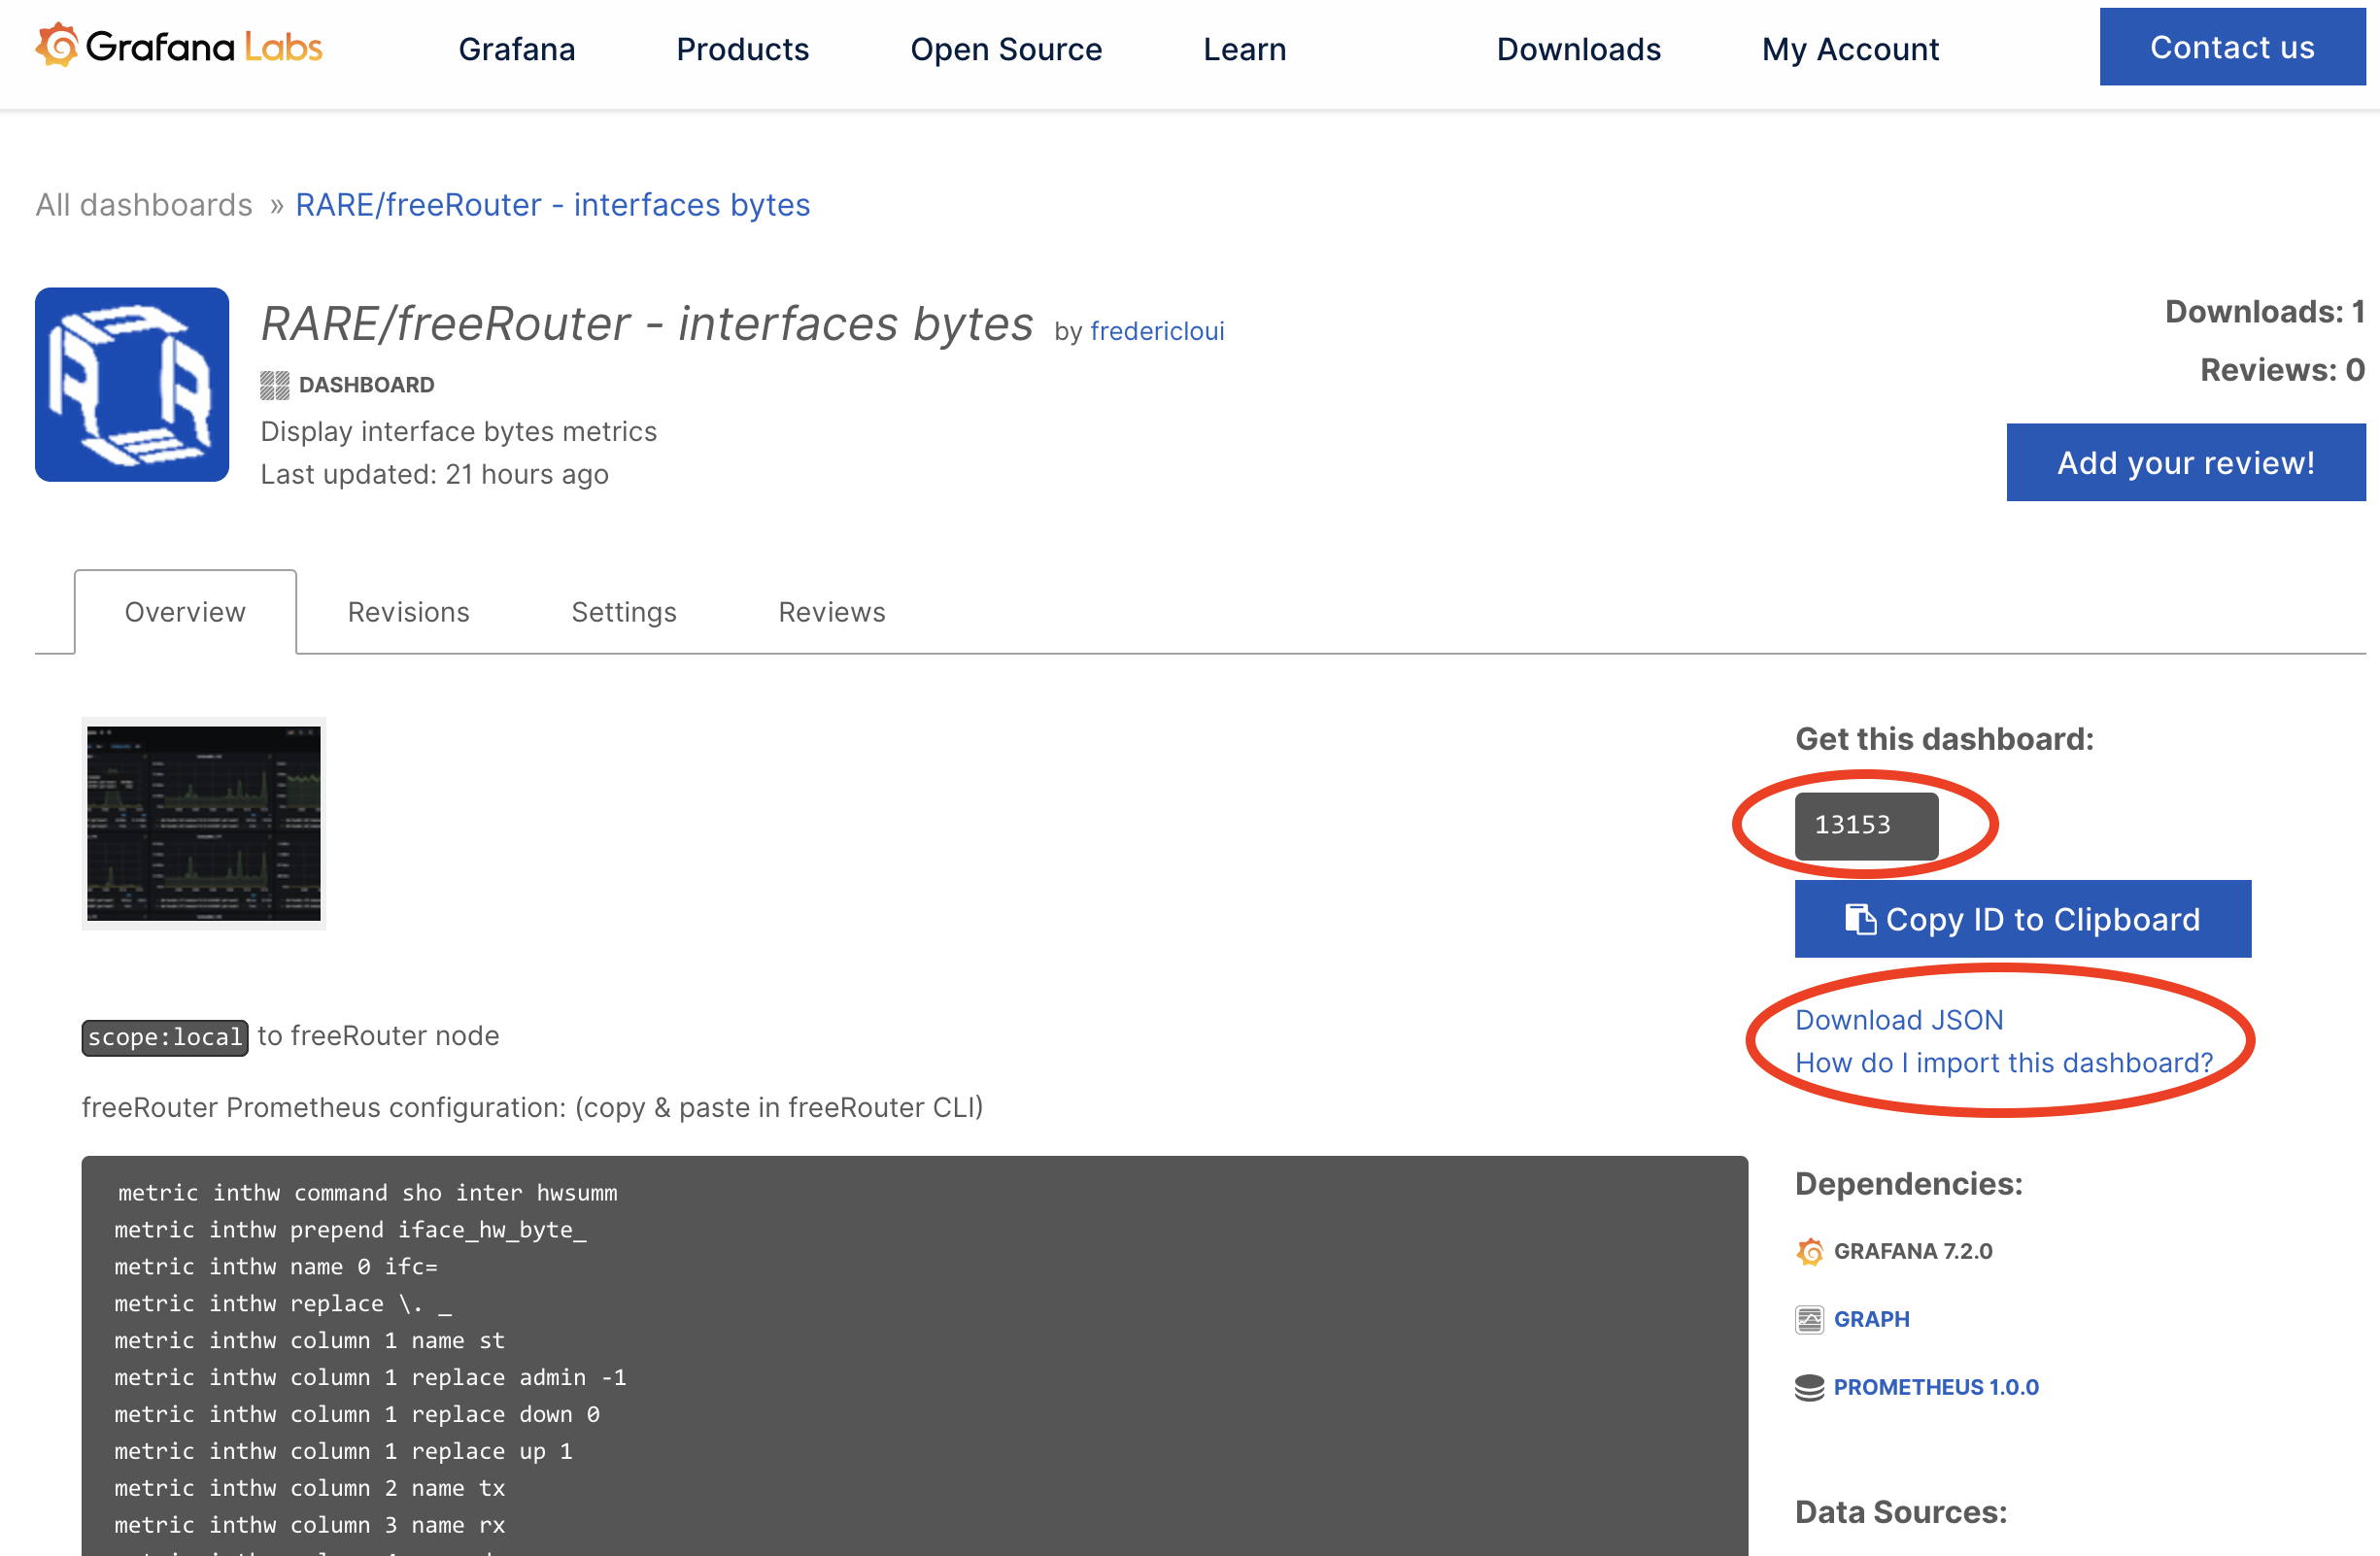
  • download freeRouter interface bytes dashboard here 


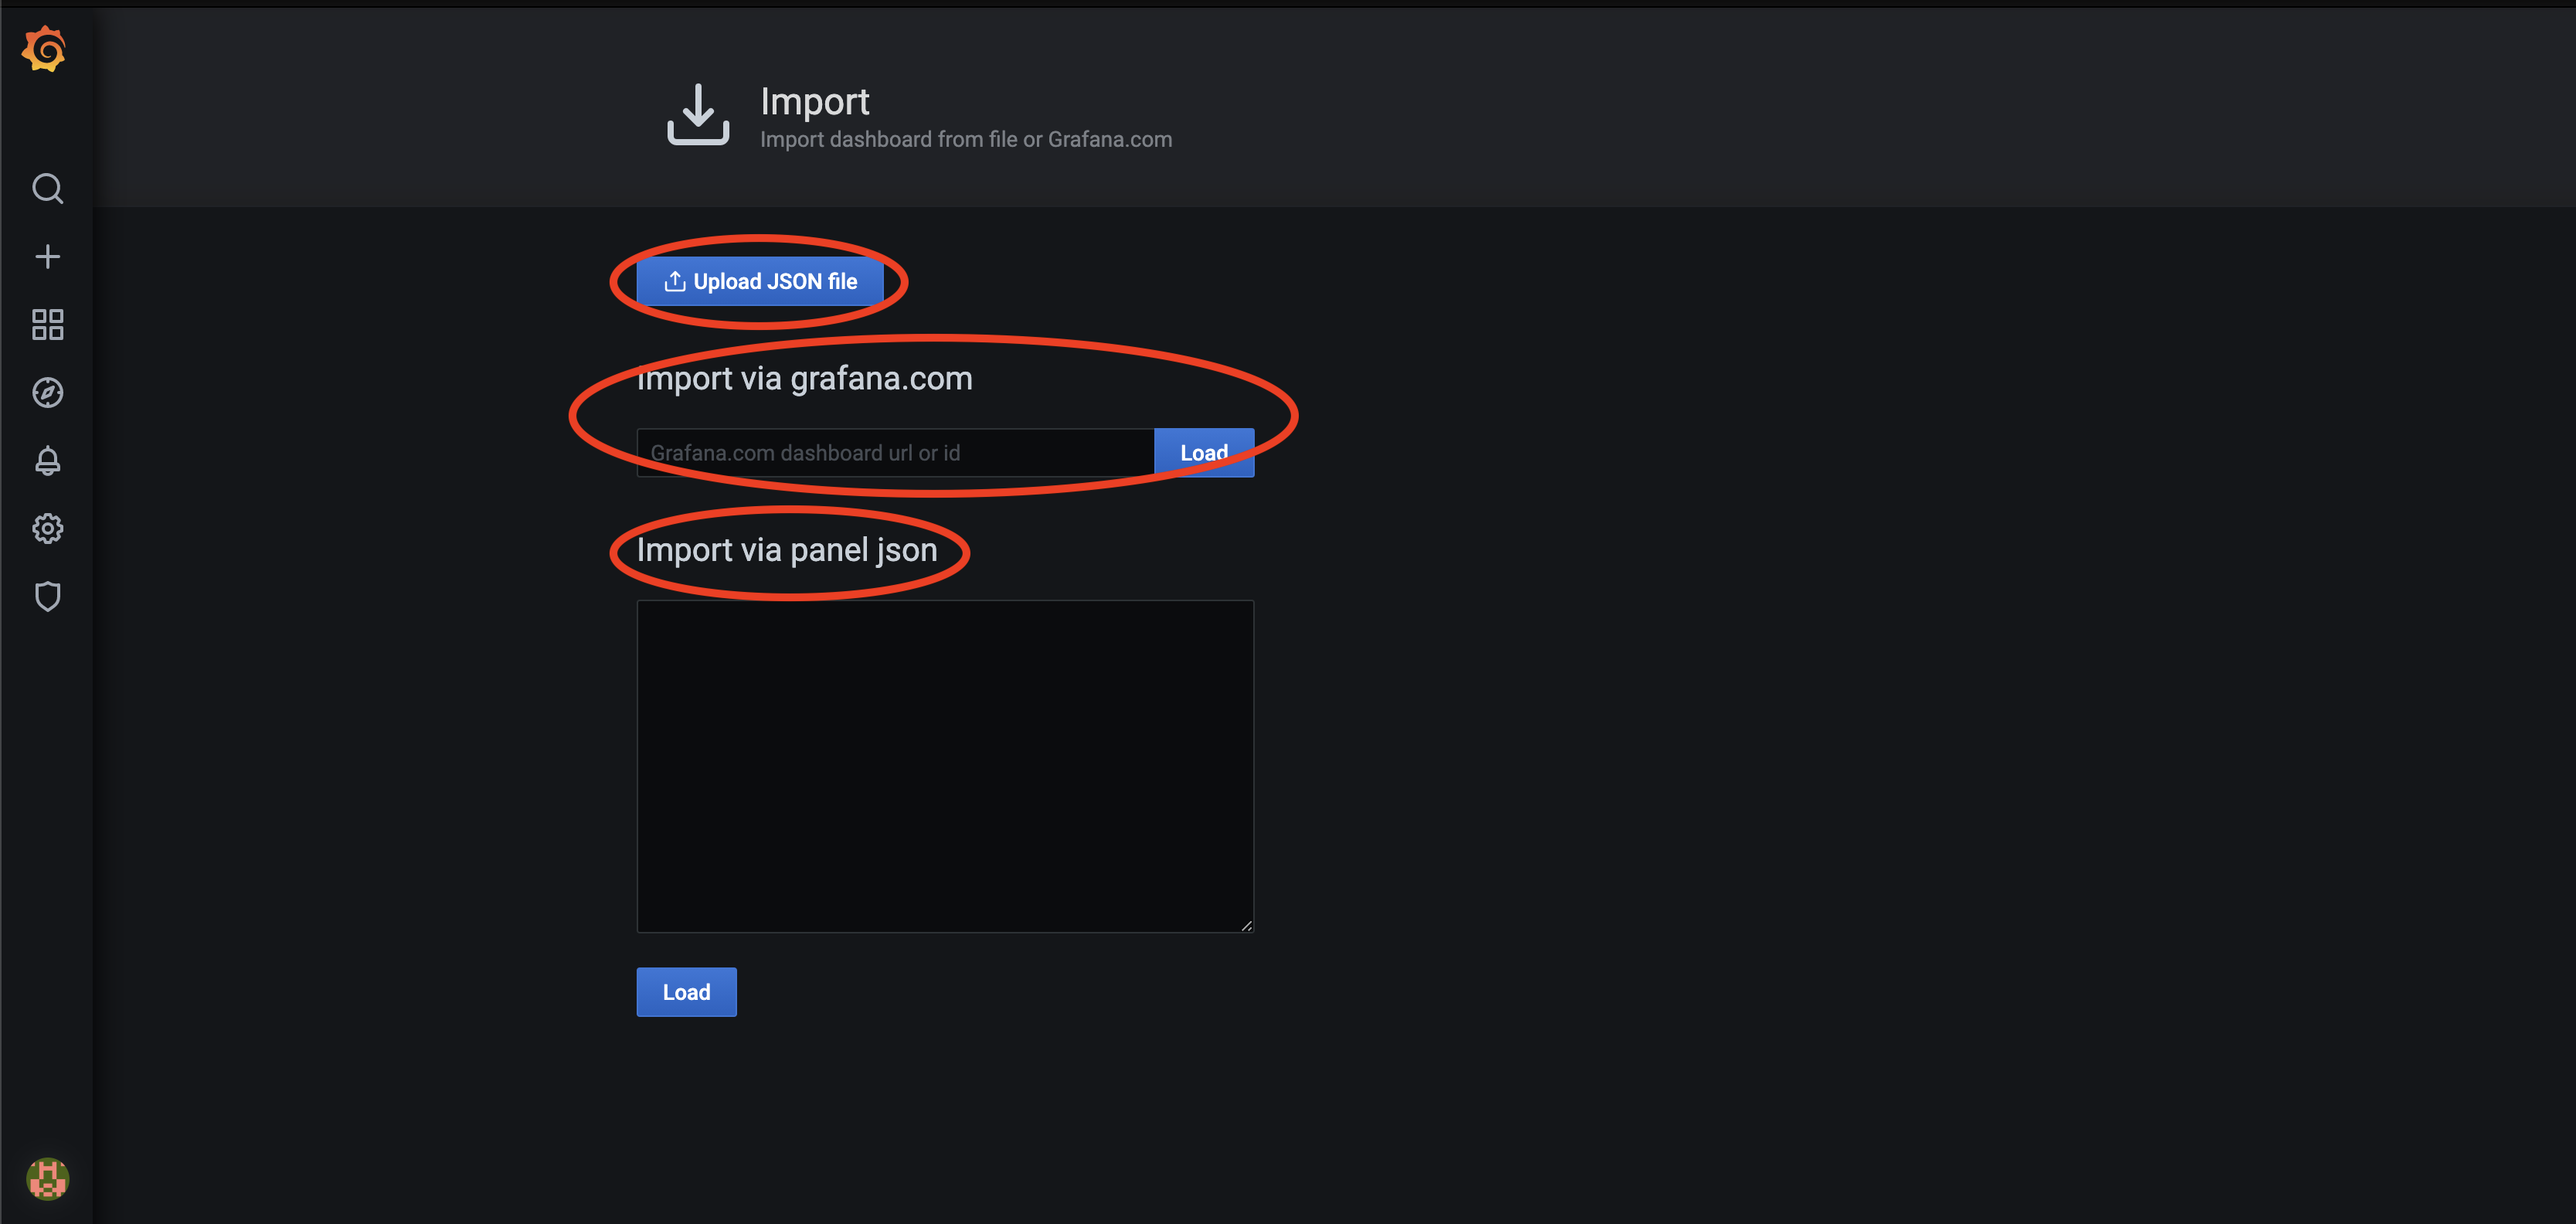
  • import the dashboard via ID or simply download JSON or use JSON panel

And Voila ! 

In order to immediately see the graph zoom in to 5m period with a refresh of 5s and you should see automagically the interface bytes TX/RX on all interface for each targets.

Discussion

This example related to interface metrics is universal, as the metrics at freeRouter level are yielded through a generic CLI command:

  • "show interface hwsummary"
  • or "show interface swsummary".

However some metrics cannot be retrieved by generic interface. Some metrics will be tied to specificities of your network. These can be the AS number, IGP process name, VRF name etc.

Let me give you a couple of examples:

But your network context you could have arbitrary deployed "isis 2200". (2200 is RENATER AS number) 

Sensor interface metric for link state protocol configuration
sensor lsigp4int
path lsigp4int/peer/peer
prefix freertr-lsigp4int
key name lsigp4int/peer
command sho ipv4 ospf 1 interface
prepend lsigp4_iface_
name 0 proto="ospf1",ifc=
replace \. _
column 1 name neighbors
.
exit

sensor lsigp4peer
path lsigp4peer/peer/peer
prefix freertr-lsigp4peer
key name lsigp4peer/peer
command sho ipv4 ospf 1 topology 0 | inc reach
prepend lsigp4_peers_
name 0 proto="ospf1",node=
replace \. _
column 2 name reachable
column 2 replace false 0
column 2 replace true 1
column 3 name neighbors
.
exit

sensor lsigp4perf
path lsigp4perf/peer/peer
prefix freertr-lsigp4perf
key name lsigp4perf/peer
command sho ipv4 ospf 1 spf 0 | inc reachable|fill|calc|run
prepend lsigp4_perf_
labels proto="ospf1"
skip 0
column 1 name val
.
exit

sensor lsigp6int
path lsigp6int/peer/peer
prefix freertr-lsigp6int
key name lsigp6int/peer
command sho ipv6 ospf 1 interface
prepend lsigp6_iface_
name 0 proto="ospf1",ifc=
replace \. _
column 1 name neighbors
.
exit

sensor lsigp6peer
path lsigp6peer/peer/peer
prefix freertr-lsigp6peer
key name lsigp6peer/peer
command sho ipv6 ospf 1 topology 0 | inc reach
prepend lsigp6_peers_
name 0 proto="ospf1",node=
replace \. _
replace \/ _
column 2 name reachable
column 2 replace false 0
column 2 replace true 1
column 3 name neighbors
.
exit

sensor lsigp6perf
path lsigp6perf/peer/peer
prefix freertr-lsigp6perf
key name lsigp6perf/peer
command sho ipv6 ospf 1 spf 0 | inc reachable|fill|calc|run
prepend lsigp6_perf_
labels proto="ospf1"
skip 0
column 1 name val
.
exit

sensor lsigp4metric
path lsigp4metric/peer/peer
prefix freertr-lsigp4metric
prepend lsigp4_metric_
command show ipv4 ospf 1 metric
name 0 proto="ospf1",ifc=
key name lsigp4metric/peer
replace \. _
column 4 name metric
.
exit

sensor lsigp6metric
path lsigp6metric/peer/peer
prefix freertr-lsigp6metric
prepend lsigp6_metric_
command show ipv6 ospf 1 metric
name 0 proto="ospf1",ifc=
key name lsigp6metric/peer
replace \. _
column 4 name metric
.
exit


prometheus interface metric configuration
sensor bgp4peer
path bgp4/peer/peer
prefix freertr-bgp4peer
key name bgp4/peer
command sho ipv4 bgp 65535 summ
prepend bgp4_peer_
name 0 peer=
replace \. _
column 2 name state
column 2 replace false 0
column 2 replace true 1
column 3 name learn
column 4 name advert
.
exit

sensor bgp4perf
path bgp4/perf/perf
prefix freertr-bgp4perf
key name bgp4/perf
command sho ipv4 bgp 65535 best | exc last
prepend bgp4_perf_
replace \s _
column 1 name val
.
exit

sensor bgp6peer
path bgp6/peer/peer
prefix freertr-bgp6peer
key name bgp6/peer
command sho ipv6 bgp 65535 summ
prepend bgp6_peer_
name 0 peer=
replace \: _
column 2 name state
column 2 replace false 0
column 2 replace true 1
column 3 name learn
column 3 name advert
.
exit

sensor bgp6perf
path bgp6/perf/perf
prefix freertr-bgp6perf
key name bgp6/perf
command sho ipv6 bgp 65535 best | exc last
prepend bgp6_perf_
replace \s _
column 1 name val
.
exit
prometheus interface metric configuration
sensor ldp4nul
path ldp4nul/peer/peer
prefix freertr-ldp4nul
key name ldp4nul/peer
command sho ipv4 ldp inet nulled-summary
prepend ldp4null_
name 3 ip=
skip 2
replace \. _
column 0 name prefix_learn
column 1 name prefix_advert
column 2 name prefix_nulled
.
exit

sensor ldp6nul
path ldp6nul/peer/peer
prefix freertr-ldp6nul
key name ldp6nul/peer
command sho ipv6 ldp inet nulled-summary
prepend ldp6null_
name 3 ip=
skip 2
replace \: _
column 0 name prefix_learn
column 1 name prefix_advert
column 2 name prefix_nulled
.
exit


Conclusion

In this 1st article, you were presented :

  • freeRouter/Prometheus integration 
  • How to add a new router in the list of Prometheus target
  • How to integrate a RARE/freeRouter Grafana Dashboard. (Feel free to adapt the other available dashboard query to your context !)

Final words

In Prometheus philosophy, normally the user should do only the minimum of tweaking regarding configuration. Ultimately, he should be only be able to enable a metric or simply disable it if the scrape cost is too high. However in freeRouter/Prometheus integration process, you see that some metric are issued using specific $variable (VRF, BGP/IGP process number ...) Which makes impossible to maintain this universality. However, from the network operator point of view this should not be a showstopper. On the contrary, it is a powerful choice to be able to alter these command via $variables.

Remember in freeRouter philosophy you can have multiple VRF, multiple IGP and multiple BGP process number ! (Which is not the case for all routing platform)

Last but not least, this Prometheus agent was developed quickly because of one reason, all the objects  at the control plane level were already well structured in table form as previously described in this article. So implementing this table row/column logic in order to derive a prometheus metric was technically possible without too much hassle.